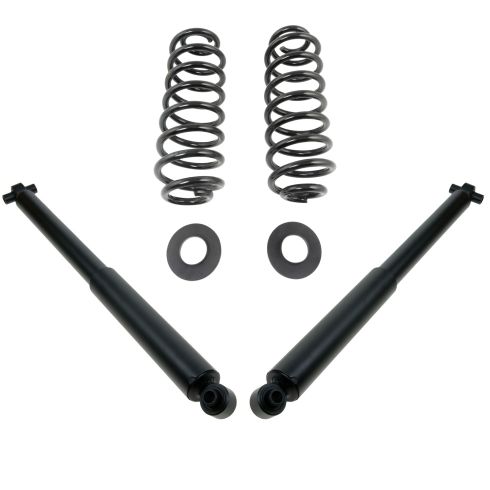
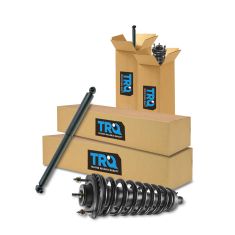
Kit Includes: (2) Rear Shock Absorbers (1) Rear Air Bag to Coil Spring Conversion Kit
Specification
Location
Rear
Our direct fit gas-charged shock absorbers help restore your vehicle's handling and ride quality to just like new.
Our coil spring conversion kit is a simple and inexpensive alternative for vehicles that came equipped with a factory air suspension. Everything necessary to replace the factory air springs with metal coil springs is included and it will install and fit without any special tools or modification to the vehicle.
Item Condition:New
Attention California Customers:
WARNING: This product can expose you to chemicals including Chromium (Hexavalent Compounds), which is known to the State of California to cause cancer, and birth defects or other reproductive harm. For more information, go to www.P65Warnings.ca.gov
Lifetime Warranty
This item is backed by our limited lifetime warranty. In the event that this item should fail due to manufacturing defects during intended use, we will replace the part free of charge. This warranty covers the cost of the part only.
FREE Shipping is standard on orders shipped to the lower 48 States (Contiguous United States). Standard shipping charges apply to Hawaii and Alaska.
Shipping is not available to a P.O. Box, APO/FPO/DPO addresses, US Territories, or Canada for this item.
Expedited is available on checkout to the United States, excluding Alaska, Hawaii.
Final shipping costs are available at checkout.
How To Replace Rear Shock Absorbers 2002-09 Chevy Trailblazer
How to Replace Shock Absorber 2002-06 GMC Envoy XL
Created on:
Tools used
Socket Extensions
18mm Wrench
Jack Stands
18mm Socket
Ratchet
Floor Jack
1/2 Inch Breaker Bar
1. Remove the shock absorber
It is recommended to raise and secure the vehicle, but it is possible to do this with the vehicle on the ground.
Remove the 18 mm bolts at each of the strut by securing one end of the bolt with the wrench and use the socket and ratchet to remove the bolt from the nut.
2. install the new shock
Insert the shock into its mount and thread the bolt though.
Repeat with the bottom end of the strut.
Tighten the nut and bolts with your socket and ratchet and wrench
Brought to you by 1AAuto.com, your source for quality replacement parts, and the best service on the Internet. In this video, we're going to show you rear shock removal and replacement on this 2004 Trail Blazer, same as most of these mid-size SUVs. Tools you'll need are 18 mm socket with a ratchet and extension, and also an 18 mm wrench, and you probably would want jack and jack stands to raise and support the vehicle, but not totally necessary.
So to replace your rear shocks, as you can see I still have the tire on the truck, and you could actually do this on the ground, although it will cause a little clearance issue as you try and remove this lower bolt. But it's possible, you can do it on the ground. So there's that lower bolt, and there's a bolt up high right there. And if you are jacking your vehicle up, you can see my lift is under the frame. And then I have a bottle jack right here that's supporting the axle. You just want to give a little support of the axle so it doesn't drop down when you release the shock. What you probably want to do is take a couple extensions, that way you can work right outside your tire. And it'll come right apart, as you can see.
This is an 18mm again, and you might need two wrenches. One for here, and one to hold. But little trick... if all you have is wrenches, hook another wrench onto the end of that one, and that gives you some extra leverage. And like I said, on the ground this is going to be somewhat more difficult. Now I'm going to cheat 'cause I've got 18mm deep socket and an impact wrench. Comes right out. Back up top here. So that's how your shock comes out. Again, the shocks on this vehicle are fine. Just showing you how to do it. So to reinstall it, you want to put the top back up in. Put this top bolt in first. Now the bottom. Put that back in. Start that nut on. A good rule of thumb for these is get it about as tight as you can get it with a ratchet like that. And up to the top here. Again, just got my ratchet on here. That's tight as I can get it with the ratchet.
We hope this helps you out. Brought to you by www.1AAuto.com, your source for quality replacement parts and the best service on the Internet. Please feel free to call us toll free, 888-844-3393. We're the company that's here for you on the Internet and in person.
Tools used
Socket Extensions
18mm Wrench
Jack Stands
18mm Socket
Ratchet
Floor Jack
1. Removing the Shock
If you are raising the vehicle, support it by the frame
Loosen the lower 18mm nut and bolt from the shock
Loosen the upper 18mm bolt from the shock
If you have raised the vehicle, support the axle with a jack
Pull the bolts out of the shock
Pull the shock down and out
2. Installing the New Shock
Put the new shock into place
Thread the top 18mm bolt into the shock by hand
Push the shock up into place
Thread the lower 18mm bolt into the shock
Tighten the top 18mm bolt preliminarily
Fasten the 18mm nut onto the lower 18mm bolt
Tighten the lower 18mm nut and bolt preliminarily
If you raised the vehicle, lower it to the ground
Start the vehicle
Allow the air suspension to inflate
Check the ride height
Tighten the two 18mm bolts
Brought to you by 1AAuto.com, your source for quality replacement parts and the best service on the Internet.
Hi, I'm Mike from 1A Auto. I hope this how-to video helps you out, and next time you need parts for your vehicle, think of 1AAuto.com. Thanks.
In this video, we're going to show you how to replace the rear shocks on this 2003 GMC Envoy. It's the same procedure for all these SUVs: Envoy, trail blazer, Ascender, Ranier,. We show you the right side; the left side's the exact same procedure. Always replace your shocks in pairs, and you'll need new rear shocks from 1AAuto.com, 18mm socket and ratchet with an extension, and it helps to have a deep socket, an 18mm wrench. You can do this without even jacking up your vehicle, but for the video, to make it easier, we do put it up on a lift and use a jack.
Your rear shock is held in with an 18mm bolt up here and an 18mm bolt down here. Using an 18mm socket and ratchet, and 18mm wrench, just loosen up this lower bolt and hit it out as far as you can with the wrench. We'll fast forward as he loosens up the top bolt. You don't have to entirely remove them until you've loosened both of them. That makes it a little bit easier. If you are using jack and hack stands, have the jack stands supporting the frame of the vehicle, and then put some upward pressure on the rear axle with your jack to take some of the load off of the shock. I'm just watching the top of the shock to see it compress some. Now with the bolts loosened, you can pull the lower bolt out and then pull the top bolt out. You see that? Then it pulls free.
Up top, is the old shock. Below it, is the new one from 1A Auto. You can see they're identical, and they'll fit exactly the same. Feed your new shock up into place and replace that top bolt to hold it in place. Now, you'll need to line up the lower hole and this I only have to push up a little bit. If you have your vehicle on the ground you'll have to push it up more, push the shock up and then put the bolt through. We'll fast forward as Mike tightens those both up. Right now you're just tightening them preliminarily, although you can, if you're working without a jack and jack stands, and the vehicle's on the ground, you can tighten them up. What we do is we start up the vehicle just to give the air suspension a chance to inflate and make sure the vehicle's at its correct ride height. Then once we know it's at the correct ride height tighten up the bolts for the shocks.
We hope this video helps you out. Brought to you by www.1AAuto.com, your source for quality replacement parts and the best service on the Internet. Please feel free to call us toll-free, 888-844-3393. We're the company that's here for you on the Internet and in person.
SKA62988
In Stock
Product Reviews
Loading reviews
4.33/ 5.06
6 reviews
5 Stars
4 Stars
3 Stars
2 Stars
1 Star
5
0
0
0
1
prompt delivery great service
don
December 22, 2017
the conversion kit fit perfect easy install
thanks again.
Great price .
Arthur
March 18, 2020
Looked around found their kit .all worked like it should .
Perfect Fit
N
November 1, 2020
Easy installation, fit like a glove! Thanks for the awesome product
DOES NOT COME WITH THE UPPER COIL SEATS
David
December 14, 2021
I ordered this item and it came within no time. I have no issues with it other than at the last minute I realized it DID NOT COME WITH UPPER COIL SEATS. Which is a major problem when you are trying to covert. That should be stated in the description of the item. I had to run out and search for them. My suggestion, it should be included with the rest of the items
A+
Paul
February 25, 2023
Fast shipping, Great fit. A1 Auto has been amazing!
Great solution
Ruth
October 29, 2024
No wear as of yet. Great solution to air suspension.
Customer Q&A
who makes this ?March 7, 2019
Gary B
10
1A Auto's house brand parts are manufactured by various aftermarket companies specifically for us and built to your vehicle's exact OEM specifications.
March 7, 2019
Emma F
can I only convert the rear? Or do I need to do the front as well. If so can the front still receive compression but keep the rear from running compressor at all times?September 26, 2019
Dylan R
10
Hello, the rear coil conversion should be separate from the front for most vehicles. Could you provide the vehicle's VIN for us to determine for your particular application? Thank you!
September 26, 2019
Preston C
Installed the rear coil kit. Back still seems low. Do you offer spacers to lift the rear some more? The rear is still lower that the frontNovember 18, 2020
S T
10
This part is specific to vehicles with a particular set of options. We will need more information about your vehicle to confirm the fit.
The information we will need in order to assist you is your VIN.
November 19, 2020
Emma F
Customer service
877-844-3393
Monday - Friday 8:00am - 9:30pm ET Saturday - Sunday 8:00am - 4:30pm ET
Chevrolet is a registered trademark of General Motors Company. 1A Auto is not affiliated with or sponsored by Chevrolet or General Motors Company.See all trademarks.
Enter Vehicle Year Make Model
Specify your vehicle's year, make and model to guarantee fit.
Year
Make
Model
Options
Drivetrain
This part doesn’t fit a . Select from parts that fit.