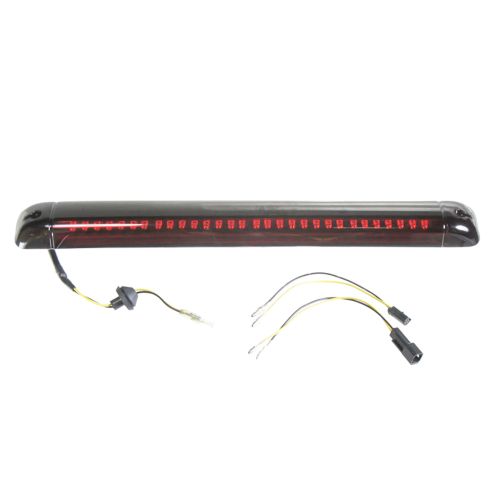
2004 Hummer H2 Center High Mount Third Brake Light DIY Solutions LHT05869
recommended installation videos
sponsored by
Out of Stock
$55.45
Notify When Available
Description
Vehicle Fit
Warranty & Shipping
How-To & Tools
Specification
Location
Center
Complete Repair in One Purchase - Stop searching for parts individually and complete your repair with a customized kit or set from DIY Solutions.
High-Quality Parts from Trusted Brands - DIY Solutions' kits and sets are selected from the best automotive brands and include hard-to-find and even obsolete parts you may need for your vehicle.
Guaranteed Fit - DIY Solutions ensures its selected parts are quality-tested to guarantee fit and function.
Assemblies may include halogen or incandescent test bulbs that should be replaced before installation.
Item Condition:New
Attention California Customers:
WARNING: This product can expose you to chemicals including Chromium (Hexavalent Compounds), which is known to the State of California to cause cancer, and birth defects or other reproductive harm. For more information, go to www.P65Warnings.ca.gov
Lifetime Warranty
This item is backed by our limited lifetime warranty. In the event that this item should fail due to manufacturing defects during intended use, we will replace the part free of charge. This warranty covers the cost of the part only.
How to Replace Third Brake Light 1994-2005 Chevy Blazer S10
How to Replace 3rd Brake Light 1995-2000 Chevy Tahoe
Created on:
Tools used
Razor Blade / Gasket Scraper
Flat Blade Screwdriver
Phillips Head Screwdriver
Putty Knife
1. Remove the third brake light.
Remove the two Phillips screws on either side of the brake light
Use a cloth and a putty knife to pry up the light.
Unplug the wiring harness.
Unclip the plastic panel on the inside ceiling of the vehicle to do this.
2. Install the new third brake light.
Thread the wiring harness up through the roof of the vehicle.
Clean up the area with some glass cleaner or household cleaner.
Remove the rubber grommet carefully with a pair of wire cutters.
Connect the brake light to the wiring harness and tuck the wires back down into the vehicle.
Have a helper depress the brake pedal to ensure the light is working properly.
Clip the plastic cover back up into place on the interior of the vehicle.
Remove the backing on the adhesive seal of the brake light.
Line the brake light up and press firmly into place.
Secure with the two Phillips screws.
Brought to you by 1AAuto.com, your source for quality replacement parts and the best service on the Internet. Hi, I'm Mike Green. I'm one of the owners of 1A Auto. I want to help you save time and money repairing and maintaining your vehicle. I'm going to use my 20 plus years experience restoring and repairing cars and trucks like this to show you the correct way to install parts from 1A Auto.com. The right parts installed correctly. That's going to save you time and money. Thank you and enjoy the video.
In this video we're going to show you how to replace the third brake light on this 2000 Chevy S-10 Blazer. It's similar for many different GM vehicles. Tools you will need for this vehicle are a Phillips screwdriver, a regular screwdriver or a putty knife and possibly some type of wire cutters or razor blade or something to cut a rubber grommet. We do apologize a little bit in advance as we're doing this in winter so you can hear the heat in the background in the garage. Obviously the third brake light is right up on top of your vehicle. You can see I'm standing right on the back bumper. There are two Phillips screws. Remove those screws. I'm going to take a sock here and put it down so I'm less likely to scratch my paint. I'm going to use a putty knife. I'm fast forwarding a little bit. Just use that putty knife to break the seal between the light and the body of the car.
You can see here's the harness. To unplug your harness I'm going to start from the outside and pull down on this trim panel. Then you can see this is pull down on this. This red right here is my connection for the third brake light. Here's the connection. See our red and black wire. I'm just going to take a screwdriver, pry that tab up and disconnect it. Now I'm going to take a piece of thin gauge wire and just wrap it right around here. You can use string or whatever for this part. You just want to put something on there to follow it up so as I pull my harness out it pulls the wire with it. Back up on top here, lightly pull through. There's my wire out. Now I'm going to use that sock and a little household cleaner like some Windex or whatever, a paper towel.
Here's our new light and the old light. The new light all the same; a little shinier. The new light is designed to fit a number of different applications so it actually comes with adapter harnesses so you basically want to choose the correct one which for this vehicle it would be this one. Then for some applications there is a rubber grommet installed. This vehicle does not require this so I'm going to use a pair of wire cutters and actually cut this grommet off carefully. I'm going to fast forward through this. There's a number of ways you can cut this off. These wire cutters are probably the safest, but obviously you could use a razor blade or even a serrated house knife. Obviously be very careful not to cut your fingers or the wires.
Now I'm just going to take these two, wrap my piece of wire around them just like before and put them down into the hole. I'm going to slowly, carefully pull them through. Now I can put on my harness. Plug it in. Then remove the guide wire. Put all that up inside. Before we install we want to remove the adhesive. Tear it to get around the wiring right there. Then what I like to do is put the screws through and make sure that the wire goes down in there and the screws hit there and the screw first and put it down in. Then tighten up your screws.
We hope this helps you out. It was brought to you by www.1AAuto.com your source for quality replacement parts and the best service on the internet. Please feel free to call us toll free 888-844-3393. We are the company with you on the internet and in person.
Tools used
Razor Blade / Gasket Scraper
Phillips Head Screwdriver
1. Removing the Brake Light
Pry out the panel and remove the two clips
Separate the yellow and black harness by pulling back on the tab
Remove the two Phillips screws from the brake light
Pull the light up and out
2. Installing the Brake Light
Push the wires into place
Cut the grommet into a square shape with a razor blade
Feed the wire into the hole
Remove the adhesive strip covers
Push the third brake light down into place
Replace the Phillips screws
Reconnect the harness
Replace the panel by feeding it underneath the side panels
Line up the panel and hit it into place
Brought to you by 1AAuto.com, your source for quality replacement parts and the best service on the Internet.
Hi, I'm Mike from 1A Auto. I hope this how-to video helps you out, and next time you need parts for your vehicle, think of 1AAuto.com. Thanks.
In this video, we're going to show you how to replace the third brake light on this 1996 Chevy Tahoe. The items you'll need for this is a new third brake light from 1AAuto.com and a Phillip's screwdriver.
Start off by prying out this panel. It's held in with two clips: one right here, and another one in the same spot on the other side. Right here, this yellow and black harness is the one to your third brake light. Just pull back on that tab and pull it free. Your third brake light is held in with two Phillip's screws: one right here and one right there. We'll just fast forward as Don removes those. Now, pull the light up and out.
Up front is the old third brake light, and behind it is the new one from 1A Auto. You can see they're identical, and they'll mount exactly the same. Just detach your harness by pushing those wires into place. Because this third brake light is for several different vehicles it does have this grommet here that you don't need. Using a razor blade just cut it into a square shape. Just feed that wire down into that hole, remove the adhesive strip covers, and push the third brake light down into place. Once you have it in place, just replace those two Phillips screws. Now, reconnect your harness and replace this panel by just feeding it up underneath the side panels. Then, just line it up and hit it into place. You're all set.
We hope this video helps you out. Brought to you by www.1AAuto.com, your source for quality replacement parts and the best service on the Internet. Please feel free to call us toll-free, 888-844-3393. We're the company that's here for you on the Internet and in person.
Product Reviews
Loading reviews
4.75/ 5.012
12 reviews
5 Stars
4 Stars
3 Stars
2 Stars
1 Star
9
3
0
0
0
Better-than-expected
L
December 30, 2020
Initially I didn't know what to expect especially given the prices much cheaper than all the other local automotive stores O'Reilly's AutoZone even NAPA Auto Parts. I took the other one off I didn't think you was going to really lineup but it did perfectly I was shocked it works beautifully it looks nice it almost looks like the original which was a plus for me would highly recommend this part
3rd Brake Light 2000 Tahoe Z71
R
January 27, 2021
It was a perfect fit and very easy to install even in 20 degree weather. The ordering process was very easy. The only reason I didn't give it 5 stars is because it took just shy of three weeks to receive the part.
Great Price..Arrive Quickly..Perfect Fit!
peter
March 16, 2021
Item was priced well, shipped out immediately, and was a great fit replacing original OEM light.
Nice part but did not fit my truck
R
April 16, 2021
Great looking product, but did not fit my 2001 chevy suburban.
Great part
albert
June 4, 2021
Came with adapters to work for my vehicle and nice quality.
Tahoe
rodney
July 12, 2021
Perfect, just what I needed
3rd brake light 1998 Tahoe LT works perfect and best price
Mark
June 28, 2022
Received the 3rd brake light in no time, installed it in 10 minutes, and after years of it being out, it finally worked again!
Looks fantastic
Darieux
August 7, 2022
Very happy,,,high quality, very bright
Fits perfect,,,
Perfect fit
Mark-
February 19, 2023
Perfect fit, I watched there video on YouTube and it quite easy, would recommend
Great Product!
Robert
June 21, 2023
The third brake light was easy to install and works great. Best of all it sealed up the water leak, which was the reason I needed to replace the old on.
John
March 13, 2024
Fits great and had it installed in no time.
Michael
June 20, 2024
Good fit and easy installation. Bonus for still works a year later!
Customer Q&A
Are the screws and mounting nuts included?August 10, 2022
John D
10
New hardware is not included with this item. You may be able to reuse your original hardware if it is in good condition.
August 10, 2022
T I
Will this fit 2nd Generation 2001 chevy Tahoe with Barn/Cargo Doors?December 6, 2022
Joseph T
10
This part will not fit your vehicle, but we may have a part that is listed to fit.
Please enter your vehicle's year make and model in the search bar at the top of the page. This will display parts guaranteed to fit your vehicle. Just be sure to verify all of the information shown in the Vehicle Fit tab before ordering.
December 6, 2022
T I
Does this fit 1996 Blazer where the lightassembly mounts on the Gate Glass (not the roof)?April 7, 2024
Richard R
10
No idea! Mine mounts on roof!
April 8, 2024
Richard S
10
No, this will only mount on the roof, not the glass. We do not have a design for your application for the glass.
April 8, 2024
Jessica D
10
If by mounting on the gate glass you mean mounting on the top of the frame for the gate glass rather than the roof, yes, it will work but requires a bit of modification. About 5 minutes with a Dremel tool took care of it for me. But no, it is not a direct fit out of the box.
May 19, 2024
Rob E
Customer service
877-844-3393
Monday - Friday 8:00am - 9:30pm ET Saturday - Sunday 8:00am - 4:30pm ET
Hummer is a registered trademark of General Motors Company. 1A Auto is not affiliated with or sponsored by Hummer or General Motors Company.See all trademarks.
Enter Vehicle Year Make Model
Specify your vehicle's year, make and model to guarantee fit.
Year
Make
Model
Options
Drivetrain
This part doesn’t fit a . Select from parts that fit.