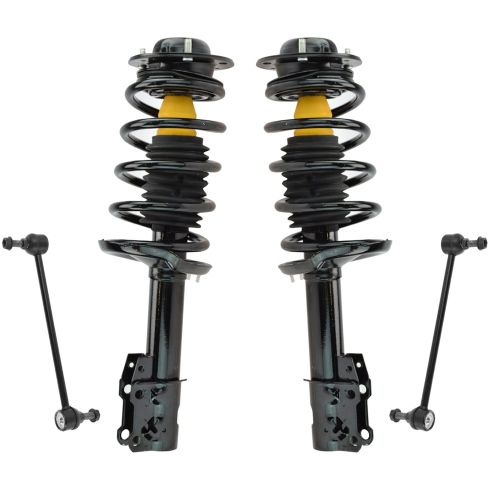
Kit Includes: (2) Front Sway Bar Links (2) Front Strut & Spring Assemblies
Quantity: 4 Piece
TRQ suspension kits are manufactured using premium raw materials and coatings for extended service life. Each TRQ suspension component is designed to be a direct, maintenance-free replacement to the stock unit. To extend the life of your steering and suspension components, TRQ recommends replacing components in pairs, sets, or kits. All products are fit and road-tested in our Massachusetts R&D facility to ensure we deliver on our promise of Trusted Reliable Quality.
Product Features
Application Specific Design: No modifications necessary
Anti-Corrosion Coated: Enhanced surface life
Pre-greased: No additional maintenance required
Kitted for Restored Performance: Improved road-feel and handling
Replacing struts used to require specialized tools to compress, remove, and transfer the old spring and mount. Our Pre-assembled, complete strut & spring assemblies come with all new parts and make the job much quicker and easier for the do-it-yourself mechanic.
Strut & spring assembly contains:
Upper Strut Mount
Strut Bearing
Coil Spring
Boot & Bumper Kit
Gas-charged Strut
Our steering and suspension components are pre-greased and sealed for long life and do not require the extra maintenance typically required by greaseable versions.
Item Condition:New
Attention California Customers:
WARNING: This product can expose you to chemicals including Chromium (Hexavalent Compounds), which is known to the State of California to cause cancer, and birth defects or other reproductive harm. For more information, go to www.P65Warnings.ca.gov
Lifetime Warranty
This item is backed by our limited lifetime warranty. In the event that this item should fail due to manufacturing defects during intended use, we will replace the part free of charge. This warranty covers the cost of the part only.
FREE Shipping is standard on orders shipped to the lower 48 States (Contiguous United States). Standard shipping charges apply to Hawaii and Alaska.
Shipping is not available to a P.O. Box, APO/FPO/DPO addresses, US Territories, or Canada for this item.
Expedited is available on checkout to the United States, excluding Alaska, Hawaii.
Final shipping costs are available at checkout.
How to Replace Sway Bar Link 2005-10 Pontiac G6
How to Replace Sway Bar Link 2005-10 Chevy Cobalt
Created on:
Tools used
A Piece of Pipe (for leverage)
18mm Wrench
Jack Stands
18mm Socket
19mm Socket
Ratchet
Floor Jack
1. Removing the Wheel
Loosen the lug nut covers with a 19mm socket
Pry off the center cap with a flat blade screwdriver
Loosen the lug nuts with the vehicle on the ground
Raise the vehicle with a floor jack
Secure the vehicle on jack stands
Remove the lug nuts
Pull off the wheel
2. Removing the Stabilizer Link
Turn the wheel by hand
Hold the upper stabilizer link stud with an 18mm wrench
Remove the upper nut from the stabilizer link with an 18mm socket
Hold the lower stabilizer link stud with an 18mm wrench
Remove the lower nut from the stabilizer link with an 18mm wrench
Pull off the stabilizer link
3. Reinstalling the Stabilizer Link
Push the stabilizer link into place
Hold the lower stabilizer link stud with an 18mm wrench
Fasten the lower nut onto the stabilizer link with an 18mm wrench
Hold the upper stabilizer link stud with an 18mm wrench
Fasten the upper nut onto the stabilizer link with an 18mm socket
4. Reattaching the Wheel
Slide the wheel into place
Start the lug nuts by hand
Tighten the lug nuts preliminarily
Lower the vehicle to the ground
Tighten the lug nuts to 100 foot-pounds in a crossing or star pattern
Reattach the center cap
Tighten the lug nut covers with a 19mm socket
Brought to you by 1AAuto.com, your source for quality replacement parts and the best service on the Internet.
Hi, I'm Don from 1A Auto. I hope this how-to video helps you out, and the next time you need a part for your vehicle, think of 1AAuto.com. Thanks.
In this video, we're going to show you how to replace a front stabilizer link on this 2007 Pontiac G6. It's the same as any 2005 to 2010 G6, as well as the Saturn Aura. Not a difficult procedure. You will need jack and jack stands, and you'll want to jack up both front wheels off the ground and support it with jack stands. Then you'll need a lug wrench or a 19mm socket with a ratchet, maybe even a breaker bar and a pipe for some extra leverage. Then, after that, you'll just need two 18mm wrenches, one of those 18mm will have to have an open end.
Start out by using just a socket to loosen the lug nut covers, or the wheel cover as in this case. We're going to use impact or air tools sometimes. If you don't have the benefit of air tools, just start with the vehicle on the ground, loosen the lug nuts, then raise and secure the vehicle, and move the lug nuts from the wheel and tire.
Use an 18mm wrench to grab on to the nuts, part of the stud of the stabilizer link, and then use an 18mm socket, loosen up the nut, and then it comes off. Here's the fun part of the repair. You pull that down out of the way, and you can see the other end of the link right there. Put the 18mm wrench on the nut that's in the shaft, just like before. Then, there's not really enough room to get a ratchet back in there, so you basically just have to take a wrench and slowly, carefully, one eighth of a turn at a time, and I'll fast-forward the video as we do that.
Then, just reinstall the link as you took it apart. Go ahead and speed up as we tighten up that lower nut, and like I said before: it's not all that difficult; it just takes quite a bit of time because you can't move that nut too far each time.
Bring the sway bar link back into place, and should you possibly feel the need to replace those sway bar links, at 1AAuto.com, we sell those as well. But then use a 18mm wrench and an 18mm socket and ratchet to tighten up that bolt. And that bolt should be tightened somewhere around 70 to 75 foot-pounds. Put the bracket that holds your brake hose back into place, and start the 10mm bolt on and tighten it up.
Reinstall the wheel. Put the lug nuts on by hand first just to make sure you don't cross thread them, then tighten them preliminarily. Put the vehicle on the ground, torque the lug nuts to 100 foot pounds using a star pattern. Now, reinstall your hubcap and we're going to do that with that 19mm socket. I'm just going to screw them in by hand. Also, we want to make sure you line up the valve stem with the notch in the hubcap for the valve stem. I'll go ahead and fast-forward through that.
We hope this video helps you out. Brought to you by www.1AAuto.com, your source for quality replacement parts and the best service on the Internet. Please feel free to call us toll-free, 888-844-3393. We're the company that's here for you on the Internet and in person.
Tools used
15mm Wrench
Hammer
Torque Wrench
18mm Wrench
8mm Wrench
Jack Stands
19mm Wrench
19mm Socket
Ratchet
Floor Jack
1. Testing the Stabilizer Link
Turn the wheel by hand or with the steering wheel
Try to move the stabilizer link by hand
A clanking or rattling noise indicates a faulty stabilizer link
2. Removing the Wheel
Loosen the lug nut covers with a 19mm socket
Pull off the hub cap
Loosen the lug nuts with the vehicle on the ground
Raise the vehicle with a floor jack
Secure the vehicle on jack stands
Remove the lug nuts
Pull off the wheel
3. Removing the Stabilizer Link
Apply penetrating oil to the stabilizer link bolts
Attach an 18mm wrench to the top stabilizer link nut
Attach an 8mm wrench to the top stabilizer link stud
Turn the 18mm wrench to remove the nut
Attach an 18mm wrench to the lower stabilizer link nut
Attach an 8mm wrench to the lower stabilizer link stud
Turn the 18mm wrench to remove the nut
Pull out the stabilizer link
4. Installing the New Stabilizer Link
Put the new stabilizer link into place
Start the nuts onto the stabilizer link
Attach a 15mm wrench to the upper stabilizer link bolt
Tighten the nut with a 19mm socket and ratchet
Attach a 15mm wrench to the lwoer stabilizer link bolt
Tighten the nut with a 19mm wrench
Tighten the nuts to between 40 - 45 foot-pounds of torque
5. Reattaching the Wheel
Slide the wheel into place
Start the lug nuts by hand
Tighten the lug nuts preliminarily
Lower the vehicle to the ground
Tighten the lug nuts to 100 foot-pounds in a crossing or star pattern
Put on the hub cap, lining up the hole with the tire valve stem
Tighten the lug nut cap
Brought to you by 1AAuto.com, your source for quality replacement parts and the best service on the Internet.
In this video, we're going to show you how to replace a front stabilizer link. The symptom of a bad stabilizer link is if you're hearing a clunking in the front of your car, but when you go around a curve, either left or right, the clunking seems to go away. That's usually a sign that your stabilizer link is starting to loosen up. Tools you'll need are 8mm to 19mm wrenches as well as a hammer.
Turn your wheel all the way to one side or the other. Then you can reach in behind and you can see it here. This is the top of your link. You can reach in behind and grab that with your hand and shake it back and forth and if you can duplicate that clanking or rattling sound then that's what you need to replace.
Start out by using a 19mm socket or a wrench and loosen the plastic covers and then remove the wheel cover. If you don't have the benefit of air tools, you'll want to loosen the lug nuts up while it's on the ground, then raise and support your vehicle and then remove the lug nuts and the wheel.
Right here is our stabilizer link. Use a little bit of penetrating oil on the upper and lower, let that sit for awhile. We've got an 18mm wrench on the bolt and 8mm wrench on the end of the shaft there. It looks like it actually coming loose, there goes that bolt. Get that started. Put this on there and I'm going to put this one on down there and same thing. Here's a close up look. I've got the 18mm wrench on there. The 8mm wrench is just holding that stud in place and I just keep flipping back and forth with the larger wrench, grabbing onto the nut and removing it. I'm just going to speed up the tape here. It takes a little while to get these things apart. It's a tedious task of getting the wrenches in there, holding it with the smaller wrench and then using the small one and then just angling the larger wrench in there as best you can. Eventually it comes apart.
Here's a new link from 1A Auto. Iit's a little bit different but it actually makes it easier to install. You'll need a 15mm wrench to hold this on that side and then a 19mm socket and ratchet to put the bolt on. We're going to put down in. It mounts in just like your original. Start the locking bolt on here and we'll start the locking bolt down here. Up top, I put my 15mm wrench through from the backside and then a 19mm socket and ratchet. I'll just speed it up as I tighten it up with the ratchet and you want to get it nice and tight and probably 40 to 45 foot-pounds. Then continuing on down to the lower, it's the same as taking it apart. You really can't get a wrench in there or a ratchet in there so you just have to use a wrench. I used the 15mm wrench to hold the stud and then a 19mm wrench to tighten up the nut and it just takes a little while and, then, again, tighten it up between 40 to 45 foot-pounds.
Once you have the wheel back in place then you put the lug nuts on by hand and I just use my impact wrench to just tighten them preliminarily. Now with the vehicle on the ground, torque the lug nuts to 100 foot-pounds using a star pattern. Now put your wheel cover back on, there's a hole for the valve stem then use a socket to tighten up the retainers.
We hope this video helps you out. Brought to you by www.1AAuto.com, your source for quality replacement parts and the best service on the Internet. Please feel free to call us toll-free, 888-844-3393. We're the company that's here for you on the Internet and in person.
PSA56224
In Stock
Product Reviews
Loading reviews
4.33/ 5.015
15 reviews
5 Stars
4 Stars
3 Stars
2 Stars
1 Star
10
2
2
0
1
Great company
jonathan
March 22, 2017
The shocks are like new and way cheaper than autozone was (360). They also shipped them to me in 2 days for free. What a deal. Don't forget that 1A auto had the best youtube video of how to change them since it was my first time doing struts. 1A Auto is the best.
Customer satisfaction
F
July 29, 2017
I really do appreciate the service I received and the product is exceptional. I would recommend this company to anyone as well as the products they sell
So Far So Good
Josh
September 11, 2017
The brand I received was Leacree, which is a Japanese aftermarket manufacturer. Punched them into Google, saw 50/50 reviews. The struts have been on the vehicle over a week and I've had no issues. Installation was fine, everything fit the way it should. So far, I recommend this product.
Struts,links
Larry
February 25, 2018
Great price everything fit prefect.This made repair easier and less time consuming.Shipping was fast.
Perfect
R
October 2, 2018
Great fit and great price will be back to order more products and refer more people to here, I dont go no where else but here
Just what I needed
T
March 1, 2019
Just what I needed. Easy install and fast shipping. Rides much better.
Dissapointed With the product
S
June 13, 2019
The same noise is coming after changing the parts, low-quality parts, such a waste of money.
Struts were great
harry
June 28, 2019
Nice parts I will shop again nice price all so vary happy
Great experience
T
July 12, 2019
The replacement struts kit and wheel hub assembly were and exact fit and easy to change great gob guys!!!
Struts
L
December 30, 2019
They worked perfect for what I needed. Installation was easy as it was posted online with detailed instruction.
S
May 10, 2020
Fit as expected. Great product.
New struts and links
Mike
August 17, 2020
Replaced all four struts ,and links on the front thought noise was gone wife said she can still hear something double checked all the bolts and everything told her drive it I couldn't hear it, few months after I was driving and noise was back almost as bad as before. Still need to get warrantied.
Great buy. But reuse old nuts.
Dominick
August 7, 2021
As far as the parts themselves, they worked just fine. But the only issue I had was the sway bar link nuts. The nuts were warped to more of an oval shape so I ended up using the old nuts I had for the original sway bar links. Not sure what the nuts were made out of but Id recommend finding out the problem with those. Besides that everything worked just fine.
ko
January 22, 2023
Nice really good
michael
March 23, 2024
Shocks were a direct replacement and easy to install however under 1000 miles later they started squeaking again.
Customer Q&A
how do i know if the 2004 malibu is the old style or new style struts? a lot of parts are 2003 because of old style of car.June 19, 2019
Dan H
10
This part is specific to vehicles with a particular set of options. We will need more information about your vehicle to confirm the fit. Can you please either provide your VIN or the OE number from your struts so we can see if these will be compatible?
June 20, 2019
Curtis L
10
That is the new body style, and this kit will be correct for that vehicle based on the information provided.
June 21, 2019
A C
What would cause play in the front tire when i have my g6 jacked up in the air and I can wiggle the tire from side to side?April 10, 2020
C A
10
Thanks for your inquiry. the issue may be with the inner or outer tie rods, however, there could be multiple reasons why you're having this particular problem. We suggest taking your vehicle to a nearby reputable shop to identify the cause. Once you know the cause, we'll be happy to see if we carry the parts and how-to videos needed for your repair.
April 10, 2020
Jessica D
I am a independent woman who can change my own wheels out is this the most difficult part of the job?July 21, 2020