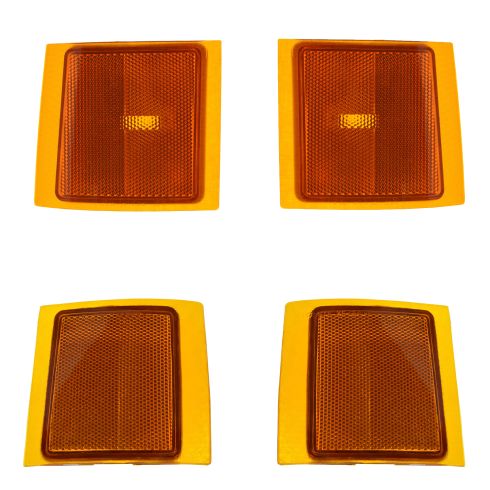
Kit Includes: (2) Upper Reflectors (2) Lower Side Marker Lights
Specification
Vehicle Light Option
with Composite Headlights
Location
Upper & Lower
Product Features
Direct Fit - No vehicle or wiring modification necessary
DOT, SAE, and FMVSS Compliant - Meets on-road use regulations
Matching set for a restored look
Complete Repair in One Purchase - Stop searching for parts individually and complete your repair with a customized kit or set from DIY Solutions.
High-Quality Parts from Trusted Brands - DIY Solutions' kits and sets are selected from the best automotive brands and include hard-to-find and even obsolete parts you may need for your vehicle.
Guaranteed Fit - DIY Solutions ensures its selected parts are quality-tested to guarantee fit and function.
Assemblies may include halogen or incandescent test bulbs that should be replaced before installation.
Item Condition:New
Attention California Customers:
WARNING: This product can expose you to chemicals including Chromium (Hexavalent Compounds), which is known to the State of California to cause cancer, and birth defects or other reproductive harm. For more information, go to www.P65Warnings.ca.gov
Lifetime Warranty
This item is backed by our limited lifetime warranty. In the event that this item should fail due to manufacturing defects during intended use, we will replace the part free of charge. This warranty covers the cost of the part only.
FREE Shipping is standard on Orders shipped to the lower 48 States (Contiguous United States). Standard shipping charges apply to Hawaii, Alaska and US Territories. Shipping is not available to Canada.
Expedited is available on checkout to the United States, excluding Alaska, Hawaii and US Territories as well as P.O. Boxes and APO/FPO/DPO addresses. Final shipping costs are available at checkout.
How to Replace Side Marker Light 1995-2000 Chevy Tahoe
How to Replace Headlight 1995-2000 Chevy Tahoe
How To Replace Front Radiator Grille 1996-99 Chevy Tahoe
Created on:
Tools used
13mm Socket
Phillips Head Screwdriver
Ratchet
1. Removing the Side Marker Light
Remove the four Phillips screws from the parking light bracket
Twist the bulb socket counterclockwise out of the light
Remove the two 13mm nuts from the side marker light
Twist the bulb socket counterclockwise out of the light
Pull the side marker light out
2. Servicing the Bulbs
Twist the bulb socket counterclockwise out of the light
Pull the bulb off of the socket
Push on the new bulb
Twist the bulb clockwise into the light
3. Installing the Side Marker Light
Insert the side marker light into place
Replace the two 13mm nuts
Twist the bulb clockwise into the light
Line up the bolt holes on the side marker light bracket to the bolt holes on the vehicle
Replace the four Phillips screws into the parking light bracket
Brought to you by 1AAuto.com, your source for quality replacement parts and the best service on the Internet.
Hi, I'm Mike from 1A Auto. I hope this how-to video helps you out, and next time you need parts for your vehicle, think of 1AAuto.com. Thanks.
In this video, we're going to show you how to replace as well as service the bulb in a side marker light on this 1996 Chevy Tahoe. We show you in the passenger side, but the driver side is the same procedure. The items you'll need for this include a new side marker light from 1AAuto.com, a Phillips screwdriver and a 13mm socket and ratchet.
Start off by removing these four Phillips screws. We'll just fast-forward as Don does this. Once those removed, pull the light out, and you just twist the sockets counterclockwise to remove them.
Now to service the bulb on your side marker light. You just twist the socket out and the bulb pulls straight out. You push your new one in, and then the socket twist back into the side marker light.
To change the assembly, you want to remove these two 13mm nuts, so just twist out that socket and remove those two nuts. We'll just fast-forward here as Don does this. Once those are removed, the side marker light will pull right out.
On the left is the old side marker light; on the right is the new one from 1A Auto. You can see they're identical, and they'll mount exactly the same.
Push your new side marker light into place and replace those two 13mm nuts. Then twist your socket back into place.
Now take your parking light and twist those two parking light sockets into place by just twisting them clockwise to lock them. Then push your parking light assembly into place. Make sure all four of those holes line up, and replace those four Phillips screws. Then you're all set.
We hope this video helps you out. Brought to you by www.1AAuto.com, your source for quality replacement parts and the best service on the Internet. Please feel free to call us toll-free, 888-844-3393. We're the company that's here for you on the Internet and in person.
Tools used
Socket Extensions
Phillips Head Screwdriver
7mm Socket
10mm Socket
Ratchet
1. Removing the Side Marker Light
Remove the four Phillips screws from the parking light bracket
Twist the bulb socket counterclockwise out of the light and side marker light
Repeat the process on the other side
2. Removing the Grille
Remove the 7mm bolts from the top of the grille
Remove the 7mm bolt from the center of the grille
Lift on the tab where the parking light was and pull the grille forward
Push the tab in the center with a flat blade screwdriver
Remove the grille
3. Removing the Headlight
Remove the four 10mm bolts from the headlight bracket
Pull the headlight out
Disconnect the headlight wiring harness
4. Servicing the Bulbs
Twist the bulb socket counterclockwise out of the light
Pull the bulb off of the socket
Push on the new bulb
Twist the bulb clockwise into the light
5. Installing the New Headlight
Reconnect the wiring harness to the headlight
Line up the bolt holes on the headlight bracket to the bolt holes on the vehicle
Replace the 10mm bolts into the headlight bracket
6. Installing the Grille
Align the grille and pull the parking light sockets through
Align the tabs on the grille and push them in until they lock
Replace the five 7mm bolts on the top and center of the grille
7. Installing the Side Marker Light
Insert the side marker light into place
Twist the bulbs clockwise into the light
Line up the bolt holes on the side marker light bracket to the bolt holes on the vehicle
Replace the four Phillips screws into the parking light bracket
Repeat the process for the other side
Brought to you by 1AAuto.com, your source for quality replacement parts and the best service on the Internet.
Hi, I'm Don from 1A Auto. I hope this how-to video helps you out, and the next time you need a part for your vehicle, think of 1AAuto.com. Thanks.
In this video, we're going to show you how to service the headlight bulbs as well as replace the entire headlight assembly on this 1996 Chevy Tahoe. We show you on the passenger side, but the driver side is the same procedure. The items you'll need for this include new headlights from 1AAuto.com, Phillips screwdriver, and a 7mm and 10mm socket and ratchet with an extension.
You want to first remove these four Phillips screws, and we'll just fast-forward as Don does this. Pull the light out, twist the sockets counterclockwise, and pull them out. Then, you want to twist this socket out of your side marker light, and then repeat the process on the other side.
Next, you want to remove this series of 7mm bolts, and we'll just fast-forward as Don does this. There's one more 7mm bolt right here. Once those are removed, you want to just lift up this tab, pull the grille forward, and there's another one on the other side. There's another clip right in the center. Using a stick or a long screwdriver, you just want to push that tab and then pull out on that center tab. Just to give you a better look at it, it's this tab right here.
Next, you want to remove these four 10mm bolts that secure your headlight, and we'll just fast-forward as Don removes those. Now, to service your bulbs, both of them are the same. You just pull back this tab and pull the harness free, then twist the bulb out. Push the new one in, twist it clockwise to lock it, and then just reconnect your harness. If you're looking to replace the whole assembly, you just want to disconnect both of these harnesses by pulling up that tab.
Then take your new headlight and push the harnesses into place. Then push your headlight back into place and replace those four 10mm bolts. Once those are in place, take your grille and pull your parking light sockets through, and then you want to line up the tabs on the grille.
The first one you want to do is the center one, and just push down that tab and push the tab on the grilled into place until it locks. Now, line up those side ones and push those into place and we'll just fast-forward here as Don replaces those five 7mm bolts. There's four along the top of the grille, and then that one in the center just above the badge.
Now, twist your side marker light back into place. Then twist your two parking light sockets back into place, just turning them clockwise to lock them. Then push the assembly into place and replace those four Philip screws. Repeat the process on the other side.
We hope this video helps you out. Brought to you by www.1AAuto.com, your source for quality replacement parts and the best service on the Internet. Please feel free to call us toll-free, 888-844-3393. We're the company that's here for you on the Internet and in person.
Tools used
13mm Socket
Socket Extensions
Flat Blade Screwdriver
Phillips Bit in a Ratchet
7mm Socket
Ratchet
1. Removing the Parking Lights
Remove the four Phillips head screws from the parking light
Pull the light out
Twist the bulb sockets counterclockwise and out
Twist the bulb socket out of the side marker light
Repeat these steps for the other parking light
2. Removing the Grille
Remove the four 7mm bolts from the top of the grille
Remove the 7mm bolt from the center of the grille
Undo the three tabs at the bottom of the grille, using a flat blade screwdriver if necessary
3. Preparing the New Grille
Remove the ten 13mm nuts from the marker lights and reflectors, and the badge on the old grille
Push the plastic clips out of the old grille, using a flat blade screwdriver if necessary
Put the marker lights and reflectors onto the new grille
Fasten the 13mm nuts onto the marker lights and reflectors
Push the badge onto the new grille
Fasten the 13mm nuts onto the badge
Push the eight plastic clips into the new grille
4. Installing the New Grille
Pull the bulb sockets through the grille as you position it
Push in the center grille tab
Push in the two outside grille tabs
Insert the four 7mm bolts into the top of the grille
Insert the 7mm bolts into the center of the grille
5. Reinstalling the Parking Lights
Twist the bulb socket into the marker light
Twist the bulb sockets into the parking light
Push the parking light into place
Insert the four Phillips screws into the parking light
Repeat these steps for the other marker light and parking light
Brought to you by 1AAuto.com, your source for quality replacement parts and the best service on the Internet.
Hi, I'm Don from 1A Auto. I hope this how-to video helps you out, and next time you need parts for your vehicle, think of 1AAuto.com. Thanks.
In this video, we're going to show you how to replace the grille on this 1996 Chevy Tahoe. It's the same part and process on these Tahoes from '95 to 2000. The items you'll need for this are a new grille from 1AAuto.com, Phillips screwdriver, 7mm and 13mm socket and ratchet with an extension, and flat blade screwdriver.
You want to first remove these four Phillips screws. We'll just fast forward as Don does this. Pull the light out and twist these sockets counterclockwise and pull them out. Then you want to twist this socket out of your side marker light. Then repeat the process on the other side.
Next, you want to remove this series of 7mm bolts. We'll just fast forward as Don does this. There's one more 7mm bolt right here. Once those are removed, you want to just lift up this tab and pull the grille forward and there's another one on the other side. There's another clip right in the center, using a stick or a long screwdriver, you just want to push that tab and then pull out on that center tab. Just to give you a better look at it, it's this tab right here.
Up top, is the old grille; below it, are the two from 1A Auto. In the middle is an exact replacement of the old grille and on the bottom is an all chrome version, which we'll be installing on this truck, but first we have to swap over all the stuff from the old grille. You just want to remove these ten 13mm nuts. We'll just fast forward as Don does this. You also want to swap over these clips and there are eight of them in total, four on one side, and four on the other. To remove them, all you do is push in those four triangular pieces, and it just pops out and if gives you any trouble, you can use a flat blade screwdriver to help push it through. We'll fast forward as Don takes the new grille and starts attaching those side marker reflectors and the side marker lights and replacing those 13mm nuts. For the badge, just push it into the center and, just like with the lights, replace those two 13mm nuts. Now, take those eight clips and just push them into place.
Once those are in place, take your grille and pull your parking light sockets through. Then, you want to line up the tabs on the grille, and the first one you want to do is the center one and just push down that tab and push the tab on the grille into place until it locks. Now, line up those side ones and push those into place. We'll just fast forward here as Don replaces those five 7mm bolts. There's four along the top of the grille and then that one in the center just above the badge.
Now, twist your side marker light back into place and then twist your two parking light sockets back into place, just turning them clockwise to lock them. Then push the assembly into place and replace those four Phillips screws. Just repeat the process on the other side.
We hope this video helps you out. Brought to you by www.1AAuto.com, your source for quality replacement parts and the best service on the Internet. Please feel free to call us toll-free, 888-844-3393. We're the company that's here for you on the Internet and in person.
LHT05615
In Stock
Product Reviews
Loading reviews
5.00/ 5.011
11 reviews
5 Stars
4 Stars
3 Stars
2 Stars
1 Star
11
0
0
0
0
Great Pricing & Fast Shipping!
1
March 21, 2017
1st time customer & will say will use this company again for my auto repair & collision repair business.
Like the free/included shipping & fast shipping!
Thanks Again!
Great Customer Service!
T
July 23, 2017
Two of these arrived broken. They shipped me two more free of charge and they were there the following day! Will do business with again!
side marker light
P
December 7, 2018
they were a perfect fit, had ordered from another co. as did not know you were even a co, theirs did not fit and they refused to take them back, now all my old pickup parts will be purchased from you if you have them ,thanks
Excellent product
G
February 12, 2019
Looks great. Could believe the difference after the old, faded lights were replaced. Highly recommend.
Nice!!
Karlan
March 6, 2019
Very nice and easy to install
Chevy upper and lower maker lights
D
August 14, 2019
Easy to order no charge for shipping good price
Corner marker lights
N
December 9, 2019
Fit like a glove. Looks clean and fresh
Noe
April 24, 2020
Perfect fit! Just like the original.
P
July 14, 2021
These were of good quality but I was installing them in an aftermarket grill so I cant say if the figment on a stock grill would be as good.
Right part the 1st time
Dan
December 1, 2022
Originally bought similar lenses for half the price on a popular website. The issue; they didnt fit. Their inventory likely had what I needed but budget price also meant they didnt take the effort to have them categorized properly.
1A Auto had the right part the 1st time. Valuable lesson.
The lenses are the final touch to keep my 25 yr old truck looking spanky clean. AND THEY FIT PERFECTLY! Definitely recommend the parts and service. Ata boyee 1A Auto!
Frank
May 17, 2024
Fix was perfect even on aftermarket grill ??
Customer Q&A
Do these come with the push nuts?July 14, 2021
George E
10
I believe I had to use the original nuts
July 14, 2021
David D
10
No mine did not
July 14, 2021
P A
Customer service
877-844-3393
Monday - Friday 8:00am - 9:30pm ET Saturday - Sunday 8:00am - 4:30pm ET
Chevrolet is a registered trademark of General Motors Company. 1A Auto is not affiliated with or sponsored by Chevrolet or General Motors Company.See all trademarks.
Enter Vehicle Year Make Model
Specify your vehicle's year, make and model to guarantee fit.
Year
Make
Model
Options
Drivetrain
This part doesn’t fit a . Select from parts that fit.