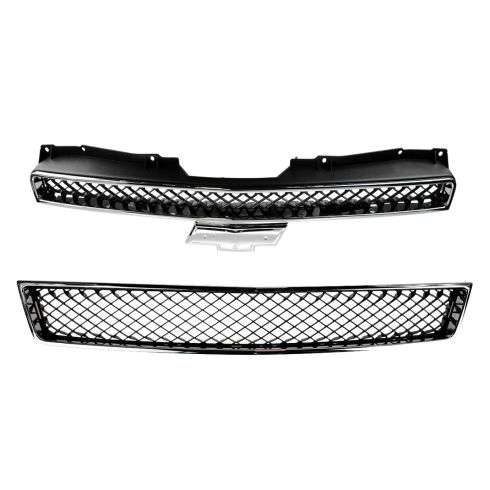
Complete Repair in One Purchase - Stop searching for parts individually and complete your repair with a customized kit or set from DIY Solutions.
High-Quality Parts from Trusted Brands - DIY Solutions' kits and sets are selected from the best automotive brands and include hard-to-find and even obsolete parts you may need for your vehicle.
Guaranteed Fit - DIY Solutions ensures its selected parts are quality-tested to guarantee fit and function.
Item Condition:New
Attention California Customers:
WARNING: Cancer and Reproductive Harm - www.P65Warnings.ca.gov.
Lifetime Warranty
This item is backed by our limited lifetime warranty. In the event that this item should fail due to manufacturing defects during intended use, we will replace the part free of charge. This warranty covers the cost of the part only.
FREE Shipping is standard on orders shipped to the lower 48 States (Contiguous United States). Standard shipping charges apply to Hawaii and Alaska.
Shipping is not available to a P.O. Box, APO/FPO/DPO addresses, US Territories, or Canada for this item.
Expedited is available on checkout to the United States, excluding Alaska, Hawaii.
Final shipping costs are available at checkout.
How to Replace Lower Front Grille 2008-12 Chevy Suburban 1500
How to Replace Upper Front Grille 2008-12 Chevy Suburban 1500
Created on:
Tools used
Socket Extensions
Flat Blade Screwdriver
7mm Socket
10mm Socket
Ratchet
Trim Tool Set
1. Removing the Fender Liner
Remove the 7mm bolts from the fender liner
Pry out the barbed clips in the liner with a flat blade screwdriver
Peel back the fender liner to access the bulbs
2. Removing the Fog Light Wiring Harness
Disconnect the wiring harness from the fog lamp
3. Removing the Bumper Cover
Remove the two 10mm bolts from behind the bumper
Remove the six 10mm bolts from the top of the bumper cover
Tug the side of the cover to unhook it on both sides
Lift the cover and grille up and off
4. Removing the Upper Grille
Remove the 10mm nuts from the emblem
Pry out the metal spring clips on both sides of the grille with a flat blade screwdriver
Compress the plastic spring tabs with a flat blade screwdriver
Press the tabs on the side of the grille out of the bumper cover
Remove the upper grille
5. Removing the Lower Grille
Press the plastic push tabs on the lower grille
Press the grille out of the bumper cover
6. Installing the Lower Grille
Snap the grille into the bumper cover until it clicks and the tabs spring out
7. Installing the Upper Grille
Place the bumper cover face up
Snap the grille into the bumper cover until it clicks and the tabs spring out
Snap in the metal spring clips on both sides
Slide the emblem into the slot
Tighten the 10mm nuts to the emblem
8. Installing the Bumper Cover
Lift the bumper cover assembly into place
Clip in the sides
Tighten the six 10mm bolt to the top of the cover
Tighten the two 10mm bolts behind the bumper
9. Connecting the Fog Light Wiring Harness
Connect the fog light wiring harness
10. Reinstalling the Fender Liner
Press in the clips to the fender liner
Tighten the 7mm bolts to the liner
Hi, I'm Mike from 1A Auto. We've been selling auto parts for over 30 years. We're dedicated to delivering quality auto parts, expert customer service, fast and free shipping, all backed by our 100% satisfaction guarantee. Visit us at 1AAuto.com, your trusted source for quality auto parts.
So we're going to peel this splash shield back. It also will make it easier if you turn your wheel to the inside of whatever side you're working on so you can open this up. You can tell it’s held in with some 7mm self-tapping screws and some push clips. I'll start with the 7mm self-tapping screws. Using a flat-bladed screwdriver or a trim clip tool, I'm going to work these barbed clips out. Now we'd fold this up.
Now you can peel your fender liner back, reach in and disconnect your fog lamp. Repeat these steps on the opposite side.
We've got our vehicle up in the air so it's easier for us to show you these bolts. There's one here, and here, but you could slide under here with the vehicle on the ground. Just make sure it's on level ground and it's not going to roll on you. So we're going to start by removing these bolts with a 10mm socket. I'm going to remove the opposite side.
All right. Remove the six 10mm bolts at the top of the grille and bumper assembly. Now you can see we're removing the last bolt here, top of the bumper cover assembly and grille. It's pretty loose. Now we're going to pull the bumper cover off its mounting bracket. With a firm tug it's going to unhook like that. I'm going to repeat this on the opposite side. Now the bumper cover is loose. I'll lift it off, and I forgot to unclip the other fog light, so unclip those before you take the bumper off.
To remove the upper grille, start with these 10mm self-threading nuts. We're going to take these off on both ends of the upper grilles of these metal spring clips. We're going to use a small flat-bladed screw driver to release the lock just by bending it out. We're going to use the same screwdriver. Actually, I'll get a larger flat-bladed screwdriver and pry it up. Just work it off the plastic. At the bottom edge of the upper grille are plastic spring tabs to compress these to remove the grill from the bumper shell. I'm just going to use my flat-bladed screwdriver. I'm going to push the grille out. Move to the next one. Move to the next one. Just work the grille out of the bumper.
The lower grille is held in with plastic push tabs. Start with one here. The next one. Just keep moving down the line. Helps if you push the bumper past it to hold them down. This one's broken. There's ones on the back side. I'm using a flat-bladed screwdriver to push them down. The grille is out of the bumper.
So here's our old grille out of our Suburban, and here's our new grille from 1AAuto.com. It's the same exact size. It'll fit in the opening great. It's got the same style tabs, push tabs just like the original, and the new one's really going to set off the front of that truck.
Installing our new grille, we've got our bumper up on a table with a blanket so we don't scratch it. We're going to bring the grille up from the front. Push it up into the grille opening. I've got one side started. There's one. There's the other one. Just push it until these tabs spring out. Ah yes. You can see there's a little edge here on the bumper where this chrome needs to fit around that. Sort of put it down like that.
Let me see. I'm going to roll this down. So I'm going to take the grille and sort of lift it up to get it over that lip and caught. I'm going to push it down. You'll hear all those clips click in. Okay, and that's the lower grille.
We're going to install the upper grille. I'm going to start with the bumper laying face up. The chrome lip at the bottom of the grille needs to go into this little channel on the bumper. I'm going to lift it up. Push it down to lock it in. I'm going to roll it back over. Now that I know the chrome is seated over that lip, I'm going to push it up so it locks in these tabs so I can see them. I'm going to take our metal spring tabs that we bent the ears out of. I'm just going to bend it back in with a flat-bladed screwdriver. Do the other one. Now we can place that on the end of the grille. That lock tab fits into that slot. Just going to make sure it's in there, and push it up. Push it down. It locks in.
We're going to install the emblem now. We're going to use our old one. If you had new one, it would have double-sided tape. You'd peel it off. Then you go up and slide it back in the holes. It actually has a locating tab on one side to make sure it's right side. It should slide in there nice and easy. Take these 10mm self-threading nuts. Just going to tighten them down. Grab my socket.
I'm going to reinstall the bumper. This foam is going to fit into this plastic channel here. You have to line it up with your bumper brackets here. There's locating tabs in the top grille. Line those up in the radiator support. Clip the bumper into the bracket. Repeat for the other side.
Reinstall the six 10mm bolts into the radiator support. Reinstall the lower bumper bolts, 10mm bolt. Reach up and reconnect your fog lamp. Repeat for the other side.
Replace the barbed clips if you took them out. Reinstall the 7mm self-tapping screws. Repeat these steps on the opposite side.
Thanks for watching. Visit us at 1AAuto.com for quality auto parts, fast and free shipping, and the best customer service in the industry.
Tools used
Socket Extensions
Flat Blade Screwdriver
7mm Socket
Ratchet
Trim Tool Set
1. Removing the Fender Liner
Remove the 7mm bolts from the fender liner
Pry out the barbed clips in the liner with a flat blade screwdriver
Peel back the fender liner to access the bulbs
2. Removing the Fog Light Wiring Harness
Disconnect the wiring harness from the fog lamp
3. Removing the Bumper Cover
Remove the two 10mm bolts from behind the bumper
Remove the six 10mm bolts from the top of the bumper cover
Tug the side of the cover to unhook it on both sides
Lift the cover and grille up and off
4. Removing the Upper Grille
Remove the 10mm nuts from the emblem
Pry out the metal spring clips on both sides of the grille with a flat blade screwdriver
Compress the plastic spring tabs with a flat blade screwdriver
Press the tabs on the side of the grille out of the bumper cover
Remove the upper grille
5. Installing the Upper Grille
Place the bumper cover face up
Snap the grille into the bumper cover until it clicks and the tabs spring out
Snap in the metal spring clips on both sides
Slide the emblem into the slot
Tighten the 10mm nuts to the emblem
6. Installing the Bumper Cover
Lift the bumper cover assembly into place
Clip in the sides
Tighten the six 10mm bolt to the top of the cover
Tighten the two 10mm bolts behind the bumper
7. Connecting the Fog Light Wiring Harness
Connect the fog light wiring harness
8. Reinstalling the Fender Liner
Press in the clips to the fender liner
Tighten the 7mm bolts to the liner
Hi, I'm Mike from 1A Auto. We've been selling auto parts for over 30 years. We're dedicated to delivering quality auto parts, expert customer service, fast and free shipping, all backed by our 100% satisfaction guarantee. Visit us at 1AAuto.com, your trusted source for quality auto parts.
So we're going to peel this splash shield back. It also will make it easier if you turn your wheel to the inside of whatever side you're working on so you can open this up. You can tell it’s held in with some 7mm self-tapping screws and some push clips. I'll start with the 7mm self-tapping screws. Using a flat-bladed screwdriver or a trim clip tool, I'm going to work these barbed clips out. Now we'd fold this up.
Now you can peel your fender liner back, reach in and disconnect your fog lamp. Repeat these steps on the opposite side.
We've got our vehicle up in the air so it's easier for us to show you these bolts. There's one here, and here, but you could slide under here with the vehicle on the ground. Just make sure it's on level ground and it's not going to roll on you. So we're going to start by removing these bolts with a 10mm socket. I'm going to remove the opposite side.
All right. Remove the six 10mm bolts at the top of the grille and bumper assembly. Now you can see we're removing the last bolt here, top of the bumper cover assembly and grille. It's pretty loose. Now we're going to pull the bumper cover off its mounting bracket. With a firm tug it's going to unhook like that. I'm going to repeat this on the opposite side. Now the bumper cover is loose. I'll lift it off, and I forgot to unclip the other fog light, so unclip those before you take the bumper off.
To remove the upper grille, start with these 10mm self-threading nuts. We're going to take these off on both ends of the upper grilles of these metal spring clips. We're going to use a small flat-bladed screw driver to release the lock just by bending it out. We're going to use the same screwdriver. Actually, I'll get a larger flat-bladed screwdriver and pry it up. Just work it off the plastic. At the bottom edge of the upper grille are plastic spring tabs to compress these to remove the grill from the bumper shell. I'm just going to use my flat-bladed screwdriver. I'm going to push the grille out. Move to the next one. Move to the next one. Just work the grille out of the bumper.
This is our old grille from our vehicle. This is our new grille from 1AAuto.com. See, they're the same shape with the same amount of mounting holes on the top. It's got the same style push tabs, just like the old one. It has the same locating tabs here, and here, and here. This one's going to go on our truck and look really great.
We're going to install the upper grille. I'm going to start with the bumper laying face up. The chrome lip at the bottom of the grille needs to go into this little channel on the bumper. I'm going to lift it up. Push it down to lock it in. I'm going to roll it back over. Now that I know the chrome is seated over that lip, I'm going to push it up so it locks in these tabs so I can see them. I'm going to take our metal spring tabs that we bent the ears out of. I'm just going to bend it back in with a flat-bladed screwdriver. Do the other one. Now we can place that on the end of the grille. That lock tab fits into that slot. Just going to make sure it's in there, and push it up. Push it down. It locks in.
We're going to install the emblem now. We're going to use our old one. If you had new one, it would have double-sided tape. You'd peel it off. Then you go up and slide it back in the holes. It actually has a locating tab on one side to make sure it's right side. It should slide in there nice and easy. Take these 10mm self-threading nuts. Just going to tighten them down. Grab my socket.
I'm going to reinstall the bumper. This foam is going to fit into this plastic channel here. You have to line it up with your bumper brackets here. There's locating tabs in the top grille. Line those up in the radiator support. Clip the bumper into the bracket. Repeat for the other side.
Reinstall the six 10mm bolts into the radiator support. Reinstall the lower bumper bolts, 10mm bolt. Reach up and reconnect your fog lamp. Repeat for the other side.
Replace the barbed clips if you took them out. Reinstall the 7mm self-tapping screws. Repeat these steps on the opposite side.
Thanks for watching. Visit us at 1AAuto.com for quality auto parts, fast and free shipping, and the best customer service in the industry.
GRI00542
In Stock
Product Reviews
Loading reviews
5.00/ 5.02
2 reviews
5 Stars
4 Stars
3 Stars
2 Stars
1 Star
2
0
0
0
0
Freshened the front end of the truck nicely!!
ORLANDO
February 27, 2019
I just replace my grill and head lights. This is a very small investment for a great looking from end.
Good as oem
Chris
February 26, 2021
The truck was purchased at 30k miles. Had all original equipment grill got broken. Purchased this one from 1a and its might as well have came from G.M. looks identical to the T
Customer Q&A
Does the upper & lower grille fit a 2012 Suburban with the Z71 package ?April 27, 2016
D C
10
Yes, according to the information you supplied, the part youre looking at will be correct for your vehicle. If you have any other questions or would like to place an order with one of our customer service representatives, please feel free to give us a call.
April 27, 2016
Brian F
Do you have this grill black on black no chrome?October 25, 2021
John D
10
This part will not fit your vehicle, but we may have a part that is listed to fit.
Please enter your vehicle's year make and model in the search bar at the top of the page. This will display parts guaranteed to fit your vehicle. Just be sure to verify all of the information shown in the Vehicle Fit tab before ordering.
October 25, 2021
Emma F
will this fit a 2010 tahoe with z71 package?November 16, 2021
John D
10
Currently, we do not carry this part for your vehicle. We're always updating our inventory so please check back soon!
November 16, 2021
T I
Customer service
877-844-3393
Monday - Friday 8:00am - 9:30pm ET Saturday - Sunday 8:00am - 4:30pm ET
Enter Vehicle Year Make Model
Specify your vehicle's year, make and model to guarantee fit.
Year
Make
Model
Options
Drivetrain
This part doesn’t fit a . Select from parts that fit.