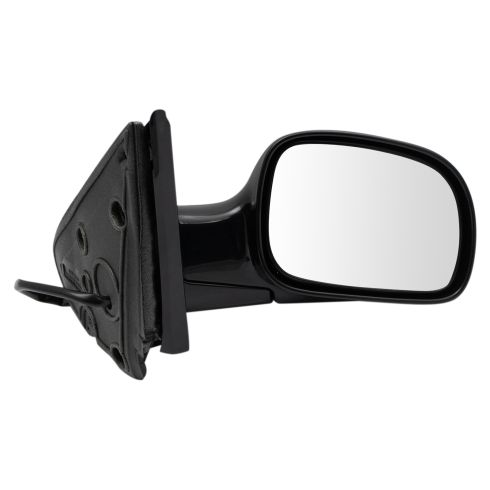
TRQ side mirrors and mirror components are designed to match the function, fixture, and performance of the original version for easy installation. TRQ mirrors are DOT certified, comply with all federal safety standards, and are independently lab tested to ensure our products comply with all government regulations. All products are fit and road-tested in our Massachusetts R&D facility to ensure we deliver on our promise of Trusted Reliable Quality.
Product Features
Direct Bolt-on Replacement: No modifications or special tools required
Complete Assembly: includes same mirror glass, housing, bracket and technology as the original unit
DOT Certified: Built to the highest quality standards
FMVSS-111 Compliant: Validated to be a dealership alternative
Exact fit - To obtain proper fit and function confirm your vehicle has the exact mirror options listed.
Item Condition:New
Attention California Customers:
WARNING: This product can expose you to chemicals including Lead and Lead Compounds, which are known to the State of California to cause cancer, and birth defects or other reproductive harm. For more information, go to www.P65Warnings.ca.gov.
Lifetime Warranty
This item is backed by our limited lifetime warranty. In the event that this item should fail due to manufacturing defects during intended use, we will replace the part free of charge. This warranty covers the cost of the part only.
FREE Shipping is standard on Orders shipped to the lower 48 States (Contiguous United States). Standard shipping charges apply to Hawaii, Alaska and US Territories. Shipping is not available to Canada.
Expedited is available on checkout to the United States, excluding Alaska, Hawaii and US Territories as well as P.O. Boxes and APO/FPO/DPO addresses. Final shipping costs are available at checkout.
How to Replace Mirror 2001-03 Chrysler Voyager
Created on:
Tools used
Flat Blade Screwdriver
T27 Torx Driver
1. Remove the damaged or old side mirror
From the outside, pry off the side mirror bezel
Remove the two T27 Torx screws.
Open the door to access the third Torx screw hiding behind the edge of the door.
Remove the side mirror.
If you have a power heated mirror, unplug the wiring harness.
2. Install the new side mirror
Thread the wiring harness back in and plug the mirror in.
Get your three T27 Torx screws started to secure the mirror.
Tighten them with your Torx driver.
Clip the bezel back on and close the door.
Brought to you by 1AAuto.com. Your source for quality replacement parts and the best service on the Internet.
Hi, I'm Mike Green. I'm one of the owners of 1A Auto. I want to help you save time and money preparing and maintaining your vehicle. I'm going to use my 20-plus six years' experience restoring and repairing cars and trucks like this to show you the correct way to install parts from 1AAuto.com. The right parts installed correctly, that's going to save you time and money. Thank you and enjoy the video.
In this video we'll be replacing a mirror on this 2003 Chrysler Voyager. Same procedure as any 2001-2007 Caravan, Voyager, and Town and Country. The only tools you'll need are a T27 Torx driver and a small flat blade screwdriver.
Okay, you have your voyager set. Your mirror wants to fight with a garage puller or something like that and you need to replace it. So, pretty easy. Take your little screwdriver here, about an inch down. Work it in between and that starts to pull out like that. Okay, then you actually pull... let's put the screwdriver down here. Keep your fingers on in there and you kind of work this up, pull it up and off.
Okay, we'll put that right there. Here's that T27 Torx screwdriver and there's two screws right here. We'll remove those and then the last screw ... I'll hold it up here to show you and right here your last torque screw, okay? It's right in there. So, you remove those three screws and the mirror comes off. I've taken out this screw and the bottom screw. I'll just pull this last one out. Okay, you can see it comes right off. Okay, so you can see this is a new mirror from 1A Auto and this is the original mirror. You can see that it's going to bolt right up there, no problem. There's a nice thick foam gasket. Upside down but, you know, everything looks the same. The mirror that I grabbed is a power heated mirror and this van has manual. If you did have a power mirror obviously you need to unplug it as you pull it out. You can see there's a little front tab so you want to press down on that and then work it out the harness that's in the vehicle.
The new aftermarket, it's all designed the same way. It has the plate that would snap in place, it all looks the same. It looks just like the original, okay. Now we are going to put this original one back on because this van doesn't need a replacement. Just trying to illustrate how you do it. Okay, we'll take the mirror and you want to put it down in behind the fender here. I generally start with this top one first. Just get it in there started then we'll get the other two and get it started. Then we'll tighten it up.
I've got my screw bolts in and as you tighten up, kind of hook it up into place. We'll tighten that up. I'll push that a little bit. We'll tighten that up. Down here another one, tighten that one up. Then we'll close this door and then, same thing, slide this down into place. Okay, that goes in. Oops, I missed this one so pull it out here. It's not going to be perfect every time for sure. Now, I've got it in place. There we go.
Brought to you by 1AAuto.com. Your source for quality replacement parts and the best service on the Internet. Feel free to call us toll free 888-844-3393, the company that's here for you in the Internet and in person. Thank you.
MRA05259
In Stock
Product Reviews
Loading reviews
4.89/ 5.09
9 reviews
5 Stars
4 Stars
3 Stars
2 Stars
1 Star
8
1
0
0
0
Simple for a novice
Lindsay
March 19, 2017
As someone with zero skills or knowledge with car maintenance, I took a chance when ordering this part after I destroyed my passenger wing mirror while pulling out of my garage in a rush. The price was at least half of what I would've paid if I ordered the part from a place in town, and the quality seems just as good. I utilized the YouTube video tutorial, which helped for the most part. I did have to look elsewhere for information on how to access the electrical wiring, since my mirror required it. That was a super important step that would be helpful to include on your YouTube channel. Otherwise, the ordering process was seamless, delivery was very quick and I was able to install the new mirror on my own with help from YouTube. I saved tons of money and I'm very happy with my experience. Thank you!
Mirror Works Great
V
June 29, 2017
The mirror works perfectly, and the video instructions made it an easy install.
Outside mirror for 2006 Dodge grand caravan
G
November 10, 2017
Part was easy to order and at a low price. The part was delivered as promised in good condition. Thanks
Great service
Ronald
January 9, 2018
Everything worked out well. The mirror looked exactly like the original and was easy to install.
The mirror motors are powered by the A/C clutch circuit while the heater is powered by the rear window defrost circuit. I hope that this tidbit of information helps someone. I had previously disabled the A/C clutch by pulling fuse #18 and never had occasion to adjust the mirror until it got replaced. It took some digging to figure out why the new mirror would not respond. The A/C clutch now is disabled by removing the A/C clutch relay and the fuse is in place to power the mirror motors.
OEM Perfect
Shane
January 28, 2018
Save about $400 by watching the online video and doing it myself. Perfect OEM match. This allowed me to bypass the dealerships and auto body shops. Thanks again 1A. You are A number 1.
Great product
seth
February 6, 2018
Shipped fast. showed up in great condition. Fit perfectly. The website even had a video of how to install it which was helpful.
Side view mirror
Tammy
February 15, 2018
My order was delivered on time. I watched the video but since mine was electrical, I had to search for a video that actually showed how to get to the connector. Once I found that, installation was easy and I saved myself $$ doing it myself.
2007 Town & Country
M
October 12, 2019
Perfect fit, easy installation.
1aauto rocks
Steve
March 10, 2021
Hey folks if you are looking for friendly folks to assist you in most parts I would highly recommend this company. I am not a spokesperson for them but have purchased many items for various vehicles - and I have to say, very impressed with them so far.
The item - mirror in which I purchased fits like a glove and to me is no different then others who are selling for more money elsewhere. Bottom line, each of there products are equally as good as others in the market in my humble opinion.
So do yourself a favor and give them a try, youll not only be impressed but the savings alone will put a smile on your face.
Customer Q&A
Does it matter if current mirror not heated (will plug fit)?November 8, 2017
Donn U
10
The mirror options need to be a 100% match to the options supported by your vehicle, otherwise, the electrical connections will be different and the mirror will not fit or function properly.
November 9, 2017
A P
Is it CAPA certified?February 28, 2020
Dollie S
10
Hi, don't know if it's certified, but it mounted like a charm and functions perfectly. Quality like own party.
February 28, 2020
B I
10
Hello,
This part is not CAPA certified. They are made to factory spec and guaranteed to fit and function like the factory parts. Thanks!
February 28, 2020
Adam G
Does this mirror retain the heated defrost and memory settings the OEM has?May 2, 2022
Tom T
Customer service
877-844-3393
Monday - Friday 8:00am - 9:30pm ET Saturday - Sunday 8:00am - 4:30pm ET
Dodge is a registered trademark of FCA US LLC. 1A Auto is not affiliated with or sponsored by Dodge or FCA US LLC.See all trademarks.
Enter Vehicle Year Make Model
Specify your vehicle's year, make and model to guarantee fit.
Year
Make
Model
Options
Drivetrain
This part doesn’t fit a . Select from parts that fit.