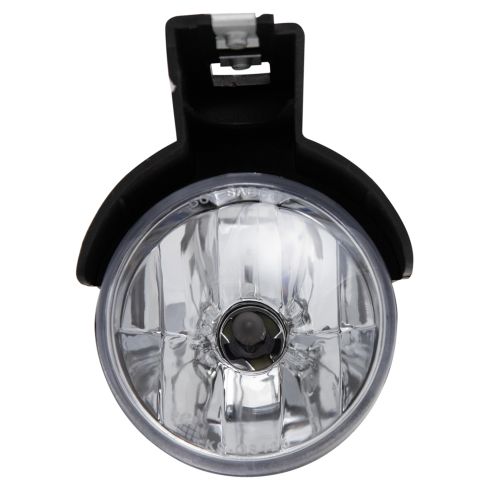
Complete Repair in One Purchase - Stop searching for parts individually and complete your repair with a customized kit or set from DIY Solutions.
High-Quality Parts from Trusted Brands - DIY Solutions' kits and sets are selected from the best automotive brands and include hard-to-find and even obsolete parts you may need for your vehicle.
Guaranteed Fit - DIY Solutions ensures its selected parts are quality-tested to guarantee fit and function.
Assemblies may include halogen or incandescent test bulbs that should be replaced before installation.
Features and Benefits
Direct Fit - No vehicle or wiring modification necessary
DOT, SAE, and FMVSS Compliant - Meets on-road use regulations
Matching set for a restored look
Item Condition:New
Attention California Customers:
WARNING: This product can expose you to chemicals including Chromium (Hexavalent Compounds), which is known to the State of California to cause cancer, and birth defects or other reproductive harm. For more information, go to www.P65Warnings.ca.gov
Lifetime Warranty
This item is backed by our limited lifetime warranty. In the event that this item should fail due to manufacturing defects during intended use, we will replace the part free of charge. This warranty covers the cost of the part only.
How to Replace Fog Driving Light 1998-2000 Dodge Durango
Created on:
Tools used
T10 Torx Driver
Socket Extensions
10mm Socket
Ratchet
1. To change the bulbs
Under the bumper you can access the assembly.
Unplug the wiring connection.
Untwist the bulb.
2. Remove the headlight assembly.
Remove the T10 Torx screw between the parking and headlight.
Pull the parking light assembly out and disconnect the bulbs.
Remove the three 10 mm bolts now exposed.
Unclip the headlight assembly and transfer the clip back onto the vehicle.
3. Remove the fog light assembly
Now you can access the two 10 mm bolts at the top of the fog light assembly.
Remove the fog light.
4. install the new fog light assembly
Put the assembly into place.
Mount with the two 10 mm bolts.
Plug in the bulbs and wiring harness.
5. Install the headlight assembly
Plug in the wiring harness and bulbs.
Clip the headlight in and bolt the headlight in with your socket and ratchet.
Plug in your three bulbs and mount your parking light.
Secure with the T10 Torx screws.
Brought to you by 1AAuto.com, your source for quality replacement parts and the best service on the internet. Hi, I'm Mike Green. I'm one of the owners of 1A Auto. I want to help you save time and money repairing or maintaining your vehicle. I'm going to use my 20 plus years experience restoring and repairing cars and trucks like this to show you the correct way to install parts from 1AAuto.com. The right parts, installed correctly. That's going to save you time and money. Thank you and enjoy the video.
In this video we're going to show you how to service a fog light and as well as we're going to show you how to replace one if you have a broken lens or a broken assembly. If you're just replacing a bulb you don't need any tools, but if you're replacing the entire fog light assembly you will need a T10 Torx driver as well as a 10 mm socket and ratchet and an extension as well. If you're just looking to replace the bulb you can access the back of the fog light right here. You can see this truck actually has an after-market light mounted onto it. I just kind of took that out of place so I could do this video and I put a good OE style light in here. Obviously to replace the bulb you would have a harness connection right on here. You just kind of pull the tab down and off and then the bulb just twists and comes out and then goes back in and twists. If you want to change the whole fog-light assembly if it has been broken or something like that the easiest way is to remove your whole headlight assembly which is not that difficult.
You start with a T10 Torx driver and there's a small screw right under here. Remove that screw and then pull out on your assembly and then there's a couple of rubber pins right here. Just pull those off. Pull out on your assembly and then in behind over here there's a connector that you twist and it pulls out and then pull it out some more and you've got two more bulbs here that twist and pull out and twist and pull out. Now you have three 10 mm bolts. One right down here. Fast forward a little bit here. So you remove that one then there's one under the inboard side of the headlight and then one kind of back between the radiator and the headlight. There's actually a clip right there that you need to pry out. There's a little clip and there's a little ball and socket. I just push the clip back into the hole and then disconnect your headlight. Now, with the headlight out you can actually see down in her and right there those two bolts and then those two 10 mm bolts right there are the bolts for the fog light. You would undo those.
Take the headlight out. It's pretty easy with your 10 mm ratchet and socket. Okay and let me fast forward here a little bit through removing those two 10 mm bolts. ... bolt back and twist and your fog light will come out. Obviously you put it back up in and twist and look right down. Okay, again here I'm going to fast forward for you. I'm putting those two bolts in by hand and then tightening them up with the socket and ratchet, and you want to have them nice and tight and firm and then we'll get back to putting the headlight in and get you back on that road..Now we can put our headlight back in, connect it first. Pull these out and make sure that you have this bulb out like that. Push it up in, get that ball and socket in the right spot. Okay, I'm just going to hit the fast forward button again. Make sure you put those three 10 mm bolts in. One note here is lift up on your headlight while you're tightening up those bolts so it makes the line nice and tight up at the top. Then put in your three bulbs and sockets and reinstall the parking light assembly and you're all set.
We hope this helps you out. Brought to you by www.1AAuto.com, your source for quality replacement parts and the best service on the internet. Please feel free to call us toll-free 888-844-3393. We're the company that's here for you on the internet and in person.
LHT09922
In Stock
Product Reviews
Loading reviews
There are no reviews for this item.
Customer Q&A
No questions have been asked about this item.
Customer service
877-844-3393
Monday - Friday 8:00am - 9:30pm ET Saturday - Sunday 8:00am - 4:30pm ET
Enter Vehicle Year Make Model
Specify your vehicle's year, make and model to guarantee fit.
Year
Make
Model
Options
Drivetrain
This part doesn’t fit a . Select from parts that fit.