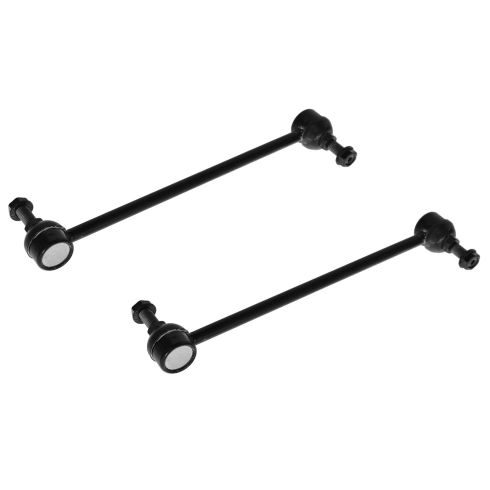
Kit Includes: (1) Front Passenger Side Sway Bar Link (1) Front Driver Side Sway Bar Link
Quantity: 2 Piece
Specification
Side Location
Driver & Passenger Side
Location
Front
Our steering and suspension components are pre-greased and sealed for long life and do not require the extra maintenance typically required by greaseable versions.
Item Condition:New
Attention California Customers:
WARNING: This product can expose you to chemicals including Lead and Lead Compounds, which are known to the State of California to cause cancer, and birth defects or other reproductive harm. For more information, go to www.P65Warnings.ca.gov.
Lifetime Warranty
This item is backed by our limited lifetime warranty. In the event that this item should fail due to manufacturing defects during intended use, we will replace the part free of charge. This warranty covers the cost of the part only.
FREE Shipping is standard on Orders shipped to the lower 48 States (Contiguous United States). Standard shipping charges apply to Hawaii, Alaska and US Territories. Shipping is not available to Canada.
Expedited is available on checkout to the United States, excluding Alaska, Hawaii and US Territories as well as P.O. Boxes and APO/FPO/DPO addresses. Final shipping costs are available at checkout.
How To Replace Sway Bar Link 1996-2007 Chrysler Voyager
Created on:
Tools used
Rust Penetrant
Lug Wrench
5/16 Inch Allen Wrench
3/4 Inch Wrench
1. Remove the wheel
Loosen the lug nuts with your lug wrench.
Raise and secure the car.
Remove the lug nuts and remove the wheel.
2. Remove the stabilizer link
Spray the bolts with penetrating oil
Use a 5mm Allen wrench and an 18 mm wrench to remove the nut and bolt on the stabilizer link.
Repeat on the bottom.
Use a Sawzall to remove the stabilizer link if it is rusted on there.
You can rent a Sawzall at a home improvement supply store.
3. install the new stabilizer links
Put the stabilizer link in place and use your wrench to bolt the locking lug nuts on.
4. Put the wheel back on
Hand-tighten the lug nuts and then lower the car.
Refer to the owner’s manual to torque the lug nuts to the correct ft lbs.
Use a star pattern.
Brought to you by 1AAuto.com, your source of quality replacement parts and the best service on the internet.
Hi, I am Mike Green. I am one of the owners of 1A Auto. I want to help you save time and money repairing and maintaining your vehicle. I am going to use my 20 plus years experience restoring and repairing cars and trucks like this to show you the correct way to install parts from 1aauto.com. The right parts installed correctly that's going to save you time and money. Thank you and enjoy the video.
In this video we will be replacing the stabilizer link on this 2003 Chrysler Voyager. This is the same as any 1996 to 09 Caravan, Voyager and Town and Country. The tools you will need for this are a set of Allen wrenches 1/4 to 5/16, 3/4 or 18 mm wrench and a socket wrench or lug wrench to remove your wheel. Depending on the year and whether or not your stabilizing links have already been replaced you may have slightly different sizes so we didn't specify each size for the wrenches.
Ok, first you need to raise your car and secure it. Always follow the safety instructions on the jack and the jack stem or the lift and I am going to remove the front wheel. Our problem is actually right here. Now that you have the wheel off, there is two bolts that hold this stabilizer link on right here. I am going to spray it with a good amount of penetrant. Here is the bottom of the link and I am going to bring it around to the side here. You can see the bolt I have actually already spread that one with some stuff. Once you have the bolts sprayed down. You are going to use an Allen wrench and this is a five mm wrench. That is the right one. I believe that's about the right one.
Probably from about 1/4 inch to 5/16 or five mm and then the wrench is anywhere from 18 mm this is actually, this car may have had this replaced before. Then if you are lucky enough, the top comes off pretty easy. You have to hold the Allen wrench while you twisting it off. You see there, it spins if you don't hold it. Now the bottom- you actually put your Allen wrench right up through this little hole in the control arm and then first you got to put your wrench on. Again this one is 3/4 but it may be a 18 mm and then put it up through there. One of the first turns is that you turn it goes by itself and once that other starts spinning you got to work that Allen wrench in there and hold on to it.
Then in my experience, if you are doing this on Northeastern rustbelt car what you are going to want to have ready is a Sawzall. You can easily enough saw right here and right through. As long as you have a new blade on here probably take about 30 - 35 seconds just to get right down through and saw that off. Because most of the time what happens is this is so rusty it won't come apart. If it was necessary up here at the top you can do the same thing, run your saw blade right through here, or if you are lucky enough you may have torch or something. A Sawzall can be rented at a place like a Home Depot or a Lowes. What I would do is when you are ready to do this project try just getting it apart with the wrenches first, but have a plan. Call your Home Depot make sure they have one of these available to rent. If you can't get it apart with the wrenches, hop over to the Home Depot, rent the saw for a couple of hours and make sure you put a new blade on it and you will go right through and get it right out.
Now I am going to remove the old one and get ready to put the new one back in. As you can see I got this hooked off and of course the locking nuts it is kind of can be a pain to the last. It's actually gotten more difficult to remove it. There is the link and what happens is there is a nylon inside and it ends up wearing out and going bad and then they start knocking, if you start hearing a clunk or vibration when you go over a pot hole. That is probably what it is. One way to really tell is if you are turning and you go over bumps and you don't hear the sound as much that is a good indicator that these are the problem. Because when you are turning you are actually putting pressure on these and you eliminate their ability to vibrate and clunk. Basically if you are driving straight and you hear clunking when you go over bumps try listening for that clunking when you are taking a slight curve. If you don't hear it as much, then it is your stabilizer links.
Take your new link from 1A Auto then it goes right there where the old one is and then all you have to do is the same drill. Just use your Allen wrench and your wrench and tighten them up. When we get them on, we will tighten them up. Same thing is to put your wrench on, use your Allen wrench. Go ahead and tighten them on. Get them on pretty tight. You can actually once it is in there tight you can use your wrench really tighten them up. Tighten up the bottom one really good. Put the wheel back on and it is ready to go.
Brought to you by www.1AAuto.com, your source for quality replacement parts and the best service on the internet. Feel free to call us toll free at 888-844-3393. The company that is here for you on the internet and in person. Thank you.
PSA55688
In Stock
Product Reviews
Loading reviews
4.56/ 5.016
16 reviews
5 Stars
4 Stars
3 Stars
2 Stars
1 Star
13
1
1
0
1
Always fast and correct!
darrell
March 17, 2017
I have used 1A Auto for some time now and have not had any issues.
Product as described,reasonable price and always shipped fast.
Thank you.
Very satisfied
David
April 13, 2018
Products came very fast and was installed with no problems
Very happy
Worked great saved a lot!
S
April 16, 2018
Repair shop wanted $75 Each! Plus $150 each for installation. Call me crazy, but I like 26 bulks and an hour of my weekend any day.
I will use A1 for everything they sell from now on.
Excellent Service
F
April 21, 2018
I would have given a 5 star but received the wrong part the first time, box was mislabeled, and they corrected in a timely manor. Very polite on the phone!
Very pleased customer
Jessie
April 23, 2018
Described correctly, shipped quickly, easy process. Very pleased that we also saved $ ordering online.
perfect
I
April 9, 2019
They fit perfectly and showed up on the second day, just as advertised. I wish they had grease fittings, but that isn't a knock.
Awesome!!
C
September 13, 2019
we love A1 auto!! Great prices for quality parts
Xuan
October 22, 2019
Take care of the noise quality good , cheaper than local stores
Perfect fit.
Joe-
January 12, 2021
Great part. Stopped the knocking and wandering in the front end of a 2009 Chrysler Town & Country van. Remember to heat the nylon nuts on the old ones before you change them. I I broke a torx bit trying to remove them without melting the nylon first.
Timely delivery and a direct fit
Walter-
April 14, 2021
1A auto has saved me hundreds of dollars on quality replacement parts. There step by step repair videos have allowed me to tackle jobs I never would have in the past. The sway bar link set has leveled my van out, and tightened my steering. very happy
Cecilo
June 19, 2023
Fixed right but I have had to replaced after 6 months
One of the end links has two extra spot welds on either end giving it a more secure or solid looking connection there (see photos) We'll see how they hold up I just installed them...
Customer Q&A
show me the how to video ?January 3, 2017
Dale H
10
The "how to video" is actually located on this page. Simply click the blue "play" button in the picture row, and the video should start.
January 3, 2017
Tim K
Customer service
877-844-3393
Monday - Friday 8:00am - 9:30pm ET Saturday - Sunday 8:00am - 4:30pm ET
Ram is a registered trademark of FCA US LLC. 1A Auto is not affiliated with or sponsored by Ram or FCA US LLC.See all trademarks.
Enter Vehicle Year Make Model
Specify your vehicle's year, make and model to guarantee fit.
Year
Make
Model
Options
Drivetrain
This part doesn’t fit a . Select from parts that fit.