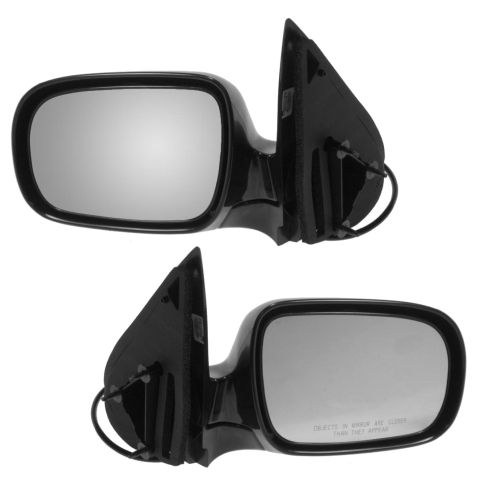
Direct Bolt-on Replacement: No modifications for an easy install
DOT Certified: Built to the highest quality standards
Complies with federal safety standard FMVSS-111
Matching set for a renewed appearance
Description
TRQ side mirrors and mirror components are designed to match the function, fixture, and performance of the original version for easy installation. TRQ mirrors are DOT certified, comply with all federal safety standards, and are independently lab tested to ensure our products comply with all government regulations. All products are fit and road-tested in our Massachusetts R&D facility to ensure we deliver on our promise of Trusted Reliable Quality.
Exact fit - To obtain proper fit and function confirm your vehicle has the exact mirror options listed.
Paint To Match Note:
"Paint-to-match finish" refers to a smooth, paintable surface. This item is not painted. Paint offers better coverage and adhesion, but it is not necessary for installation.
Attention California Customers:
WARNING: This product can expose you to chemicals including Lead and Lead Compounds, which are known to the State of California to cause cancer, and birth defects or other reproductive harm. For more information, go to www.P65Warnings.ca.gov.
Lifetime Warranty
This item is backed by our limited lifetime warranty. In the event that this item should fail due to manufacturing defects during intended use, we will replace the part free of charge. This warranty covers the cost of the part only.
FREE Shipping is standard on orders shipped to the lower 48 States (Contiguous United States). Standard shipping charges apply to Hawaii and Alaska.
Shipping is not available to a P.O. Box, APO/FPO/DPO addresses, US Territories, or Canada for this item.
Expedited is available on checkout to the United States, excluding Alaska, Hawaii.
Final shipping costs are available at checkout.
How to Replace Side View Mirror 1997-2005 Chevy Venture
Created on:
Tools used
Socket Extensions
Flat Blade Screwdriver
10mm Socket
Ratchet
1. Removing the Door Panel
Pry up the switch panel.
Disconnect the harnesses from the switch panel.
Pry out the door handle bezel.
Remove the two 10mm screws (Under the door pull and behind the removed bezel).
Pull the clips out around the door panel.
2. Removing the Side Mirror
Pull back the water shield.
Disconnect the mirror harness.
Remove the three 10mm nuts.
Pull the mirror out and off.
3. Replacing the Side Mirror
Run the harness down through the door.
Line up the mirror and push it back into place.
Replace the three 10mm nuts.
Reconnect the mirror harness.
Replace the water shield.
4. Replacing the Door Panel
Line up the door panel and push the clips in around the door panel.
Replace the two 10mm screws.
Replace the door handle bezel.
Reconnect the harnesses to the switch panel.
Press the switch panel down into place.
Brought to you by 1AAuto.com. Your source for quality replacement parts and the best service on the internet.
Hi, I'm Mike Green. I'm one of the owners of 1A Auto. I want to help you save time and money repairing and maintaining your vehicle. I'm going to use my 20+ years of experience restoring and repairing cars and trucks like this to show you the correct way to install parts from 1AAuto.com. The right parts installed correctly, that's going to save you time and money. Thank you and enjoy the video.
In this video, we're going to show you how to replace the driver's side mirror which is pretty much the same as replacing a passenger side mirror on this '99 Venture in the same process for most '98 or '97-05 Venture, Montana, Transport, Silhouette, the GM minivans. Tools you'll need are a flat-blade screwdriver and a 10mm socket and ratchet with extension.
First, you got to want to pry up this switch plate and then actually unplug the three connectors and I find it easiest just to kind of press on this black tab and then pry. This green one, kind of the same thing. Use a screwdriver, press on that tab, push. This mirror switch, there's a little tab right here, you need to pry back with your fingernail or a screwdriver and then pull the connector out. I've done that before so it looked kind of easy. That will require some force usually the first time. Now again with the screwdriver, we're going to pry out this bezel here and the door handle.
Now, there are two 10mm screws, one right in there and then one right down there. You need to remove those. Those are out. Now there are just a series of pins around the outside parameter and then two right in here that you need to pull out. You can either use a like putty knife or something to get it released. I actually just work my fingers right underneath up here and give a good tug, work it out further, give a good tug and work my way around the door and then it comes off.
You can see here your mirror is held on by three 10mm bolts. You want to just pull back. This right here is your mirror lead. There's a tab right there, probably the best thing. Let's see here. Just kind of squeeze in this clip to pull it out. Now, push that tab. Pull out the part and now we can remove these three. Okay and I fast forward through to removing those and those are 10mms nuts just like screws for the door panel.
There's your mirror. Here's my old mirror. New mirror from 1A Auto. As you can see it's all the same. Okay, plugs are the same and everything. It's going to go right in there with no problem. Just had a little knob for shipping purposes and actually, you could see there's nothing wrong with my old mirror. I'm just doing this to kind of show you how to do it but obviously, these get broken in parking lots or parking garages. We need to wire down first and make sure that wire doesn't get caught up anywhere. You can actually kind of reach in here, pull the wire down. Okay and just kind of speed it up as we reinstall those three 10mm nuts and you want to tighten up nice and firm. We don't want to go too crazy with tightening them. Put this in. Back up. Now, we put the door panel back on. Okay and I am going to speed up putting the door panel back on. Once you've taken it off, getting it on is pretty easy. You pin it back on and then put the two screws in, replace the bezel and replace the switch and you're pretty much all set.
We hope this helps you out. Brought to you by www.1AAuto.com. Your source for quality replacement parts and the best service on the internet. Please feel free to call us toll-free, 888-844-3393. We're the company that's here for you on the internet and in person.
MRA09109
In Stock
Product Reviews
Loading reviews
5.00/ 5.07
7 reviews
5 Stars
4 Stars
3 Stars
2 Stars
1 Star
7
0
0
0
0
2005 Chevy Venture mirrors
Mark
March 13, 2017
They fit and look good. Very fast shipping is a plus! Thanks!
Mirrors
Mike
January 8, 2019
Fit perfect...and a great price...thanks 1aauto...Ill be back
Awesome Mirror
M
August 1, 2020
Awesome Mirrors Unfortunately They Dont Fit My 1998 Pontiac PontiacFirebird!!!!
Thanks D. Winchester
Mirror set
Joan
April 4, 2021
I ordered and received a pair of side mirrors for my Montana. The shipping material including the soft bag the mirrors were slipped in had the items in excellent condition. Plus being able to watch the how to video makes it easier for when I install a new item.
Mirrors
JoAnn
April 7, 2021
Mirrors were packed really good, they are exactly what we ordered n wanted..
Paul
October 19, 2021
Excellent product and fast shipping. Thanks again
AMAZING!
randy
September 8, 2024
jUST LIKE ORIGINALS! EASY ORDER. EASY SHIP. EASY INSTALL.OBJECTS DO NOT OCCULATE IN THESE MIRRORS.
Customer Q&A
No questions have been asked about this item.
Customer service
877-844-3393
Monday - Friday 8:00am - 9:30pm ET Saturday - Sunday 8:00am - 4:30pm ET
Pontiac is a registered trademark of General Motors Company. 1A Auto is not affiliated with or sponsored by Pontiac or General Motors Company.See all trademarks.
Enter Vehicle Year Make Model
Specify your vehicle's year, make and model to guarantee fit.
Year
Make
Model
Options
Drivetrain
This part doesn’t fit a . Select from parts that fit.