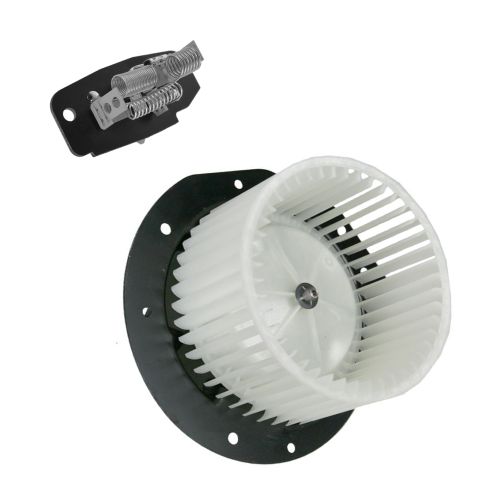
Kit Includes: (1) Heater Blower Motor (1) Heater Blower Motor Resistor
Specification
Vehicle Heating & A/C Option
with Factory Installed Air Conditioning
with 250 Degree Thermal Limiter
Highest Quality Materials
Made from highest quality materials that meet or exceed OEM standards
Quality Tested - built to a strict level of product standards.
Item Condition:New
Attention California Customers:
WARNING: This product can expose you to chemicals including Di(2-ethylhexyl)phthalate (DEHP), which is known to the State of California to cause cancer, and birth defects or other reproductive harm. For more information, go to www.P65Warnings.ca.gov.
Lifetime Warranty
This item is backed by our limited lifetime warranty. In the event that this item should fail due to manufacturing defects during intended use, we will replace the part free of charge. This warranty covers the cost of the part only.
Returns: Parts with electrical components cannot be returned once installed.
FREE Shipping is standard on Orders shipped to the lower 48 States (Contiguous United States). Standard shipping charges apply to Hawaii, Alaska and US Territories. Shipping is not available to Canada.
Expedited is available on checkout to the United States, excluding Alaska, Hawaii and US Territories as well as P.O. Boxes and APO/FPO/DPO addresses. Final shipping costs are available at checkout.
How To Replace AC Heater Blower Fan Motor 1980-96 Ford F150 F250 F350
How to Replace HVAC Blower Motor Assembly 1992-1996 Ford F-150
Created on:
Tools used
Razor Blade / Gasket Scraper
Ratchet
5/16 Inch Socket
1. Removing the Blower Motor
Disconnect the blower motor wiring harnesses
Unclip the top wiring connector from the blower motor
Remove the four 5/16 inch bolts from the blower motor
Pull out the blower motor
Pull the vent tube off the blower motor
Peel off the blower motor gasket, using a razor if necessary
2. Installing the New Blower Motor
Line up the new blower motor gasket
Expose the gasket adhesive by pulling off the backing paper
Stick the gasket in place
Attach the vent tube to the new blower motor
Push the new blower motor into place, using the locating tabs
Start the top 5/16 inch bolt
Put the wiring harness clip into place
Insert the 5/16 inch bolt into the wiring harness clip
Start the remaining 5/16 inch bolts
Tighten the four 5/16 inch bolts
Connect the blower motor wiring harnesses
Clip the top wiring harness into place
Brought to you by 1AAuto.com, your source for quality replacement parts and the best service on the Internet.
Hi, I'm Mike from 1A Auto. I hope this how-to video helps you out, and next time you need parts for your vehicle, think of 1AAuto.com. Thanks.
In this video we're going to show you how to replace the heater and A/C blower motor on this 1996 Ford F150. This procedure is the same for many F150s, F250s, F350s and Broncos from the '80s through the '90s. The only tool you're going to need is a 5/16 inch socket and ratchet. You may also need a razor blade and you'll, for sure, need a new motor from 1AAuto.com.
Your heater blower motor is tucked right down in here. This is the passenger's side of the engine compartment. Take these two hoses and push them over. There are a couple of connections. You just pull back on the tab with your thumb, probably work the connection out a little bit, right there. Then, for this connector, push down on the tab here. Try to flex it back a little bit. Break the plastic part of it free. Push down. Disconnect that. Pull this little pin that hooks this connector in here. Pull that out. Now you have a pretty clear view of your motor and there are four bolts: one here, one down here, one under this clip here, and one down here. These bolts are 5/16 inches. We're just going to use a socket, a 5/16 inch socket and a ratchet. I'm going to fast forward here as I remove those four bolts. They are fairly easy to get out. You do have to just get your wrench down in there and just make sure on the outer upper one where there is that clip that the connector hooked into, just make sure that you don't drop that clip or lose any of them and be careful not to drop any of the bolts. If you do happen to drop one, they usually just fall right down onto the inner fender and then kind of bounce out the back. Underneath here, there's a hose that you'll feel. Pull that off. You'll probably have to break the motor free somewhat. Pull that out. Just make sure you pull the gasket free. If there's any gasket remaining behind on the heater housing, pull it free and clean it with a razor blade if necessary to get any other gasket off.
A new motor from 1A Auto comes with a new gasket. I'm going to reach in here and fit it on. I'm going to make sure I know the right way and remove the backing. Make sure it goes on to the pins. You can see the holes where the bolts go. Stick it right on. Here's a new motor. I pulled the vent tube from the old motor. Put the vent tube in like that. Push everything out of the way here. Push the motor right down in. The lineup tabs go in place. We'll start this first upper screw, right here, the easiest one. This one, here, has the little bracket for the wire harness. Start all four bolts in place first. Here, again, I'm going to use some fast forward. Again, I start all four of the bolts in place at first and then I go through, and kind of snug them up one by one and make sure there are no wires getting pinched in there or anything like that. Then tighten them up the rest of the way. Bring this one over. Mount it back there. Reconnect. Reconnect our main lead to the motor.
We hope this video helps you out. Brought to you by www.1AAuto.com, your source for quality replacement parts and the best service on the Internet. Please feel free to call us toll-free, 888-844-3393. We're the company that's here for you on the Internet and in person.
Tools used
1/4 Inch Ratchet
Gloves
Socket Extensions
3/8 Inch Drive Ratchet
5/16 Inch Socket
Trim Tool Set
Safety Glasses
HMA80244
In Stock
Product Reviews
Loading reviews
5.00/ 5.04
4 reviews
5 Stars
4 Stars
3 Stars
2 Stars
1 Star
4
0
0
0
0
Great packaging, great parts!
Shawn
July 28, 2021
The parts arrived in great shape and were exactly what I needed. I got them installed and so far they are working great!
[{"url": "https://wac.edgecastcdn.net/001A39/prod/media/pNISJll75W64CYGsite/3b0e1fb63697af0a6af5992d33a8a2c9_1671914114313_0.jpeg", "caption": "Fit was a little tight, but simple install. Fan speed seems a little slower than OEM, but works."}, {"url": "https://wac.edgecastcdn.net/001A39/prod/media/pNISJll75W64CYGsite/bcf563071670a078c22da8ee3ee14114_1671914670878_0.jpeg", "caption": "A little buried in there, but easy enough."}]
j
December 24, 2022
Works.
Works great thz
Melvin
January 7, 2023
Works great easy to install after watching video thx for having parts for older vehicles
Shawn
May 5, 2024
I ordered. They shipped. I installed. It works.
Customer Q&A
Does this blower come with a gasket?October 20, 2021
John D
10
There is no gasket included.
October 20, 2021
Jessica D
does that part was made in China?November 26, 2022
Frank C
10
DIY solutions brand parts are manufactured by various aftermarket companies specifically for us and built to your vehicle's exact OEM specifications.
November 28, 2022
T I
10
Believe so
December 24, 2022
J I
Customer service
877-844-3393
Monday - Friday 8:00am - 9:30pm ET Saturday - Sunday 8:00am - 4:30pm ET
Ford is a registered trademark of Ford Motor Company. 1A Auto is not affiliated with or sponsored by Ford or Ford Motor Company.See all trademarks.
Enter Vehicle Year Make Model
Specify your vehicle's year, make and model to guarantee fit.
Year
Make
Model
Options
Drivetrain
This part doesn’t fit a . Select from parts that fit.