Brought to you by 1AAuto.com, your source for quality replacement parts and the best service on the internet. Hi I'm Mike Green, I'm one of the owners of 1A Auto. I want to help you save time and money repairing and maintaining your vehicle. I'm going to use my 20 plus years experience restoring and repairing cars and trucks like this, to show you the correct way to install parts from 1AAuto.com. The right parts, installed correctly. That's going to save you time and money. Thank you and enjoy the video.
In this video we're going to show you how to replace a window motor on this 2003 Ford F-250 Super Duty, same as an '01 to '07, 250 or 250 Super Duty. One thing to note that often times when your window motor goes bad, it could be because parts of your regulator are going bad, so you may want to consider replacing your entire regulator. We have a video for that as well. Tools you'll need, 7mm, 8mm, 10mm, and 7/32 inch sockets with a ratchet and extension, flat blade screwdriver, vice-grips style, locking pliers, and some painter's tape.
To prevent your battery from running down while you have your door open, disconnect the negative cable. An alternative is you could just pull out your interior light bulbs that way you can keep the battery connected and still be able to run the window up and down when you need to. Using a small flat blade screwdriver, take this lens, pop it off; and mine is actually broken. It should pry out here, pop it off. Here you're going to do the same thing. You're going to just pull up your handle, you'll use your screwdriver a little bit; right in the front, pull that up. Pull it forward and then you disconnect all the harnesses. There's little push tabs on them, push on the tab with your thumb, pull the harness here, push on the tab. Your tab here, push on it to remove it. Same thing there, you just pull down this trim panel. It's got two clips that hold it on. Now there are two 7mm bolts, one right there and then one right there. 7mm socket with a ratchet and extension, a wrench would work as well. I'm going to fast forward as I just remove those two bolts. Once those two bolts are off just lift up on your panel and bring it out. Then in behind is your courtesy light, just turn it counter clockwise and pull the socket out, and your door panel comes off.
You want to remove your speaker too, and it's a 7/32 socket. Take the speaker out and then there's a little tab here, disconnect it. Remove your shield the rest of the way. I've got my switch plugged in and key on. Actually you can see that my motor and regulator are working just fine. What we'll do is we'll do the worst case scenario, which is if your motor or regulator breaks in the up position. Now disconnect your lead, it's right back here through the speaker. Just press and pull. Now remove these four bolts that hold the regulator and these two nuts that hold this track. I'm just going to fast forward as I remove the two nuts from the track. Then also I remove three of the bolts that hold the regulator bracket. I'll slow back down here as I start removing the last one. You just saw my window, the window actually slid down some; that's actually the regulator turning. I'm holding the window with one hand. Pull this back out and the whole thing comes down. Now you want to loosen two nuts, one there and then when the window is low enough you can see that one through there. Once you loosen those then the track just slides forward and comes off. Now with those loose the track slides forward. Be careful now that the regulator is basically free from the window. Now I can pull my window back up. I pull my window up. You can see I've got some painter's tape up here. Hold on, hold it in place for right now.
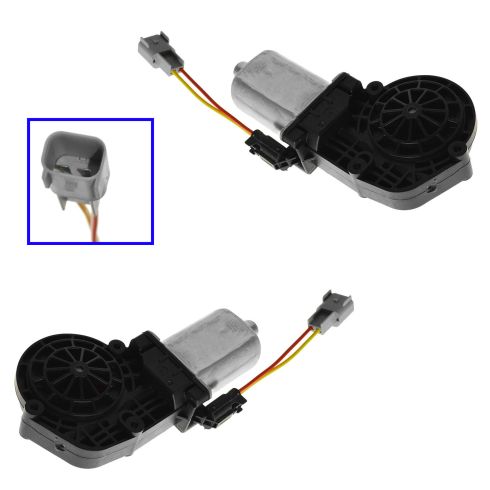
Right down here this comes out, it comes together. There's your regulator out. Now one thing you may want to check is make sure none of these are broken of worn out. If any of the mechanism is broken or worn out, you will want to replace the whole regulator as well as motor. To remove the motor from the regulator, what you'll want to do is actually remove this balance spring first, a pair of locking or vice grip style pliers. Put it on the end of this spring here, lock it on nice and tight. I just stand on the motor, pull the spring up, and then once it lets go carefully release it and take it off. Actually just leave your pliers right on it. Turn this over, three 8 mm bolts. I'm just going to speed it up here as I remove those three 8mm bolts. There's your motor off. It's a new motor from 1A Auto, you can see it's the same. It is maybe fit a few other applications so it does have this adapter harness. Just to make this plug the exact same as the old plug. I'm actually just going to take a little but of the grease of this old one put it right around, you don't really need much. It's all still pretty clean. Just a little bit of grease to make sure the gears mesh well. Put it right in. Make sure the holes are all lined up, this is on there.
Fast forward again here as I just start those 8mm bolts in and then tighten them with my ratchet and socket. These bolts are self-threading so they are, they're usually a little bit difficult as far as how much pressure or torque you have to use to put them in. That's on there now. Let's take our spring, with our foot on the motor. Turn it around, I'm really pressing down with my foot right now. Get that in there. Make sure the spring is right down where it should be. Start at all four of these bolts back in. Get that in. Bring the regulator up and get all these bolt, so here's one bolt through. What I'm going to do, is I'm going to reconnect my harness here. It's just held in place lightly. Reattach your window switch. Turn the key on and hook up the battery obviously if you need to. I'm going to move the regulator down some. That now allows me to easily put this into place. Also allows me to put this into place and tighten. I'm going to fast forward here. I start that nut on there and then tighten both the nuts for the track and then tighten all four bolts that hold the regulator and motor assembly.
Bring your regulator down. You can see this part here and you can see the mounting hole right through here. You can see where you mount the window on there and then that right there. Take the tape off, slide it down slowly. Now pull the track and the window together. Here make sure this is together. Now slide this back and tighten those up. I'm going to suggest that here since you have some extra length with this new harness, take your harness and just wrap it around this main harness here a couple times. Then connect these together. It gives it enough to get in behind the speaker but not interfere with the window at all. Now let's put this back together and do a test. Looks like everything works quite well. I'll speed up as I put the water shield back on. What I like to do is find one point where a screw goes through and you line up that point and go out from there. Then reinstall your speaker, make sure that you plug it in first, and then reinstall the four 7/32 bolts that hold it in place.
To reinstall your door panel what you want to do is take your bottom clips, and they're actually designed just to go on here and rest in place. You can reach down and put in your courtesy light and turn it clockwise to lock it in. Then make sure all these harnesses come up through. Press it against, life it up a little bit. Make sure your door lock comes through. Press it against. You lift it just up a little bit, push it in, and bring it down on to make sure your nice and tight against the door and nice and tight against the door over here. We'll speed it up again as I take those to 7mm screws put them in and then tighten them up nice and firm. Now I'm going to clip the molding on up top to cover the mirror mounting holes. Then take my switch panel, reconnect all my harnesses. Then I slide the tab back into the back first. I make sure the wires are getting pinched in there and then clip it down in place. It's all set. If you disconnected your battery then reconnect it and tighten the 8mm bolt.
We hope this helps you out. Brought to you by www.1AAuto.com, your source for quality replacement parts and the best service on the internet. Please feel free to call us toll free, 888-844-3393. We're the company that is here for you on the internet and in person.