Hi, I’m Mike from 1A Auto. We’ve been selling auto parts for over 30 years!
Remove the negative battery terminal using an 11 millimeter wrench. Remove the fuel filler neck with an eight millimeter socket and ratchet. Loosen the hose clamp of the vent hose. Hold these off of the middle lines.
If you need to use a metal pick and run it around the hose to help separate it from the metal tube, move the filler neck hose and get the vent hose off. Remove the vent hose from the tank with an eight millimeter socket and undo the hose clamp. Remove the hose. Normally this connector would be attached to the body or the frame somewhere, on ours it's broken off. We're going to use a flat bladed screwdriver, push this connector in, this tab down, and we're going to remove the connector from the fuel pump.
To remove the locks from the fuel lines use a long flat-bladed screwdriver to pop them off. Using a quick disconnect here from the line with the fuel line. We have the two pressure and return lines disconnected. Now we have to remove this vent hose here. Just has a spring clamp on it, but I will squeeze with some needle nose pliers and remove it. With everything at the top of the tank disconnected, now we're going to undo the tank straps. And at this point you should have someone here to help you.
This tank is pretty much empty. We’ve run it almost dry, so it should be pretty light, but you will want an assistant to hold one end while you hold the other end and undo the tank straps and lower it down. Okay. I'm loosening this tank strap. This one has a 13 millimeter bolt. This tank strap using a 17 millimeter bolt, just let that swing down out of the way. There it goes. Okay.
When you're working with gasoline, make sure you're working in a well-ventilated area. We’ve got the door open here in our shop. Before you remove the send unit form the tank, you're going to want to clean around the area. You don't want dirt and debris falling in the tank. I'm going to use a rag and brush everything that I can away from the opening. There's some stuck under here.
If it's really rusty you can use a wire brush and knock away any excess rust. We're lucky this tank is in decent shape, so I'm just going to clean any debris that's on the top. If you've got compressed air and a blow gun, now would be a good time to blow this off. If you don't, just wipe it as best you can with a rag or brush. Use the 10 millimeter socket and ratchet extension to remove the 10 millimeter bolts that are on top of the sending unit.
Once they're loose, I'm just going to use the socket extension. Put these bolts aside. We’ll re-use them. With the bolts removed the send unit will lift out of the tank. As you bring it up, let the fuel drain out of it. Have to feed the float out of there. Have a bucket ready to hold the old one.
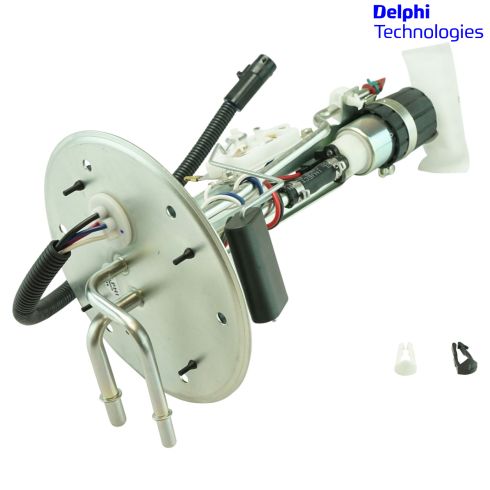
Here's our old fuel pump and sending unit that came out of our vehicle. This is our new one from 1AAuto.com. As you can see, they both have the floats for your level sensor, both come with in-tank screeners. This has the same style quick-disconnect lines. Same style electrical connector.
When you go to install it, you'll want to remove these protective caps that keep debris from going down here. For now I'm going to leave them in there until we install it in the vehicle, so that nothing goes down the tubes. This new one's a good match. That should keep your vehicle running.
Take our new sending unit and lower it into the tank. There's a dimple here on the tank that needs to line up with the arrow on the sending unit. When that arrow's lined up with the dimple, your bolt holes should line up. Re-install the 10 millimeter bolts. May have to just move it around a bit, get them to line up. We're going to tighten these down in a crisscross manner. Try to bring them down evenly.
Just going to go until they start to feel tight, then I'll stop. Just squishing that rubber gasket down. Alright, with an assistant helping me, lift the gas tank into position, we're going to go this way. And bring it back, alright, we can go up, straight up. Start bolting them in. This - I have to switch sockets to this one. Re-connect the pressure and return lines. Don't forget to remove your plastic caps.
These have their spring inside them, and when we go to release them to take them off we use a tool that goes in here, that spreads them open, you pull them off. When we go to re-install them they just clip back on. We're going to install the safety catches. Re-connect this vacuum hose. Squeeze the other with needle nose pliers. Re-connect our electrical connector. Re-install the filler neck hose. Work that over it. Okay. Hose clamp back. Eight millimeter socket to tighten it. Re-connect the vent hose. Re-install the hose clamp, eight millimeter socket and ratchet to tighten it. Re-connect the electrical connector. Re-install the rear vent hose, the spring clamp on this one is broken, so it has a low clamp. Eight millimeter socket, tighten it. With everything on the top of the tank re-connected, finish tightening down the tank straps. Re-connect the negative terminal. Cycle the key three times to prime the pump.
Thanks for watching. Visit us at 1AAuto.com for quality auto parts, fast and free shipping, and the best customer service in the industry.