WARNING: This product can expose you to chemicals including Lead and Lead Compounds, which are known to the State of California to cause cancer, and birth defects or other reproductive harm. For more information, go to www.P65Warnings.ca.gov.
Lifetime Warranty
This item is backed by our limited lifetime warranty. In the event that this item should fail due to manufacturing defects during intended use, we will replace the part free of charge. This warranty covers the cost of the part only.
FREE Shipping is standard on orders shipped to the lower 48 States (Contiguous United States). Standard shipping charges apply to Hawaii and Alaska.
Shipping is not available to a P.O. Box, APO/FPO/DPO addresses, US Territories, or Canada for this item.
Expedited is available on checkout to the United States, excluding Alaska, Hawaii.
Final shipping costs are available at checkout.
How To Replace Rear Disc Brake Pads and Rotors 2004-10 Ford F150
How to Replace Rear Brakes 2009-2011 Ford F-150
Created on:
Tools used
21mm Socket
Large C-Clamp
Hammer
Flat Blade Screwdriver
Torque Wrench
Jack Stands
Chisel
White Grease
10mm Socket
Ratchet
Wire Brush
Floor Jack
1. Removing the Wheel
Pry off the center cap with a flat blade screwdriver
Loosen the lug nuts with the vehicle on the ground
Raise the vehicle with a floor jack
Secure the vehicle on jack stands
Remove the lug nuts
Pull off the wheel
2. Inspecting the Brakes
Check for gouges on both sides of the rotor
Check the thickness of the brake pads
3. Removing the Brake Pads and Rotor
Remove the two 10mm bolts from the brake caliper
Pry the brake pads into the caliper with a flat blade screwdriver to push in the pistons
Pull the caliper aside
Pull the rotor off
Pry the brake pads off the caliper with a flat blade screwdriver
Clean the friction areas with a wire brush
Clean the slides with a wire brush
Pry off the brake pad slides with a flat blade screwdriver
Tap the slides on with a hammer
Apply white grease to the slides
4. Installing the Brake Pads and Rotors
Put an old pad in the caliper
Use a large C-clamp and the old pad to push the pistons back
Slide the rotor on
Adjust the emergency brake, if necessary, by turning the star wheel with a flat blade screwdriver
Install the new brake pads into the caliper
Put the caliper on
Thread the two 10mm bolts by hand
Tighten the 10mm bolts to 17 foot-pounds
5. Reattaching the Wheel
Slide the wheel into place
Start the lug nuts by hand
Tighten the lug nuts preliminarily
Lower the vehicle to the ground
Tighten the lug nuts to 120 foot-pounds in a crossing or star pattern
Reattach the center cap
6. Testing the Brakes
Pump your brakes repeatedly until they feel firm
Test your brakes at 5 miles per hour and then 10 miles per hour
Road test the vehicle
Brought to you by 1AAuto.com, your source for quality replacement parts and the best service on the Internet.
Hi, I'm Mike from 1A Auto. I hope this how-to video helps you out, and next time you need parts for your vehicle, think of 1AAuto.com. Thanks.
In this video, we're going to show you how to replace the rear brakes on this 2005 Ford F150. We show you on the passenger's side but the driver's side is the same procedure. The items you'll need for this is a new brake pads and rotor kit from 1AAuto.com, a 10 and 21mm socket and ratchet, a hammer, flat blade screwdriver, large C-clamp, wire brush, torque wrench, brake grease and jack and jack stands.
Pry off the hub cap and then remove these 21mm lug nuts and you just want to loosen them each up while the vehicle's still on the ground. Then you want to jack the vehicle up and support it and then remove the lug nuts the rest of the way. Then your wheel will pull free.
With your wheel off, you can do a quick inspection. You just want to feel with the back of your fingernails the rotor and you're just feeling for any deep grooves. You're going to have slight grooves. You can see the brake pads. Actually you can see them better right through here. There's the brake pad and then the rotor and the brake pad. You can see, actually, the rear brakes on this look fairly new but we're going to replace them anyways just to show you.
We'll remove these two 10mm bolts. A good idea, just to help you get it apart, take a large screwdriver or pry bar and you can just pry against the rotor and just do it slowly and easily. If you get a good enough grip, you can actually push the piston all the way back in, which is what you want to do. Then you want to pull the top up first and then pull that right off. Now the rotor will pull right off.
To remove your shoes, you want to remove the outer one first. Pry it with a screwdriver and just pull the shoe this way a little bit, pry out, and the inner one just pulls right out. These are the surfaces that your brake pads slide on and what can happen is, as these trucks age, this cast iron bracket, caliper bracket . water will get in between the bracket and slide and it will start rusting and that will cause these slides to actually expand a little bit and they'll seize your pads into the one spot and your brakes really won't work. First just clean the slide itself off with a wire brush and then we want to remove the slide. Just pry out these end tabs a little bit and now we want to wire brush the caliper bracket itself, as well.
I'm seeing just a little bit of scale here so I'm just going to take a chisel and if yours is in good shape, you don't have to worry about this but I'm just going to scrape it down some. Then there's two little indents here, the indents on the slide go to the outside, just put it in place. Then we're just going to put some brake grease on the slides. We've repeated the entire process for the slide up above it and then we're just going to apply some brake grease to that as well.
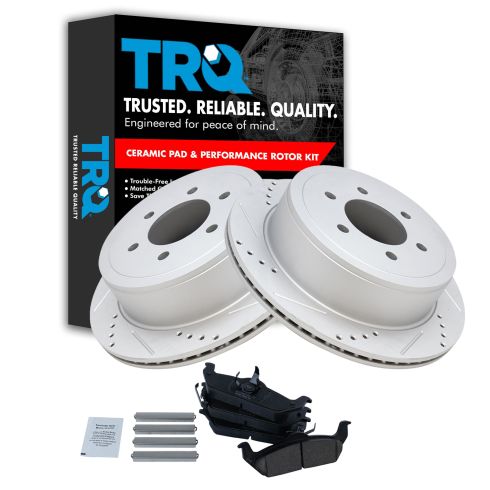
On the right, are the old brake pads and rotor. On the left, are the new ones from 1A Auto. You can see they're identical and they'll fit exactly the same.You want to push the piston back in. I was able to do that with a screwdriver at an earlier step but if you wanted to make sure, you could use a large C-clamp and take the C-clamp and press it back in. You can also just put your old brake pad in there for something for the C-clamp to be able to push on.
I'm putting my old brakes back on because as you saw they're in good shape and when you put the rotor on, make sure it goes on. You want a little bit of contact from the emergency brake shoes. You can see there's a lot of play so we're going to adjust the emergency brake shoes. On this side, we're going to go down and it's exposing more threads so that means it's pushing the emergency brake shoes out. The rotor still has quite a bit of play, so we'll continue to adjust it.
For the inner pad, again I'm using my original ones because they're in good shape. It goes into the caliper and then the outer one pushes in. Here you want to make sure these are nice and free, push them that way so it will go on. You might have to pull them out a little bit and they go right in. We'll just fast forward as Mike replaces those two 10mm bolts and tightens them up. Now torque both of those to 17 foot-pounds.
We'll fast forward as Mike replaces the wheel and then replaces those lug nuts and tightens them preliminarily. Then lower the vehicle and torque each of the lug nuts in a crossing pattern to 120 foot-pounds. Then just replace that hub cap.
After doing any work on the brakes, you just want to pump the brake pad until it firms up and then doing a stopping test from 5 miles per hour, then 10 miles per hour.
We hope this video helps you out. Brought to you by www.1AAuto.com, your source for quality replacement parts and the best service on the Internet. Please feel free to call us toll-free, 888-844-3393. We're the company that's here for you on the Internet and in person.
Just installed my new brakes and rotors, after watching the 1aauto video it took less than two hours . Had some trouble removing one rotor,but with some on blaster and elbow grease was able to remove it.
Working great
Pete
January 25, 2018
Shipment arrived quickly. Installation was easy and the brakes and rotors are doing great so far. Very happy with my purchase
Great
Jeff
May 12, 2018
Great product. Installed just as described. Fast shipping
Perfect
Doug
April 22, 2019
Fit perfect and worked great .Will buy from 1A-Auto in the future.
Great response time and shipping.
Brakes
Nolan
November 19, 2019
Every thing in the info.are spot on.
Brake kit
John
December 3, 2019
I purchased a brake kit .
The kit arrived in a timely fashion, as promised. Was an easy job, all the parts were exact fits .
I got what I ordered, it fit and it was a much better price than a brick n mortar store.
I will be buying from A1 again , will recommend
Great value for the money
Aaron
August 28, 2020
Everything fit perfectly they work great.
Great stuff great videos super fast shipping
Anthony
February 17, 2021
Really fast shipping! I think I got the stuff in two days and I ordered on a Saturday. Components are excellent. And the how to videos are perfect for me and my level of skill
vince
August 12, 2021
good all around
rotors
Brent
November 5, 2021
These rotors were added along with new calibers and pads. the whole package was priced very well and shipping was fast.
HECTOR
April 4, 2022
Good quality. I am no expert but it really seems as though vehicle stops better than before. I replaced all 4 rotors
David
June 6, 2022
Very good product fast shipping
Great set and great price
WILL
August 18, 2022
The rotor and pad replacements are great! Total improvement from what I was experiencing. The video tutorial was great to watch. It was cost efficient for front and rear sets altogether and I dont feel I sacrificed performance at all.
Ken
October 10, 2022
All parts fit perfectly with no installation issues, and the braking performance was noticeably improved - back to normal.
Customer Q&A
Will these work on a super cab f150 ?May 31, 2018
R O
10
They should. I used these on a crew cab f150. Drivetrain should be the same
June 12, 2018
Pete S
Customer service
877-844-3393
Monday - Friday 8:00am - 9:30pm ET Saturday - Sunday 8:00am - 4:30pm ET
Ford is a registered trademark of Ford Motor Company. 1A Auto is not affiliated with or sponsored by Ford or Ford Motor Company.See all trademarks.
Enter Vehicle Year Make Model
Specify your vehicle's year, make and model to guarantee fit.
Year
Make
Model
Options
Drivetrain
This part doesn’t fit a . Select from parts that fit.