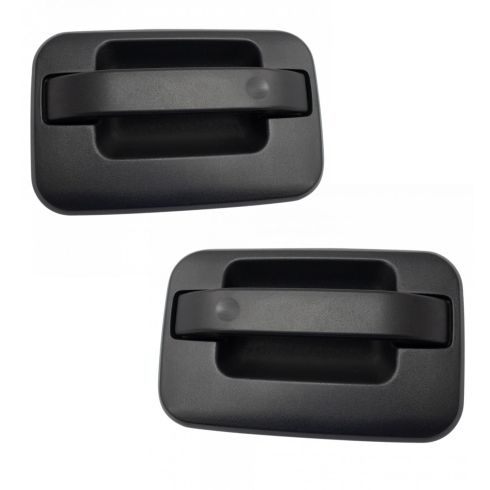
Kit Includes: (1) Rear Driver Side Exterior Door Handle (1) Rear Passenger Side Exterior Door Handle
Handle Color: Black
Quantity: 2 Piece
Finish: Textured
Specification
Side Location
Driver & Passenger Side
Location
Rear
Item Condition:New
Attention California Customers:
WARNING: This product can expose you to chemicals including Lead and Lead Compounds, which are known to the State of California to cause cancer, and birth defects or other reproductive harm. For more information, go to www.P65Warnings.ca.gov.
Lifetime Warranty
This item is backed by our limited lifetime warranty. In the event that this item should fail due to manufacturing defects during intended use, we will replace the part free of charge. This warranty covers the cost of the part only.
FREE Shipping is standard on Orders shipped to the lower 48 States (Contiguous United States). Standard shipping charges apply to Hawaii, Alaska and US Territories. Shipping is not available to Canada.
Expedited is available on checkout to the United States, excluding Alaska, Hawaii and US Territories as well as P.O. Boxes and APO/FPO/DPO addresses. Final shipping costs are available at checkout.
How To Replace Rear Outside Door Handle 2004-08 Ford F150
Created on:
Tools used
Flat Blade Screwdriver
5.5mm Socket
6mm Socket
8mm Socket
10mm Socket
7/32 Inch Socket
1. Removing the Door Panel
Pry off the trim piece inside the door handle with a flat blade screwdriver
Pry up the window switch panel with a flat blade screwdriver
Disconnect the window switch wiring harnesses
Pull off the side panel next to the window
Remove the 6mm bolt next to the window
Remove the two 8mm bolts inside the door handle
Remove the 10mm bolt inside the door pull
Remove the two 6mm bolts at the bottom of the door panel
Pry out the door panel
Lift the door panel up and off
Disconnect the latch cables from the door handle
Remove the 5.5mm or 7/32 bolts from around the speaker
Pull off the speaker
Disconnect the speaker wiring lead
Carefully peel off the water shield
2. Removing the Interior Door Handle
Remove the 10mm bolt from the door handle bracket
Pull out the door handle bracket
Unclip the latch rod
Pull the two rubber plugs out of the door
Remove the two 10mm bolts from the door handle
Remove the two 10mm nuts from the door handle
Lift the door handle up and out
Twist the latch rod out of the door handle
3. Installing the Interior Door Handle
Twist the latch rod into the handle
Push the door handle into place
Fasten the two 10mm nuts onto the door handle
Insert the two 10mm bolts into the door handle
Push the two rubber plugs into the door
Clip the latch rod into place
Put the door handle bracket into place
Insert the 10mm bolt into the bracket
4. Reinstalling the Door Panel
Put the water shield into place
Insert the 5.5mm or 7/32 bolts around the speaker
Connect the speaker wiring lead
Put the speaker into place
Connect the latch cables to the door handle
Lift the door panel into place
Push in the door panel clips
Insert the two 6mm bolts at the bottom of the door panel
Insert the two 8mm bolts inside the door handle
Insert the 10mm bolt inside the door pull
Insert the 6mm bolt next to the window
Connect the window switch wiring harness
Push in the switch panel
Push on the trim piece inside the door handle
Push on the trim panel next to the window
Brought to you by 1AAuto.com, your source for quality replacement parts and the best service on the Internet.
Hi, I'm Mike from 1A Auto. I hope this how-to video helps you out, and next time you need parts for your vehicle, think of 1AAuto.com. Thanks.
In this video, we're going to show you how to replace a rear exterior door handle on this 2005 Ford F150, and we show you on the driver's side but the passenger's side is the same procedure, and the items you'll need for this are a new rear exterior door handle from 1AAuto.com; a 6, 8, and 10 millimeter socket and ratchet with an extension; flat blade screwdriver; and a 5.5 millimeter or a 7/32 socket.
Pry out on the small panel behind the door handle. Then pry up on this panel, and just pull it forward. Lift it up and push the tab on the harness and disconnect it. Then pull out on this panel and pull it free. It helps to use the flat blade screwdriver and just pry it free. Remove the 6mm bolt, these two 8mm bolts, this 10mm bolt, and then these two 6mm bolts down here. We'll fast-forward as Mike does that. Now lift the door panel up and pull it out. Then you want to pull out your door handle cable. It's easiest with a flat blade screwdriver to pry it out. Then unclip it from the door handle, and your door handle's free. Then remove these 5.5mm or 7/32 bolts from your speaker. You may notice that we switched doors. We're just going to show you the procedure on this door that actually has a water shield. Pull your speaker out, and then just push the tab on the harness and disconnect it. Then just peel back your water shield.
Now remove this 10 millimeter bolt and just pull that bracket out. Now reach back here and with a flat blade screwdriver. You want to just pry this green clip open and pull the rod out. Now pry off these cap and then remove this 10 millimeter nut, this 10 millimeter nut right in here, and then these two 10 millimeter bolts on the side. We'll fast forward as Mike removes those. Pull the door handle out and lift it up and out, and then just twist this rod out.
Up top is the old exterior door handle; below it is the new one from 1A Auto. You can see they're identical and they'll fit exactly the same. This rod inserts from this side. Put it down in. These tabs go back and then the studs in the front feed in. We'll fast forward as Mike replaces those two 10 millimeter nuts and the two 10 millimeter bolts and tightens them up. Now just put the door handle rod back into that green clip and reclip it, and then take this bracket, put it back into place, and replace and tighten up that 10 millimeter bolt.
Now replace your water shield. Reconnect your speaker. Push it back into place and then replace those four 5.5mm bolts and tighten them up. To replace your door panel, just re-clip the door handle cable into the door handle and then push it back into place. Make sure these clips stay into the door. Then line up the tabs on the back and make sure that the lock rod goes up through the door panel and that your harness for your window switch is coming up through that hole in the door panel. Then push the door panel down into place. We'll fast-forward as Mike replaces all of those bolts. Now replace the small panel behind the door handle, reconnect your window switch, push those tabs into place, and push the panel back down. Then line this panel up, slide it down into the door panel, and push those two clips back into place. You're all set.
We hope this video helps you out. Brought to you by www.1AAuto.com, your source for quality replacement parts and the best service on the Internet. Please feel free to call us toll-free, 888-844-3393. We're the company that's here for you on the Internet and in person.
DHA72564
In Stock
Product Reviews
Loading reviews
5.00/ 5.01
1review
5 Stars
4 Stars
3 Stars
2 Stars
1 Star
1
0
0
0
0
Satisfied customer
Darren
December 6, 2024
Satisfied customer again
Customer Q&A
No questions have been asked about this item.
Customer service
877-844-3393
Monday - Friday 8:00am - 9:30pm ET Saturday - Sunday 8:00am - 4:30pm ET
Lincoln is a registered trademark of Ford Motor Company. 1A Auto is not affiliated with or sponsored by Lincoln or Ford Motor Company.See all trademarks.
Enter Vehicle Year Make Model
Specify your vehicle's year, make and model to guarantee fit.
Year
Make
Model
Options
Drivetrain
This part doesn’t fit a . Select from parts that fit.