Hey friends. It's Len here at 1A auto. Today I'm working on a 2011 Ford F150. I'm replacing the left rear door latch. It's a very easy job. I want to be the guy that shows you how to do it. If you need this or any other part. You can always check out a 1Aauto.com. Thanks.
So to start doing this latch right here, what we're going to have to do is we're going to have to get inside to it. We need to disconnect everything that's connected in there. It's probably some wiring, some linkage, so we're going to need to remove this panel. The panel itself doesn't have push clips that lock it in. Normally a lot of door panels will have that. They'll have a couple of screws and then just push clips so you grab it and yank it once you get all the screws out. This one has a little hooks that go down. So once we get all our screws out, we're going to go ahead and we're going to take it, we're going to lift it up and then out, and we're going to make sure that we've got everything disconnected that we need to, and then we can remove it.
So first I'm going to start at the top. This panel right here has to come off. So you can use whatever you've got to try to pry it off. I'm just going to go ahead with a plastic tool. Okay. It's just a molding tool. It's nothing special. I'm just going to work my way along. Pull it right off. Let's get the little locking clips. They fit in here. Okay, I'll set this aside. I can go ahead and remove this right here. I'm going to go ahead and use the six millimeter, turn it to the left to remove it. Our screw. So now generally speaking, in the center of the door, there'll be another mounting point and then there'll be probably another one or two under here, which feels like there's two. So we'll start in the center here. I'm gonna try to remove this black plate right here and I'm just gonna use something like a hook. See if I can work something behind there. Just give it a little tug. Sometimes they can be pretty stuck in there. There we go.
So we've got this under here. That's a little bit larger. It looks like maybe an eight. We can figure that out in a minute. We'll work our way down here though. Let's see what else we're dealing with so we can get all the tools we need at once. One right here, one over here. Let's see if this six works again. Since I got my tool out already, I'll just go ahead and remove these and then I'll move up to that one up there. Once I get the right socket for that. We've got out our two bottom ones. I'm just going to grab this upper one up here with my eight millimeter short extension can use whatever you've got. It's an eight millimeter head. Okay, there it is. Seems a little overkill for me, but I'm no engineer.
So now we'll just kind of analyze our situation here. This feels like it's got plenty of movement at this point. I don't feel any more bolts coming around. Just double check. I got those two out. I'm just going to try to lift it. Very nice. There we are. So we can take a peek behind. See what we're dealing with. Good news is we don't have any wiring over here. We just have our handle release cable should be pretty easy to remove that. I'll take a look. I've got a couple of little squeeze clips there so I'll grab some pliers. What else do we need? Wiring harness down here. See if I can do this. It feels like I need to squeeze it. Right in the center there's a little squeeze. Should just want to pull down. Okay. I'm squeezing it. It doesn't want to pull. There it is.
Like always whenever we remove wiring, we take a look and make sure that it's nice and clean. It's not rusted or funny rainbow Colors, we don't need any thing like that in this. It looks okay. So it's kind of hard to see and do things back like this. I told you how to get that off, but it's difficult to get stuff in here. All I'm going to do is I'm going to push on this right here and this right here and I'll show you what it was. Now I can flip this around. I'm just going to get it so it'll stay and we can actually work on this. So now we can see our two little squeeze tabs. There's one there and one on the bottom side.
Take my little pliers, or long pliers. Just gonna try to squeeze those in nice and easy. I'm going to try to push this green thing out of my handle, just like that. Bring that around. Slide this out. So we got that handle out. And lift this up. We'll set this aside. Everything looks great. Just put it aside. So now we're going to take off this insulating stripping here. So some of it will stick. Some of it won't stick as much. You just use something like this. Little plastic. Just try to get the majority of it to stick with the plastic.
Sometimes you'll get this stuff. It will be so sticky, you'll get it all over yourself. So just be careful. Uh oh, that's gonna be on there forever. Great. So we're just going to keep doing this until we get it peeled back quite a bit and we can get into here to see what it is we're going to be working with. So here we go. We're going to analyze our situations so we know what we're dealing with. This is essentially what it's going to look like except it's in the door. Right here. We're going to have an electrical connector. We're going to have this right here for the lock and we're going to have this right here. So this is all going to be inside the door panel right in here. It's going to be hard for you to see while I'm trying to work on it, but I want to kind of give you an idea of what's going on.
This right here, it's going to be pretty easy. We'll assume that it's locked, right? I'm just going to grab it with my little hook. Pop it, and I'm going to remove the rod. It's just sitting in there. Once I pop that free, that'll just be nice and free. Over here there's our little lock clip. So I'm going to be coming from behind with my pick once again, I'm going to try to pick it, pull it out, and pull this straight out. Okay. This one right here is going to be the most challenging of the two. There's a little a slot right there. So all I'm going to do is I'm going to try to push through and see if I can release this, move it, and I'm gonna see if I can slide it out. It'll either come this way or it'll go this way. I'm not a hundred percent sure yet until I get it out. But then there's going to be another rod that goes in through there. So what I believe is going to happen is I'm going to push this and then I'm going to be able to just take the whole piece, slide it out, and that's how it's going to come out. Okay. So I want to kind of give you a little idea of what we're looking at here.
So the first thing I'm going to do is the electrical connector. Squeeze the tab and pull it out. I'll show you that. There's a little tab just like this. Try to squeeze it with my index, pulled it right out. We'll check to make sure there's no funny colors, no rust or greens or blues or any rainbow colors. You pretty much just want solid metal color. It looks great. We can set this aside.
Next I'm going to do the pink clip that I showed you. I'm just going to use my a pick. I'm gonna try to grab it. Just pull it towards me. There it is. Grab that rod. Just going to pull it aside. All right, so I've got that rod off now. I'm just going to grab this cable right here. I'm going to disconnect that just by simply sliding out of that groove that it was in that I showed you. Okay, perfect. So now I'm going to grab these. Just going to use a ratchet. I have a T27, Torx bit 27. got our first bolt here to show you real quick. That one I'm going to put back in just a little bit, just a few threads.
Then I'll just remove these other two. So I'm holding the inside. I'm holding onto my latch. I can wiggle it if I want. Going to take this. Take it right out. I'm trying to grab our latch. Okay, so now we're going to have to move our window regulator around. So the way that we're going to do that is there's a 10 here, 10 there, and 10 right down here. So what I'm going to do is I'm just going to remove these two and then I'm going to loosen this one so I can move it around. Hopefully I can get it out of the way enough to be able to move our latch around so we can see what's going on. So let me turn these to the left with my 10 millimeter, stand up.
Set that stuff aside. We should be able to move this around. Let's see. Let's try to get this out of the hole. Still feels a little stiff. Try to loosen this up some more. Maybe even take it right out so we can see exactly what's going on. Okay, so I got all three of those bolts right out. It gives us plenty of room right here. So hopefully we can maneuver this. Going to try to get the whole arm right down and out. Here's our cable, just a little scoopy thing and it slides right into there.
All right, let's see if I can get this last down. Just trying to work it around and sometimes you have minimal room areas like this. So there we go. Okay, so now we gotta get this off. Just goes like this and then out. It goes right into this top hole. If you want to put it in, just go like that. And then, okay? Cable just went right in there, just like this. So when I go to install my new latch, this is exactly what we're going to do. I'm just going like that, like that, going like that, except I'm going to be in the door doing that. Okay. So when I removed it, all I did was just go like that. That part didn't come out as easy. It was in the door, but then it would just slide out.
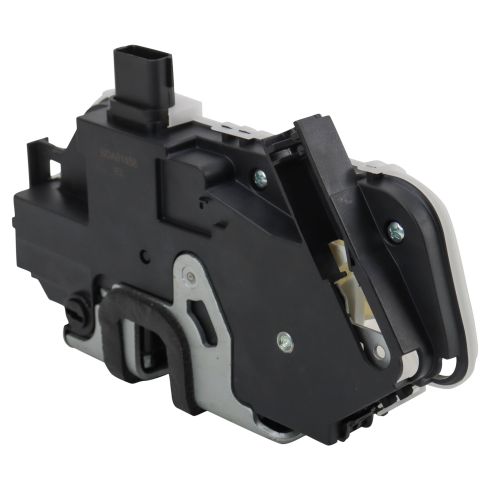
I just wanted to show you the comparison between the old one and the new one. Get the latch, obviously on both of them. Cool. This right here, same setup. Perfect. Electrical connectors. Perfect. There are a little pink clips. That one just pulls up. A little easier with a screwdriver or something like that. But anyway, same thing. Got the spot that the cable goes into, or the arm for the ... I'm sorry, for the lock. Same right there. So there you go. As you can tell, they're both the exact same quality parts. So if you need this or any other part, you can always check us out at 1Aauto.com
So we've got our brand new quality part here. I'm going to take my locking arm, I'm just going to slide it in, try to get it just like that. I'm going to bring it up along the unit. Okay. Can even bring it up here if it makes it easier for you. Now what we need to do is we need to weasel this and the door. Imagine it's inside coming up, up, up. This needs to come up through this hole right here. Okay. Right up in there. This is going to completely slide over here while it's in the door but not mounted. We're going to take this and take the little cable, stick it in that hole right there. Just like that. Boom, boom, boom. Lock all that in. We'll take our three bolts. We'll just start them all in so it can still move around a little bit and then we'll get everything hooked up like our rod unit right here. Our power wire right there. Now we'll go ahead and tighten everything up. Okay? Here we go. Wish me luck.
See if I can weasel it in here. Not breaking anything. Super important to not break anything. Okay. My locking arm, trying to bring it right up through this hole right here, like I mentioned. Come on baby. There it is. Our bar rod got out of the way back there. Okay, got my cable. Show you what I'm doing. Going in. Slide that in there. That's nice and locked in. All I'm doing now is I'm trying to get the rod that goes into that pink clip out of the way, so when I put in my two or three mounting screws, it won't be pinched. Okay. Got My three bolts.
If you wanted to try to use some thread locker, that's up to you. I'm not worried about that. I'm just going to start these in like I said. Or at least that's the plan. See if I can get it going. Just going to give them a couple of little cranks just so I can make sure that they are actually physically started in pretty good. I don't want to try to wobble them around too much if they're not in at least a few good threads. Just cause I don't want to strip off the holes on the new unit.
All right, so I've got those three bolts in. They're started pretty good. I can still move my unit around so that's good. Now I'm going to go for that rod that goes into the pink clip. I'm just going to slide it in to where it'll sit. There we go. I'm going to lock that clip in just for a little click. I've got this right here. When I took it off, I used my index finger like this, so that's how I'm going to put it back in. I'm not going to try to go this way. It doesn't go that way. I use my index finger to take it off so I know which direction it goes in. I'm just gonna go ahead and put it in the same way. Listen for a click. Perfect. Get our little cable here. Nice. We'll tighten up our unit. It feels pretty great.
Now we can go ahead and put in the the bolts and the nuts and everything we've got here for this. So we'll just try to move it around. Get everything lined back up. Looks like it should go pretty good. That's what I'm dealing with. Got my nut down here, obviously, because you gonna have to figure out. Go for the top bolt next. I'm just gonna lift it up, see if I can get it moved here. Sometimes getting this stuff lined up is difficult. Something like this would have been nice if we could've just kept this particular bolt in because it's got the little slide groove right here, but I would've had to let the window down to be able to raise this up and it would've just made a little bit more complicated. So for the sake of time and effort, I just went about doing it this way, and I think it's going to be fine. Just grab my 10 millimeter here in one second. I can get the other tool off my ratchet. I'm just going to go ahead and tighten these right down. That's good. Last one. Cool.
Now grab my tool out of here. Flashlight. Before I go ahead and put everything back together, I'm just going to give it a test because why not, right? Just set this up so it's not going to get caught anywhere. I can hear that functioning. It's moving the lock inside here, up and down, so that's great.
Alright, very good. I lock in it, make sure that I get another door open. All right. Perfect. So we know we've got that together right. Okay, so before we put it back together, we'll just double check. Everything's nice and tight, tightened, tightened, tightened. Get this all reconnected, secured, so it's not flopping around. It's not going to hurt anything. This is going to be secured by the door panel. It won't be able to wobble around and make noise. We tightened all three of these and everything inside the door. It's plugged in obviously because it functioned. Let me just give it a tug. I think it's fine. We'll move along on. The seal here. There we go. Let's grab our door panel.
So here we go. We've got our electrical connector here. Got our door lock shaft got this right here for the handle. Okay, so we need to find all these things on the door or door panel. We've got our connector here, so that's where our electrical is going to go to. Awesome. It's right here. That's where this is going to go through. Okay, and then this right here, just going to slide up in through here and we're going to go ahead and put on the door handle. All right. The way that this door panel came off is the same way that's going to go on essentially. It's just going to kind of slide right down into these holes, and then down. You've got all these holes. So this one, some door panels, you'll find that they just push on like this. This one, you just gotta line it all up. Start at the bottom probably just so it holds it for you. You're going to find your electrical connector. Okay. Feel how it goes.
We're just going to see if we can get it in. Let's see. Might be easier to get it in if I took out this switch. Well, let's see if I can do it without. If I can't, well it's no big deal. We'll just take out the little switch. Yeah, I think it'll be easier. So before we go ahead and install this, let's uninstall the old one.
So to take the switch unit out. I'm just going to take a screwdriver or whatever I have access to. I'm going to push right here. I'm going to do the same thing on this upper one. There's my switch. Okay. Let's put this aside. We'll get the door panel on now. Okay, nice and easy at this point. We're just going to line up all those little groups, make sure that we have access to our wire and we'll go to get this on. Getting this part up in here might be the most interesting part because ... There it is coming up through. There we are. So now we'll just try to find our cable real quick before we go ahead and start screwing anything in just in case we have to move on, lift it back up and grab our cable. I can feel it.
All right. It's just out of reach. Here it is. Some door panels end in flush up against all the way around the door. I know I've got everything situated in there. Got my wire, got my cable. This is for my door handle? Door locks ready to go. Perfect. All right, grab this. Let's get our little clip you do there. Going to slide this unit in. Got our handle. Okay. That's what it looks like on the backside. Pretty easy. So this little nub right here is going to go into there and then we're going to go basically like, see if I can show you. Essentially like this, bring it around, and I'm going to bring the green clip to the outside there, right through this little slot. I'm just going to see if I can push it in. That's the way it's going to look. It has to be completely locked right there. Okay? Those ears have to wrap around and grab on. So this thing can go nowhere. Last thing you want is that falling off and then you can open your door, right? It's no fun for anybody.
Okay, so now to put this in, we're going to go in this way and then latch it in this way. Right here there's a couple of ears. These are non-moving years, so they're going to slip behind there. Over here are the pronged ones. These do move. So we're going to go with the nonmoving ones. We'll just shove those into place and we're going to roll it in just like that. So here's what we're dealing with. Three of these. One of these. All right. This one right here, we remember it went in here. Took days to get out. Well not really days, but it seemed like it. And then the other three, you've got one and then one under here and one over here. Okay. Easy peasy. We'll just get all those in. We'll move along.
So we've got our eight millimeter here. I'm just going to get that all the way turned in. Once it feels like it bottoms out that, just give it a little bit. Not too much. That feels pretty great. Next we'll move on to our other three screws. You got them up here using a six millimeter. Formed out a little bit. Do other two down here. Here it is. So here we go.
We're in the final stretch everybody. Got a couple pieces left. See where they go. This one's going to go right up here, right? Little push clips. Polls, so they're lined up. Feels good. You get this one. No real clips really, it's just kind of like these little angled things. So there isn't too much to worry about or think about. Just push him in. Alright, I'm gonna hop in. I'm going to give it a try. Here we go. Going to lock it. Feels good. Unlock. Perfect. All right, everybody, we completed that service. Great job.
Thanks for watching. Visit 1Aauto.com for quality auto parts shipped to your door. The place for DIY auto repair. And if you enjoyed this video, please click the subscribe button.
