Replaces
Replaces Ford F150 Freestar Mercury Monterey Intake Manifold Runner Control Motor Ford OEM 3F2Z9J559BC
$388.95
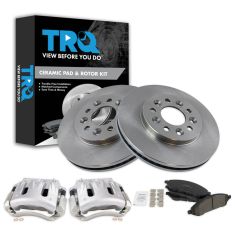
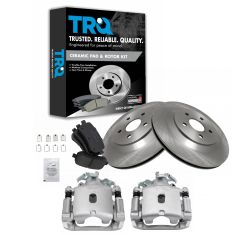
Replaces Ford Freestar Mercury Monterey Front Ceramic Brake Pad & Rotor Kit with Calipers TRQ BKA25225
$279.95
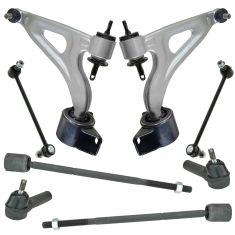
Replaces 2004-07 Ford Freestar Mercury Monterey Front 8 Piece Steering & Suspension Kit TRQ PSA59363
$249.95

Replaces Ford Freestar Mercury Monterey Fuel Pump Module Assembly Delphi FG0829
$247.95
Replaces 2004-07 Ford Freestar Mercury Monterey Rear Ceramic Brake Pad & Rotor Kit with Calipers TRQ BKA18369
$247.95

Replaces 2004-07 Ford Freestar Mercury Monterey Front 6 Piece Steering & Suspension Kit TRQ PSA59354
$234.95
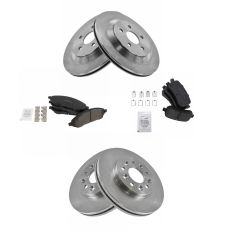
Replaces 2004-07 Ford Freestar Mercury Monterey Front & Rear Ceramic Brake Pad & Rotor Kit TRQ BKA11584
$224.95
Replaces 2004-07 Ford Freestar Mercury Monterey Front 4 Piece Suspension Kit TRQ PSA63628
$219.95

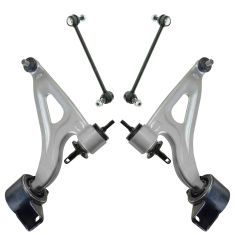
Replaces 2004-07 Ford Freestar Mercury Monterey Front Driver & Passenger Side Lower 2 Piece Control Arm with Ball Joint Set TRQ PSA62191
$214.95
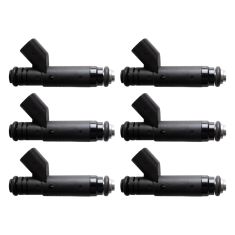
Replaces Ford Mercury 6 Piece Fuel Injector Set TRQ FIA58821
$206.95
Part Details
Left Hand Drive:
All of our auto parts are intended for Left Hand Drive USDM vehicles. If your vehicle is Right Hand Drive, please ensure the part is correct for your specific vehicle.
Item Condition:
New
Attention California Customers:
 WARNING: This product can expose you to chemicals including Lead and Lead Compounds, which are known to the State of California to cause cancer, and birth defects or other reproductive harm. For more information, go to www.P65Warnings.ca.gov.
Lifetime Warranty
This item is backed by our limited lifetime warranty. In the event this item should fail due to manufacturing defects during intended use, we will replace the part free of charge. This warranty covers the cost of the part only.
Returns: Parts with electrical components cannot be returned once installed.
FREE Shipping is standard on Orders shipped to the lower 48 States (Contiguous United States). Standard shipping charges apply to Hawaii, Alaska and US Territories. Shipping is not available to Canada.
Expedited is available on checkout to the United States, excluding Alaska, Hawaii and US Territories as well as P.O. Boxes and APO/FPO/DPO addresses. Final shipping costs are available at checkout.


Created on:
Tools used
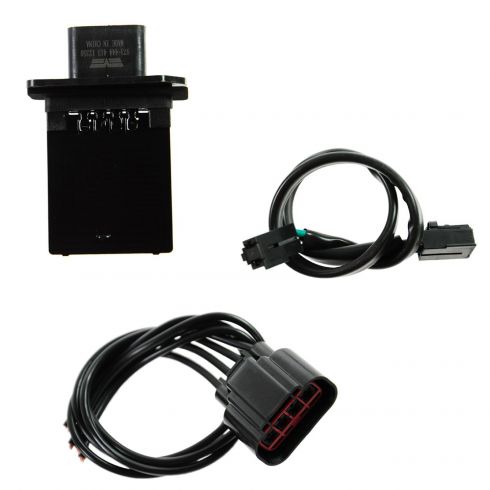
Okay, friends, to get started on our Blower Motor Resistor, let's go ahead and open up our glove box, squeeze in on the sides that way there these tabs release. Looking behind here, you're gonna be able to see your blower motor resistor. You can either try to access this right through up here or, of course, you can try to come underneath the dash, which is pretty easy as well. I'm just gonna squeeze on the little tab. I'll draw this off of here, and now I'll show you what tab I'm talking about. Right here where my index finger is the tab, you squeeze that and pull it away, and it releases. Now following your blower motor resistor pigtail, you wanna follow those wires to where you feel as though they kind of secure onto the blower motor box. We need to get the wiring so it's disconnected from that. I'm just gonna use this little forky tool, get in under there, and separate the two. Now, I'm just gonna feel that wiring until it leads to where the blower motor pigtail is. I'm gonna squeeze the little tab, just like I did on the resistor, and pull that wire down as well. You're gonna notice it's a great connector.
At this point, we can bring the wiring right up here and we can get to work on it. All right, friends, to get started on this wiring harness, what we need to do is get rid of any tape that's holding all the wires together here. Essentially, what we wanna be able to do is separate the wires going up the line here so we have plenty of slack with everything. Let's get all that tape right off of there. The next thing we need to do is analyze the wiring to see if there's any areas that are damaged. If they are, then that's an area that, of course, we would wanna cut off down towards this. These all look really good. So, what I'm gonna do is I'm gonna cut one wire right here. We'll set those aside for now. And now we'll remove the outer lining. Give the wires a little twist. And now if you hold this up to your other wires, the next thing we wanna do is continue on by trimming up the line. So, I'm gonna bring this one so it ends a little bit higher than the other one. The reason for that is so that when we're putting on our connectors, they're not all in one big bubble. They'll be kind of expanded out down the line.
Now that we have the wires coming from the vehicle all done, we wanna make sure that we have the wires for the blower motor pigtail done as well. Something that we wanna pay attention to before we do any cutting is the direction of the pigtail itself. As you can tell, these are very opposite. If I was to cut the wires in this direction and then mount them up onto here, there's gonna be an issue. Let's hold them so they're in the same exact direction, and then look at the wires like this. At this point, you can tell exactly how you wanna cut the new wiring harness as well. Something that I like to mention though is I'm not gonna cut it all the way down here and just get rid of all this wiring, but I'm also not gonna use all of the wiring because as you can tell, they gave us a whole lot of extra wiring. Let's come about halfway up, but make sure that you keep all the wires in their corresponding spots. And then we'll just kind of line these up and we're gonna trim them along the same line as the original resistor. Let's make our first trim on the first wire right here, and then we'll move further up for the last wire.
Now that we've made the first cut, we wanna continue on with the second cut, and the third, and forth. As you can tell, we went a little longer each time. Let's try to do the same approximately on the new wiring harness as well. Now let's remove the outer sheathing on all of these. Now that we have all the wires cut in the corresponding lengths, let's start connecting them in. Pay attention to where each wire went. You can tell that the black with the white tracer was the shorter of the wires. Continuing on, you had the gray with the black, the purple with the orange, and then the longest wire that we have on ours is gonna go to the green with the white. Okay, friends, real quick, I wanted to let you know that we're gonna be using this type of connection to put our wires together. Some people would choose to use solder, which is fine as well. This is just a crimp connector, so we're gonna put one side of the wires in one side, crimp it down, the other side, and this side, crimp it down. It's always a good idea to try to use a little bit of heat shrink if you have access to some. A lot of times people don't. And the good news, really this is underneath the dash, so there really isn't very many possibilities you're gonna get water underneath here. So you don't really have to worry about it being waterproof. If you don't have access to the heat shrink, just go ahead and tape it up.
To put our connectors on, we wanna make sure that you twist up the end of the wires. This is gonna be very important to make sure they don't fray. Any frayed wires could potentially mean loss of voltage going into where it's supposed to. I'm just gonna go ahead and crimp this down. You wanna be very careful not to go to the very edge of it. We'll give that a nice squeeze, give it a nice tug. If it feels like it can move around, you need to crimp it down a little further. Let's do the same to all the rest of these wires. If you have any heat shrink, slide it on your wires now.
Okay. So now that we have all the wires done up nice, we're gonna take a look at our old resistor. And you can tell which wire went where, so this is gonna help you out. The wire that's gonna be the shortest on our new pigtail is gonna be the one that goes to the black and white wire. So let's go ahead and connect that in now. Make sure your wire is completely pressed in. Give it a nice tug. Make sure it's completely secure. Move down the line, move to the next longest wire. Our next wire for us, as you can tell, is gonna be the gray with the brown tracer. Moving along, our next wire is gonna be the purple. And lastly, our green wire. At this point, we should be able to pull on our wiring harness and all the wires should be approximately the correct length. This looks amazing. Let's go ahead and wrap this up with some electrical tape. There we are. Let's get this back in. Let's go ahead and reconnect our blower motor pigtail. Now let's resecure that wiring into the blower motor box. There we are. Reconnect the blower motor resistor. Let's close the glove box. Now you would just wanna test your blower motor on all speeds.
Tools used
One of the first things I'm gonna do is I'm gonna take out this glovebox right here. If you were to look right underneath, you're gonna see four mounting bolts. I'm gonna remove those. Grab the glovebox. Be careful because it might wanna fall down. Grab those sides and pull it right out.
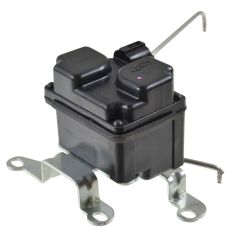
At this point, you have a clear view of where your blower motor resistor is. I'm gonna grab onto this little button, squeeze it, and then draw this down. I always take a peek inside, make sure I don't see any funny colors. This one actually looks really good, so I'm gonna continue on by removing the two mounting bolts, using an 8-millimeter. There it is. Awesome.
Let's get ready to install our new resistor. Should slide right in. We've got our two screws. Now I'm gonna carefully tighten these up, just till they bottom out. Okay. They're both bottomed out. Just gonna give them a teeny bit more. There it is. Grab that wiring harness. Click it in. Give it a tug. Now you would just test your blower motor and make sure it works on all speeds. Oh, yeah. Perfect.
Let's get our glovebox back in here. First put up one side. Put up the other side. I'm just gonna latch it in. That's gonna hold it for me. Now we'll come like this. We're gonna screw in all of our mounting screws down along here. Snug them up. Awesome.
Tools used
Tools used
Brought to you by 1AAuto.com, your source for quality replacement parts and the best service on the Internet.
Hi, I'm Mike from 1A Auto. I hope this how-to video helps you out, and next time you need parts for your vehicle, think of 1AAuto.com. Thanks.
In this video, we're going to show you how to replace the blower motor resistor on this 2005 Ford F150. It's the same part and similar process on these F150s from 2004 to 2010. The items you'll need for this is new blower motor resistor from 1AAuto.com and an 8 millimeter socket and ratchet.
Open up your glove box and just push in on the passenger's side and pull it down. Now, push the tab on the bottom of this harness and then just pull it free. Then remove these two 8 millimeter bolts. We'll fast forward as Mike does that. You can use an air ratchet for this, just to speed up the process. Once you remove the bolts, it pulls right out. Then, you just want to pull off this gasket as well.
On the left is the old blower motor resistor. On the right is the new one from 1AAuto. You can see they're identical and they'll fit exactly the same. Make sure the gasket's in place, and then feed your blower motor resistor back into place. Then, replace those two 8 millimeter bolts by hand. One corner is notched and there's a tab in it, so you can only put it in one way. Tighten up the bolts, careful not to over-tighten them. You don't want to strip out the plastic. Reconnect your harness and then push in the side of your glove box and close it.
We hope this video helps you out. Brought to you by www.1AAuto.com, your source for quality replacement parts and the best service on the Internet. Please feel free to call us toll-free, 888-844-3393. We're the company that's here for you on the Internet and in person.
Tools used
Tools used
Tools used
All right, so coming in on your passenger's side, right underneath the glove box, you're gonna be able to see your blower motor resistor. It should be fairly easy to get to. We're gonna remove the wiring harness from it and then, of course, of the two mounting bolts. Let's get started.
Now, if you take your finger and you press right on this little center point, you'll be able to squeeze that and then draw this away. I always take a peek at my wiring harness. Make sure there's no funny colors. If you see something, you know you have to repair that. This looks good, so I'll set it aside. Now I can see my mounting bolt here and one right there, remove them both. There's one. It's out. There's our second. And then of course the blower motor resistor.
Now it's gonna be time to install our brand new blower motor resistor. If you were look at it, you can see that it has one corner that's, kind of, angled off. That needs to be on the top and towards the rear. I'm just gonna put it just like this, I'll slide it directly into the box, and then, of course, we'll put in our two mounting bolts. Okay. There it is. Just like that. Let's get this one in a few good threads. You want it to be as straight as possible. You're gonna be screwing into plastic, so it could be very simple to accidentally cross-thread in your bolt or even strip out the plastic box. Okay, so I get that one bottomed out. Do the same thing to the other one. You don't wanna overtighten these. Like I said, they're only screwed into plastic. Okay, that's bottomed out, just a tiny weeny bit more. That's it. Let's get our pigtail reattached. Push it in. Listen for a click. Give it a tug. That feels great. Now we're gonna test our blower motor.
All right, I can hear the blower motor on level one, two, three, oh yeah, and it works on high. This is perfect.
Tools used