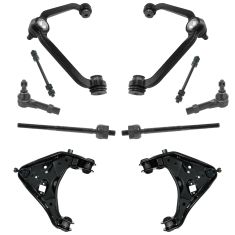
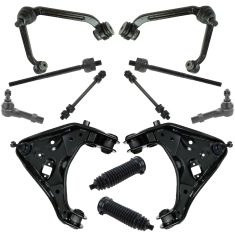
Replaces


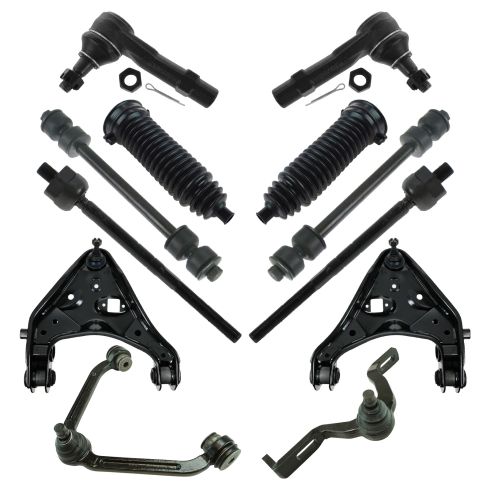


Part Details
Specifications
Product Features
TRQ drivetrain kits are manufactured using premium raw materials to restore original performance. Each TRQ drivetrain component is designed to be a direct, maintenance-free replacement to the stock unit. To extend the service life of your drivetrain, TRQ recommends replacing wheel hubs, bearings, and constant velocity (CV) drive axles at the same time to ensure even wear of components and improved ride comfort. All products are fit and road-tested in our Massachusetts R&D facility to ensure we deliver on our promise of Trusted Reliable Quality.
Install Tip: When replacing steering components, have a professional alignment performed afterwards. This ensures proper tracking and even tire wear.
Our steering and suspension components are pre-greased and sealed for long life and do not require the extra maintenance typically required by greaseable versions.
Attention California Customers:
 WARNING: This product can expose you to chemicals including Chromium (Hexavalent Compounds), which is known to the State of California to cause cancer, and birth defects or other reproductive harm. For more information, go to www.P65Warnings.ca.gov
Lifetime Warranty
This item is backed by our limited lifetime warranty. In the event that this item should fail due to manufacturing defects during intended use, we will replace the part free of charge. This warranty covers the cost of the part only.
Created on:
Tools used
Hi, I'm Mike from 1A Auto. We've been selling auto parts for over 30 years. We're dedicated to delivering quality auto parts, expert customer service, fast and free shipping, all backed by our 100% satisfaction guarantee. Visit us at 1AAuto.com, your trusted source for quality auto parts.
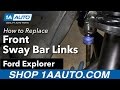
In this video, we're going to be working with our 2006 Ford Explorer. We're going to show you how to remove and replace your vehicle's sway bar link in the front. If you like this video, please click subscribe. We have a ton more information on this and many other vehicles. If you need these parts for your car, you can follow the link down into the description over to 1AAuto.com. Here are the items you'll need for this repair.
Using a 19mm socket and a breaker bar, loosen the lug nuts on your tire. Raise and support your vehicle. We're doing this on a lift to make it easier to show you what's going on, but this job can be done at home on a jack and jack stands. Finish removing your lug nuts. You should be able to do this by hand at this point but you can use a ratchet if you need to. You can then remove your wheel and tire.
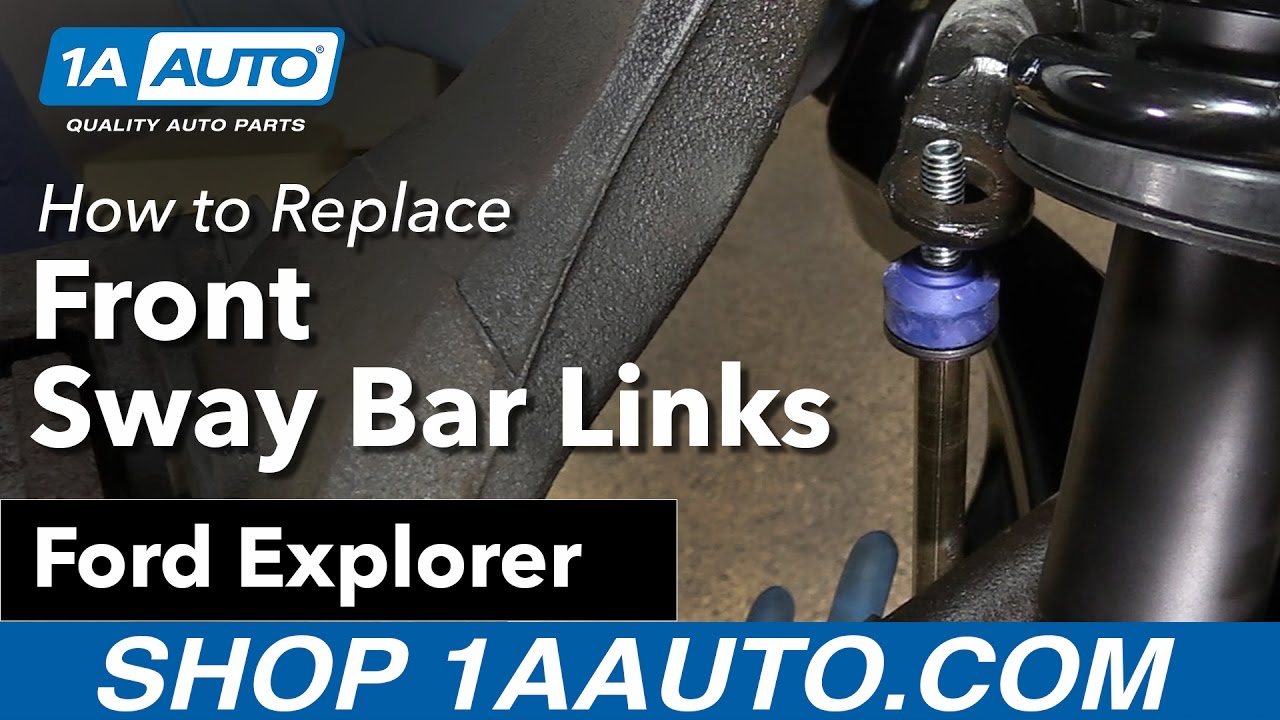
It may be a good idea to apply some penetrating oil to whatever parts you're going to be working with. Put a 17mm wrench on the nut on the top side of your sway bar link and brace it against the frame of the vehicle. You can then use a 16mm socket and ratchet on the bottom to loosen it. The sway bar link on these vehicles is essentially a series of bushing and washers with a sleeve all held together by one long bolt, as opposed to being a one-piece unit like some other vehicles.
You can see ours is pretty rough here, because there's usually not this much slack. That's actually what your bushing is supposed to look like on all four pieces, one on each side. You can see the old ones are worn down or cut there. It looks like they've actually fallen off over time. Once the nut's out, you can try to remove the bolt from the center of the sway bar link. This can be pretty difficult, so if it doesn't come out by hand, don't be afraid to get on there and give it a good hit with a hammer. The sway bar link will disassemble just like that when you pull it out, so just make sure you have all the old bushing material and all the old washers off of it.
Now you sort of need to build the sway bar link into the truck, so we'll start with a washer and then a bushing. We'll go up through the control arm, install a bushing with the tapered end down, followed by another washer, the sleeve, a washer with the cup end facing up, and a bushing with the tapered end facing up. We'll go through the sway bar, install another bushing. You may need to use a screw jack or floor jack to jack up the control arm to get enough slack on that bolt to install the sway bar link. Then install the washer and a nut and tighten your new hardware down. You'll want a 17mm wrench on the nut and a 16mm socket and ratchet on the bolt end. Just tighten that up until it compresses the bushings so you know that everything's nice and tight and there's no slop in there to make any noise when you go over bumps. Once that's down tight, you can lower the weight off of the screw jack or floor jack.
Reinstall the wheel and tire onto your hub. It's easiest to put a lug nut inside of the 19mm socket to start it onto the studs. Get all five of these down as tight as you can by hand, and then we'll torque the wheel once there's some weight on it. Lower the vehicle back down and put partial weight onto the wheel and tire. This means that you may have your jack or lift under the vehicle. Get the tire to touch and let the vehicle come down some without allowing it completely off of the lift or jack. Torque your lug nuts to 100 foot-pounds in a cross pattern.
Thanks for watching. Visit us at 1AAuto.com for quality auto parts, fast and free shipping, and the best customer service in the industry.
Tools used
Brought to you by 1AAuto.com, your source for quality replacement parts and the best service on the Internet.
Hi, I'm Mike from 1A Auto. I hope this how-to video helps you out, and next time you need parts for your vehicle, think of 1AAuto.com. Thanks.
In this video, we're going to show you how to replace the front sway bar link on this 2003 Mercury Mountaineer, same as any 2002 to 2005 Mountaineer, as well as Explorer. Our front passenger side is broken, so we show you how to get it out and replace it with a new one from 1A Auto. You'll need new sway bar link from 1AAuto.com, 16mm and 19mm socket and ratchet, a piece of pipe for some leverage, jack and jack stands and a torque wrench.
You'll want to remove your center cap. If you don't have the benefit of air tools, then loosen your lug nuts with the vehicle on the ground. Then raise both front wheels and support the car with jack stands and then remove the lug nuts and wheel the rest of the way. Now you can pull the wheel free.
This is the driver side, which is actually still together, so you would, if you're removing one that was still together, put a 15mm socket and ratchet on top and a 16mm wrench on the bottom, remove that top nut and then go from there. On ours, it's broken so I'm just filling, basically, the cavity with penetrating oil. This is pretty typical: it breaks off up top here and you saw where you just filled it up with penetrating oil and now we're just messing around with it. We locked some locking pliers onto it. That penetrating oil really helped the bolt start up and we've basically broken the plastic here. Now this plastic tube will slide off.
We're just going to use a hammer and chisel to remove the rest of the plastic. This, of course, is the worst case scenario, you just want to remove the plastic, you can use some locking pliers and then just remove the nut on the bottom or at least loosen it up as much as you can. Then just hammer this down and out.
Before installing it, just jack up the other side, just slightly. Now replace your sway link and the order it should go in is: washer, bushing, control arm, then bushing, washer, the tube, and another washer, and then the bushing, and then your sway bar, then another bushing, another washer, and then the nut. You just want to tighten that nut preliminarily,and then release the jack.
To tighten up the link, what you want to do is have the car back down on the ground, and now I have a jack supporting just the front suspension so that basically everything is level and the suspension is in its correct ride height. Then tighten up the link by holding the wrench on top and then turning the bottom. Tighten it up so that the bushings are all squeezed to about the diameter of the washers.
Replace your wheel, then replace all the lug nuts and tighten them preliminarily. Then you'd want to lower the vehicle and tighten them the rest of the way, then torque each of these in a crossing pattern to 100 foot-pounds. Now replace your hubcap. Just line it up and hit it back into place.
We hope this video helps you out. Brought to you by www.1AAuto.com, your source for quality replacement parts and the best service on the Internet. Please feel free to call us toll-free, 888-844-3393. We're the company that's here for you on the Internet and in person.

PSA34488