What's up, guys? I'm Andy from 1A Auto. In this video I'm going to show you how to replace this inner tie rod end on this 2012 Ford Escape. If you need this part or other parts for your vehicle, click the link in the description and head over to 1AAuto.com. One thing you're going to want to do anytime you do any kind of front end repair or suspension repair, you're going to want to go to a local shop and have your alignment performed. Otherwise, you're going to have premature tire wear.
Just going to use a little rust penetrant right here. Give that a squirt. Before I loosen this nut up, I'm actually going to loosen this nut up, here. I'm going to use a 21-millimeter wrench, loosen it up. I'm going to use an 18-millimeter socket and a breaker bar. Loosen this nut up and take it off. All right, take that nut off. I'm going to take a hammer and because of the way the threads are on this, I'm not going to damage the threads. So, I'm just going to hammer on the tie rod end, up. When I unscrew this tie rod, the outer tie rod, I'm going to count how many times. So, one, two, three, and on until I get it off. 22, 23, 24. So, 24 so I'm going to write that down. 24. Just going to remember that.
So, if I'm going to install a new tie rod end, outer tie rod end, I'm going to put that on 24 turns. Or, if I'm going to install a new inner tie rod end and reuse the outer one I'm still going to do 24 turns. I need to remove this nut. I am going to use a little rust penetrant and let that soak for a little bit. I'm going to use some locking pliers. And take this socket and a ratchet, loosen this up. Take those pliers off. Next, I want to take that clamp off right there. So, I'm going to use these needle nose pliers. Slide this over here and slide it off.
Next, on the passenger side only, there's this little shield right here. It's in the way, so I'm just going to take a trim tool. And there's some little trim clips that hold it in, I'm just going to get underneath it and just pry it out. These might break, you might have to replace the clips. This is just to keep the exhaust, the heat of the exhaust away from the boot on the rack. Just like that. We could actually just fold it out of our way like that, you just got to remember to put it back. So, from underneath the vehicle, that shield would have been in our way, if that shield was still there.
So, with that out of the way you can use a pick tool. And you want to loosen up this clamp. Right here there's a clamp. So, I'll just use this, try to pry in here. We want to loosen up that clamp. If you can do it without breaking it, then you can try to reuse it. A lot of times it's a good idea to replace it. There we go. All right. Once you loosen this up a little bit, might be able to grab the boot and just slide it off, sometimes. All right, just twist it back and forth. All right, there we go. Got that off. With that clamp off, now I can just grab the boot, just twist it a little bit, slide it up.
I am going to reuse this boot because it's still okay. It's not ripped or anything. Just make sure that I didn't do too much damage to the clamps. So I'm going to reuse that as well. All right. So, we want to remove the inner tie rod end. Now, there's no splines or anything on the factory tie rod, which makes this very hard to remove. If you could get a pipe wrench in there, you can do that. Or if you have a special tool. We actually sell these tools at 1AAuto.com. And this is a Universal Inner Tie Rod Tool. We'll slide this on like this. And from underneath, I'm going to use a 14 millimeter socket, extension and a ratchet. I'm going to try to tighten these down like this.
Now, I'm going to take an extension and another ratchet, slide it right into the tool, and loosen this up. That was a little tough but not too bad. It came right off. And here we go. It is a good idea when you're removing an inner tie rod, to take some pliers and just hold the rack from spinning because you don't want to damage the rack when you go to remove it. So, keep that in mind.
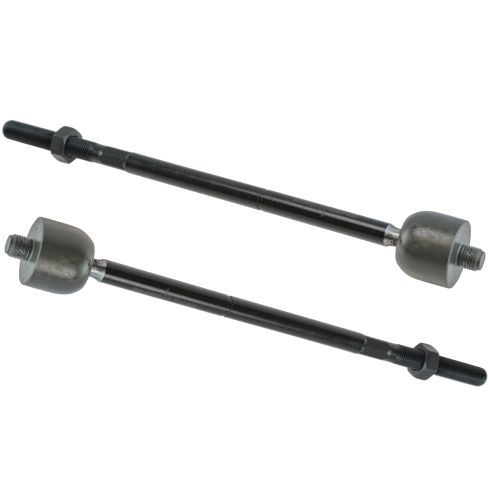
Here's the old inner tie rod end. Here's the new inner tie rod end from 1AAuto.com. As you can see, the size is the same. The new one comes with a new nut. Threads are the same on the backside. The new one is actually slotted, which makes it installing and removing a lot easier. You can put a wrench on there or if have a special tie rod tool, you can use that. And it makes it easier to torque. Get yours at 1AAuto.com and you'll be ready to rock and roll.
So, when we go to install this inner tie rod end, I'm just going to put a little thread locker on it. You want to make sure that does not come loose. So, to install this, because this is slotted we could actually use a wrench. Or we could use a tool like this that slides over here. And this goes all the way on here, then you can torque it on like that. But, I'm actually going to use our own tool. Show you how that works. Start the tie rod in, tighten that down. All right. So, then I'll take this tie rod tool, even through it has slots, I will tighten this on. And we're going to torque it with this. Just going to snug these up a little bit.
Now, I'm just going to use this torque wrench. We actually sell this torque wrench at 1AAuto.com with the extension. And I'm going to torque this to 66 foot pounds. And that's good. I'm just going to use a ratchet wrench, 14 millimeter ratchet wrench to remove the tool. You could install the tool with this as well. All right. So, you want to check your clamp. Make sure your clamp is okay. If it's bent really bad, you're going to have to get a new one. You're going to need a tool like this, which is going to pinch it and push on it at the same time. So, once I install that we'll take these special pliers and pinch that back on.
Take this nut off first. Take that off, set it aside. You can slide the boot over. All right. So, this is going to go in a little groove right there, so you know that's locked in on the back side. Just going to have to try to force that over the rack. Take these pliers, slide it onto the clamp. I'm going to pinch it down, just squeeze it. And that looks like it's really tight. You can give the boot a shake, make sure it's nice and tight. And you're good to go. Now, we're going to take this clamp, make sure you put this clamp on before you put the nut on or even the outer tie rod. And then use some pliers, just squeeze this. Sometimes they slide off so be careful. Keep your fingers away from it. Right there.
Now, I'll take this heat shield that's back here. Slide that back into position. Push the push pins in, right there. Lower one in down here. That goes right there. Push that in like that. Then I'll take this nut and we'll slide this on this way. Now, we're going to take the outer tie rod end. We remember that we turned it 24 times. So, we're going to do the same as taking it off. One, two, three, four ... 23, 24. Okay. So, we'll just make sure that jam nut is snug right there. Line the tie rod into the knuckle. Push it down. Now, I'll take this castle nut, slide this on the tie rod end. And I'm going to use an 18 millimeter socket and a ratchet. Start tightening this up.
We're going to use a torque wrench with the same 18 millimeter socket. And we're going to torque this to 59 foot pounds. Now, we're going to take the cotter pin. ... Now, the reason we have the cotter pin is so the nut doesn't loosen up. And we'll slide it into the hole. If the castle nut doesn't line up with the hole, what you can do is tighten it a little bit more so that it lines up properly. And then, I'll take some side cutters, I'm just going to bend the end of this. Bend the end of the cotter pin down, just fold it. There's not really any right or wrong way to do this as long as it's not going to hit any suspension components. And I'll just trim the excess.
Now, I'm going to take the grease fitting. Get this lined up right there. Just take a seven millimeter wrench, or you could use a socket and a ratchet and just snug it up. Not too tight. All right. Now I'm just going to use a grease gun and grease this. Just give it a couple pumps. I normally watch the boot and see when it inflates a little bit. And that's when I stop. And that looks pretty good. Just two or three pumps. And slide it off. I am going to tighten this jam nut up using a 21 millimeter wrench. The torque spec on this jam nut is 46 foot pounds. So just do the best you can.
At this point we would put the tire on, put the lug nuts on, lower the vehicle and torque the wheels.
Thanks for watching. If you want the parts to do it yourself, check out 1AAuto.com. The place for DIY auto repair.