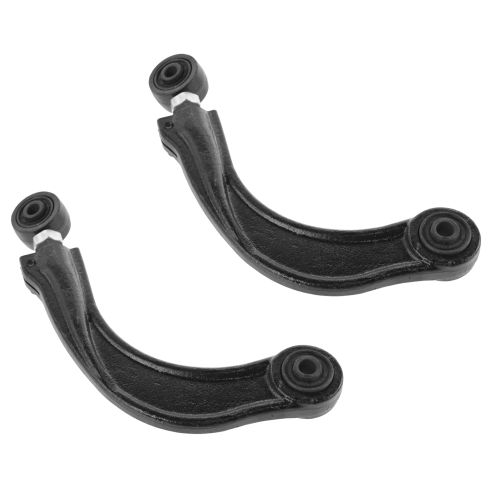
1ASFK02134-Ford Mazda Volvo Rear Driver & Passenger Side Upper 2 Piece Control Arm Set TRQ PSA62950

Replaces
2008 Volvo C70 Rear Driver & Passenger Side Upper 2 Piece Control Arm Set TRQ PSA62950

Product Reviews
Loading reviews
4.80/ 5.0
25
25 reviews
Focus ST
November 3, 2017
If you put any type of lowering spring in your focus? These are a must if you don't want to prematurely wear your tires out.. fully adjustable to get all the positive camber you need. Well built! Would buy again.. thx 1A auto!! A+++
quality machining
November 22, 2017
I was very surprised about the much lower price 1A Auto asked for these parts so I didn't know what to expect. The parts looked of good quality and installation was easy. Thank you
Adjustable upper control arms
September 25, 2018
These upper adjustable control arms are an exact replacement fit for my 2013 Ford focus. This being the first time I worked on the rear suspension of my focus I proceed with caution.After jacking the rear up and finding a safe place to put the jackstands I took the rear tires off.Unbolting the stock links was easy After I realized the bolts holding the links were Threaded into a Non-removable stationary nut.With the stock upper control link in my hands I proceeded to match it up to the new link using the existing bolts as a guide And lock the Adjustment nuts.After Installing the new upper adjustable control arms and rear tires l Proceeded to the alignment shop.When I was asked what I needed I Told the tech I wanted the rear camber adjusted on my 2013 Ford focus Because I was getting abnormal inside tire wear.This is where it gets a little difficult.Finding it almost impossible to access the adjustment nuts on the new upper control arms With the tires on.Removing the rear tires an
Awesome product
November 17, 2018
This resolved my lineup issues for rear camber, great fit ,fast delivery , quality product!
rear camber kits
November 21, 2018
these kits are very good quality fairly priced and are shipped the same day. i would tell everyone to use 1a auto for there automotive parts. thanks greg root
Awesome product
November 25, 2018
Great product overall really helped with my alignment and get me the fitment I wanted in the rear! Good heavy duty compared to stock. Is a little heavier but that's because it's one solid piece compared to the oem non adjustable one. I recommend ordering it if you're lowered or got new wheels and need to adjust the rear.
Great Transaction
August 23, 2019
The Upper Camber Arms were just as described, arrived fast and installed without a problem.
Love 1A Auto and have always had a positive experience with every interaction.
Parts
October 16, 2019
Yes this part helped my car. Did exactly what I need to fix the problem.
excellent choice
February 11, 2020
Fast easy purchasing and shipping the parts worked perfectly
Good solution for camber adjustment
April 6, 2020
These control arms look pretty beefy and were good for adjusting over camber situation. They came with no directions though. It would have been helpful if some directions said to flip the hex locking bold to the other side for the driver side of the car. Otherwise the hex head is inaccessible. Another tip, put the upper bolt in first.
Great for fixing rear toe issues
June 1, 2020
Easy to install and brought it in for laser alignment after replacing the suspension in my focus.
Good solution for bad engineering
June 15, 2020
My 2010 Mazda 3 had strage wear patterns on the rear tires. After some research I found out that Mazda has the camber for the rear tires set to increase handling... it also increases the number of tires you have to buy with people reporting struggling to get 40k miles out of their tires. These parts fix that stupid design from the factory. You may lose some handling but the Mazda 3 isn't a racecar to begin with.
Great part, easy repair!
September 8, 2020
Part fit and works well. 30 minute repair per side. (Before alignment). Threaded end goes to the tire. I had it in right, my alignment shop told me the threads should go to vehicle center, so I took them out and changed them. After taking it back for an alignment, the shop changed their mind and switched them back to how I had then in the first place!
WORKED GREAT
October 12, 2020
These control arms fixed the back wheels camber on my Mazda 5, 2014. For some reason that year the back tires were slanted slightly for 'performance'. I found my this caused my tires to wear down quickly and unevenly, and I had to put air in the tires once every 3 weeks or so. After alignment, this problem is now solved. The car drives much better and I am confident that the tires will have a long, even life.
1st time customer, A-1 did great.
November 8, 2020
Free delivery. Had choices of product quality & company maker. Customer service knew products and answered all questions. Will buy from them again. John M.
GREAT PRCHASE
March 15, 2021
GOOD PARTS AND QUICK SHIPPING, WILL CONTINUE TO ORDER THESE FROM 1A.
Dont quite fit
August 6, 2021
They work great for what they are, and the price makes them great. But they didn't initially fit because of the fine tuning adjuster screws. I eventually just took them off because it didn't fit. Other than that though they work and my camber is normal again.
Part was as described
August 9, 2022
Worked out great and the fit was good
Fixed the camber problem
September 7, 2022
Worked as intended excellent parts
Very good product
April 4, 2023
Made it real easy to adjust the rear camber. I wonder why Ford never thought of adjustable camber.
Bring your patience
June 20, 2023
My main complaint with these is that the milled out areas for the locking screw need to be larger. You can't even get a box wrench or a socket on the nut, making it very difficult to tighten when installed. Some installation instructions would've also been helpful.
Fix rear camber
August 24, 2023
They were exactly what my 08 Mazda 3 needed. I was burning up the inside tread on my rear tires I was told that my camber was off and the fix would be a new set and these fit the bill.Mazda made it a little difficult on the passenger side but I got it done.
Execelent fit
December 26, 2023
Fitted like a glove
Good products
February 14, 2024
Fit perfectly and are heavy duty forged pieces that are adjustable! Exactly what I needed.
Very good
[{"url": "https://wac.edgecastcdn.net/001A39/prod/media/pNISJll75W64CYGsite/c2c0da958fb122cc4588fb5a7001577e_1730197457752_0.jpeg", "caption": "Old and new"}, {"url": "https://wac.edgecastcdn.net/001A39/prod/media/pNISJll75W64CYGsite/920ec99c971c09098b1dc68f9798df64_1730197457752_1.jpeg", "caption": "Old and new"}]
October 29, 2024
Excellent arm. After replacement I finally managed to make alignment!
Customer Q&A
Who is the manufacturer of this product?
February 8, 2019
10
1A Auto's house brand parts are manufactured by various aftermarket companies specifically for us and built to your vehicle's exact OEM specifications.
February 8, 2019
Jessica D
Will this work on my 09 mazdaspeed 3?
July 16, 2020
10
Thank you for the inquiry! This is listed to fit your 2009 Mazda 3 Mazdaspeed model and they are backed with a Lifetime Warranty. Please let us know if you have any additional questions.
July 16, 2020
Andra M
10
They fit fine on my 08 Mazda 3 touring
July 17, 2020
Brian R
Will this fix my negative camber on both rear wheels no problem? I am off by a degree on both wheels and these camber bolts I have are not working? Are they easy install at home? Also, will it be easily adjustable for the mechanic when doing the alig
September 4, 2020
10
Thanks for your inquiry. Written and video installation instructions are found on the product page under the "How-To & Tools" tab.
We're constantly adding new installation video instructions. If we do not have one for your vehicle on the product listing page, please check again at a later time or check our Video Library to see similar repairs here: https://www.1aauto.com/videos
September 4, 2020
Emma F
What tool is needed to adjust the camber? Multiple mechanic shops say they don't have the tool to make the adjustments.
September 8, 2021
10
Factory Mazda control arms have no adjustment capability, so they might be telling you that the camber cannot be adjusted, rather than telling you they don't have the tool. For adjustable control arms, one end is fixed, and the other end has a locking nut that, when loosened, allows you to spin the adjustable end in or out (making it longer or shorter). This length adjustment is what changes the camber of the rear wheels. Every shop should have a way of measuring camber.
September 8, 2021
Jonathan J
10
The shop needs to be able to perform alignments.
September 8, 2021
E U
10
I'm not sure. I always take nine in to have done at the shop.
September 9, 2021
J S
Is it universal?
June 14, 2023
10
No, these parts are not universal. Please see the 'Vehicle Fit' tab on the listing for a complete list of the vehicles and specs that these parts will fit.
June 15, 2023
Andra M
I need to know if these will fit a 2005 Ford focus zxw wagon?
August 14, 2023
10
Yes they should fit.
August 14, 2023
Efrain S
10
Yes, this part will fit your vehicle.
August 14, 2023
Jessica D
Volvo is a registered trademark of Volvo Trademark Holding AB. 1A Auto is not affiliated with or sponsored by Volvo or Volvo Trademark Holding AB.
See all trademarks.


