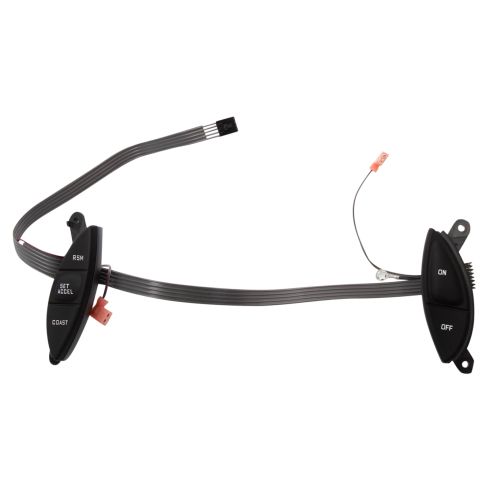
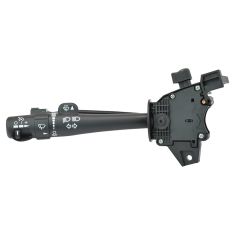
Complete Repair in One Purchase - Stop searching for parts individually and complete your repair with a customized kit or set from DIY Solutions.
High-Quality Parts from Trusted Brands - DIY Solutions' kits and sets are selected from the best automotive brands and include hard-to-find and even obsolete parts you may need for your vehicle.
Guaranteed Fit - DIY Solutions ensures its selected parts are quality-tested to guarantee fit and function.
Item Condition:New
Attention California Customers:
WARNING: Cancer and Reproductive Harm - www.P65Warnings.ca.gov.
Lifetime Warranty
This item is backed by our limited lifetime warranty. In the event that this item should fail due to manufacturing defects during intended use, we will replace the part free of charge. This warranty covers the cost of the part only.
Returns: Parts with electrical components cannot be returned once installed.
FREE Shipping is standard on Orders shipped to the lower 48 States (Contiguous United States). Standard shipping charges apply to Hawaii, Alaska and US Territories. Shipping is not available to Canada.
Expedited is available on checkout to the United States, excluding Alaska, Hawaii and US Territories as well as P.O. Boxes and APO/FPO/DPO addresses. Final shipping costs are available at checkout.
How to Replace Steering Wheel Mounted Cruise Control Switches 1998-2003 Ford Ranger
Created on:
Tools used
Socket Extensions
Flat Blade Screwdriver
Torque Wrench
Phillips Head Screwdriver
8mm Socket
Ratchet
T50 Socket
1. Disconnecting the Battery
Remove the negative battery terminal with an 8mm socket and ratchet
2. Removing the Steering Wheel
Pry off the trim buttons on the steering wheel
Remove the two 8mm bolts
Touch metal components
Remove the air bag
Disconnect the electrical connector from the bag
Remove the T50 Torx bolt in the center of the steering wheel
Disconnect the cable
Work the wheel off
3. Removing the Cruise Control Switches
Remove the four Phillips head screws from the switches
Remove the two Phillips head screws on the back cover
Remove the cable switches from the retainer
Remove the two spade connectors at the top
4. Installing the Cruise Control Switches
Insert the connector into place through the wheel
Tighten the four Phillips head screws
Plug in the switches
Insert the back cover into place
Tighten the two Phillips head screws
5. Installing the Steering Wheel
Insert the steering wheel into place
Connect the cable
Tighten the T50 Torx bolt to the center of the wheel
Torque the T50 Torx bolt to 30 foot-pounds
Connect the air bag connector
Insert the air bag into place
Tighten the two 8mm bolts to the wheel
Press on the trim buttons
Turn the key to the on position
6. Reconnecting the Battery
Reconnect the negative battery terminal
Tighten the terminal with an 8mm socket and ratchet
Check the airbag for deployment
Brought to you by 1AAuto.com, your source for quality replacement parts and the best service on the Internet.
Hi, I'm Mike from 1A Auto. I hope this how-to video helps you out, and next time you need parts for your vehicle, think of 1AAuto.com. Thanks!
In this video, we're going to be working with our 2001 Ford Ranger. We're going to show you how to remove and reinstall the cruise control switches in your steering wheel.
These have a ribbon type connector on them, which can be very brittle sometimes. It can get caught up in stuff inside of the steering wheel, bind and get torn or cracked, causing your cruise control to malfunction. This information is going to be the same for 1998 to 2003.
If you like this video, please click subscribe. We have a ton more information on this truck, as well as many other makes and models. If you want this part for your vehicle, you can follow the link down in the description over to 1AAuto.com.
Here are the items you'll need for this repair: flat blade screwdriver, 8mm socket, ratchet, socket extension, T50 Torx, Phillips screwdriver, and a torque wrench.
When working with or around any components of the airbag or SRS system, be sure to disconnect the negative terminal of the battery and allow the modules inside of the vehicle to fully power off for 30 minutes. SRS components can be identified by yellow wire harness wraps and yellow electrical connectors. Always be cautious around these components for power or static charges.
We're going to use an 8mm socket & ratchet to loosen the terminal on the battery or you can use a wrench. Loosen the clamp, wiggle it off of the terminal, and tuck it somewhere down to the side where it won't accidentally come back and complete the circuit.
To make it easier to show you, we're going to be working from the passenger side of the steering wheel here, but you'll have to repeat these steps on the passenger's side in order to remove the airbag. Pop this cover off with a flat blade screwdriver and the same one on the opposite side of the wheel. Remove the two 8mm bolts.
Be sure to touch metal components of the vehicle before removing the bag to make sure that there's no static charge on your body.
Disconnect the electrical connector at the back of the bag. Remove the T50 Torx bolt in the center of the steering wheel with the Torx bit, ratchet, and extension. Remove this connector. You may need to use a small flat blade screwdriver to get back there. Push the tab. Carefully wiggle this cable out. Now, you can use a steering wheel puller, but if you don't have access to one, you can normally hit the back of the wheel and work it back and forth. Carefully remove it so you don't tear out the clock spring.
Remove the four Phillips head screws for your switches. Remove these two Phillips head screws on the back cover of the steering wheel. Remove the back cover of the steering wheel.
We'll remove our switches and their cables from the retainer. Carefully pass the connector through and remove the two spade connectors at the top. It may help to use a small flat blade screwdriver to pry them off of the spades. Remove your switches.
Here we have our old cruise control switches that we removed from our vehicle and our new parts from 1AAuto.com. As you can see, these parts are exactly the same with the exception of some minor aesthetic differences. We have the same mounting locations. We have the same ribbon style connector, as well as these connectors on the ground here. This ribbon style cable can be very brittle, can become torn or caught inside of the wheel and possibly become damaged, making your cruise control malfunction. If you need to fix your cruise control switches, this new part from 1A Auto is going to go in direct fit just like your original equipment and fix you up right.
Send the connector back through the slot in the wheel. Send the buttons down into place. We'll reinstall our Phillips head screws. Be sure when installing this top screw on the on/off buttons that you get that ground wire on there too. Send the spade connectors around the back side of the wheel. Plug them in at the top. Flip the wheel over. Lock the ribbon into place.
Now, reinstall back cover. Be sure that the ribbon doesn't get pinched anywhere while we're doing this and that the holes for the airbag is going to reconnect or clear. Reinstall your two Phillips head screws. Send the wire harness from the clock spring back through the steering wheel. Pull the ribbon out of the way so you don't get it pinched. There is an alignment tab so you can turn the wheel until you feel it seat in. Push it back into place.
Reconnect the ribbon connector to the clock spring. Reinstall the T50 Torx bolt in the center. Bring it down with a socket and ratchet. Torque the bolt to 30 foot-pounds.
Reconnect the electrical connector. Reinstall the airbag into the wheel. Be sure that all wiring is out of the way of the bag and its mounting points. Reinstall the two 8mm screws on the back of the airbag. Once the screws are tight, reinstall the plastic covers.
The safest way to check that you installed your airbag correctly to make sure that it doesn't go off with you in the vehicle, we'll put the key in the ignition, turn it to the ON position and then reconnect the battery. If there is an issue and the bag is going to deploy, it does so while wear outside the vehicle.
Reconnect the battery. Tighten the clamp back up. We're going to use an 8mm socket & ratchet or you can use a wrench. Ensure your connection is tight. You're ready to go. Thanks for tuning in. We hope this video helped you out. Next time you need parts for your car, please visit 1AAuto.com. Also check out our other helpful how-to and diagnosis videos.
Product Reviews
Loading reviews
4.72/ 5.032
32 reviews
5 Stars
4 Stars
3 Stars
2 Stars
1 Star
27
3
0
2
0
Crusin'
W
August 20, 2017
Recently purchased a cruise switch assembly for a 2001 Ranger. Observed the video to ensure the work was within my capabilities. The part arrived quickly after ordering. It is exactly the same as the originally; only made in China. The installation was similar to the video; one exception being the wheel removal required a puller. Stearing wheel removal tool does not work; gear puller was required to loosen. Assembly was quick and easy. Thanks for posting the video! It takes the nknown outifthe work for a non auto mechanic.
Joe
September 23, 2017
Everything was fine except the off button was hard to push and it just didn't snap like the other buttons. but did work. steering wheel needed a puller to remove. other then that video was very helpful
Removed snd replaced cruise control switches 99 ford explorer
B
December 4, 2017
I needed to replace the cruise control switches on my 1999 ford explorer. The replacement switch was perfect and the video from 1A showing step by step procedures on how to complete the work was excellent. The price was very good compared to a local auto parts store. I received the part from 1A very quickly one day ahead of the scheduled delivery date. A very positive customer experience.
Perfect!
T
December 22, 2017
Easy to install by following video. Just as good as stock, premium feel!
E
March 27, 2018
Good product, good service and good price. Well pleased with all three.
1AZCC00178-Cruise Control Switch
Stephen
March 28, 2018
I followed the video instructions, got the air bag "bomb" off without setting it off! pulled the cables off the old switches, plugged in the new ones. Works great, Thank you
Great product
F
April 4, 2018
I ordered cruise control switches for my 1999 Ford Ranger that Im having trouble letting go of. I has a hiccup with my order because I accidentally put a digit incorrectly for my address. A1 couldnt have been more helpful in pointing me in the right direction. I got the part and it worked like a charm. With their easy to follow instructional videos on YouTube I installed myself. The part was way cheaper than buying from dealership. And doing it myself with A1s instruction saved me huge in labor. Quality parts, great customer service and installation instructions they have a new customer for life.
Don
April 18, 2018
Matched the OEM Part for fit and finish. Easy to install.
2001 ranger cruise control switches
T
May 13, 2018
Good quality. Easy to install. Great price. Highly recommend.
Perfect
Timothy
October 21, 2018
Only needed the switches but saved the cable for future repair. Repair video was accurate and the switch replacement was completed in less than 30 minutes. Super easy! Switches work and feel good.
Mike
October 29, 2018
Great replacement part. Looks exactly like the original.
Great product
Steve
February 16, 2019
Relatively simple installation. I tried cheaper switches that didnt work. These are great!
Do it yourself
K
March 8, 2019
Thought I would try it myself. Easy to order part. Viewed video on how to install. Amazing results ( it worked)
Replacement Cruise-control switches on 1999 Ford Explorer XLT
T
May 6, 2019
Reviewed 1A YouTube videos for Removal and Replacement procedures ('98 Explorer and '02 Ranger).
Inquired with 1A for recommendations on Motorcraft vs. generic replacement parts, and chose the generic switches plus wiring harness assembly 1A used in both How-To videos.
Performed the Remove and Replace labor myself, with only a minor "hitch" of needing a gear-puller to remove steering wheel that was "stuck" on splined-shaft.
Put everything back together, and it worked-first-time.
Economical fix for an annoying problem.
2001 Explorer Cruise Control
George
June 8, 2019
Changing out the old non-working cruise control was intimidating. After watching the 1A video, I decided to give it a try. The part fit perfectly, exactly as the video had shown. Even more difficult was changing a window actuator. Again, 1A came through...has saved me hundreds of dollars.
wrong part
R
July 7, 2019
the part looks fine and i got it pretty fast, its not the right one
i think there is two different styles this ant it mine are rectangular
and snap in to the wheel and only have to connections this one has four.I'll be sending this one back
can you send me the right one please thx
M
August 14, 2019
Great product and easy installation.Easy installation video
perfect fit
B
April 25, 2020
Perfect fit . Very easy install overall.
Ranger Cruise Control Buttons
Ted
February 9, 2022
Excellent parts. Better than factory buttons, which turned hard and wouldn't depress anymore. This material doesn't seem like it will ever turn hard.
Switches were ok
James
February 13, 2022
Pretty sure it should be illuminated but only one of the switches lights up and even that one is hard to see. At least they aren't all cracked and broken anymore I guess
Bruin
March 1, 2022
Works great!
Switch
nick
June 21, 2022
Good price fast shipping as advertised easy install
DAVID
September 25, 2022
This part fit exactly where the original was installed and works perfectly. The video showing installation was very helpful. I am pleased with this experience.
David
February 4, 2023
Great product.Fits perfect. Easy install. Works like new.
Greg
March 6, 2023
Perfect match
Nicholas
May 19, 2023
Great product and wild buy again.
Love it
Lane
July 5, 2023
Easy to install and looks and works great!
Works Great for 2001 Ford Ranger
Ryan
July 18, 2023
Used this replacement for the cruise control buttons on my 2001 Ford Ranger. The product worked great and the video 1A Auto provided was very helpful to DIYing this replacement myself. Thanks!
Steve
September 29, 2023
Excellent fit, works great!
Replacing wiring not required if only switches are bad
Carl
December 12, 2023
This cruise control switch works great! Delivery was fast! The Youtube video gave me the confidence that I could install it. The only reason I docked it one star was that the video failed to point out that if the problem was with the switches and not the wiring, only the switches needed to be installed, which is what I did. This did not require removing the steering wheel or rerouting the wiring, so it was much quicker and easier.
Right fit and easy instructions to follow
Pete
August 26, 2024
I'm giving this a 5 star review as the part arrived quickly, the installation instructions were easy to follow, and the part appears to be an exact fit. However, it isn't working, and I'm wondering if I'm missing an easy step somewhere. Again, I'm assuming the part is good and it's an error on my part. I also just ordered a blower motor resistor, as I'm confident in the parts being in working order.
Great replacement controls.
Larry
December 4, 2024
I bought two cruise controls for two vehicles. The installation video was very helpful. The new controls were installed and an operational check was done. The vehicles now have an operating cruise control.
Customer Q&A
the photos show no switches on the right part. The description says 5 switches. the black photo at the end of the photos shows switches on the right side. What's up?February 6, 2018
E L
10
it's exactly as your old oem part with different font on description of functions
February 6, 2018
Loren O
10
The right switch has the accel, resume and coast or cancel buttons. Great kit and easy to install.
February 6, 2018
Robert W
10
It matched the original exactly. Easy to remove and install.
February 6, 2018
W G
10
I received the proper switch assembly for my 2001 Explorer. All 5 switches are there.
February 14, 2018
E I
are the switches back-lit?April 2, 2020
Tom B
10
Hello Tom! These switches are made to OE specifications, so if your originals are back-lit then these will be as well!
April 2, 2020
T I
Can this part have an effect on the horn?June 9, 2023
Ron H
10
This typically will not affect the horn.
June 12, 2023
Emma F
10
No. You have to disconnect the horn to install, but in wiring harness goes under the horn contacts.
July 5, 2023
Lane C
Where is this component made?September 25, 2023
Harry C
10
I cannot recall where it was manufactured!!! However, I installed it over 2 years ago and I have had no issues!
September 25, 2023
Mark N
10
I dont know but it worked great. I use it all the time on the highway.
September 25, 2023
David T
Customer service
877-844-3393
Monday - Friday 8:00am - 9:30pm ET Saturday - Sunday 8:00am - 4:30pm ET
Enter Vehicle Year Make Model
Specify your vehicle's year, make and model to guarantee fit.
Year
Make
Model
Options
Drivetrain
This part doesn’t fit a . Select from parts that fit.