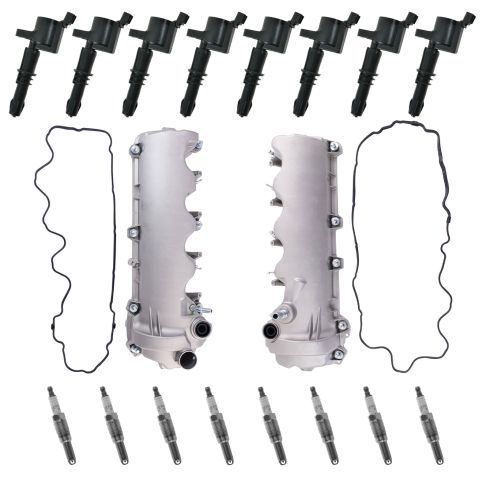
Complete Repair in One Purchase - Stop searching for parts individually and complete your repair with a customized kit or set from DIY Solutions.
High-Quality Parts from Trusted Brands - DIY Solutions' kits and sets are selected from the best automotive brands and include hard-to-find and even obsolete parts you may need for your vehicle.
Guaranteed Fit - DIY Solutions ensures its selected parts are quality-tested to guarantee fit and function.
Highest Quality Materials
Made from highest quality materials that meet or exceed OEM standards
Quality Tested - built to a strict level of product standards.
Item Condition:New
Attention California Customers:
WARNING: This product can expose you to chemicals including Lead and Lead Compounds, which are known to the State of California to cause cancer, and birth defects or other reproductive harm. For more information, go to www.P65Warnings.ca.gov.
Lifetime Warranty
This item is backed by our limited lifetime warranty. In the event that this item should fail due to manufacturing defects during intended use, we will replace the part free of charge. This warranty covers the cost of the part only.
Returns: Parts with electrical components cannot be returned once installed.
FREE Shipping is standard on orders shipped to the lower 48 States (Contiguous United States). Standard shipping charges apply to Hawaii and Alaska.
Shipping is not available to a P.O. Box, APO/FPO/DPO addresses, US Territories, or Canada for this item.
Expedited is available on checkout to the United States, excluding Alaska, Hawaii.
Final shipping costs are available at checkout.
How to Replace Spark Plug 2006-08 Ford Explorer
How To Install Replace Ignition Coils 4-6L V8 2006-08 Ford Explorer F150 Mustang More
Created on:
Tools used
Socket Extensions
Torque Wrench
Paper Towels
8mm Socket
7mm Socket
9/16 Inch Spark Plug Socket
Ratchet
Magnet - Extendable
1. Removing the Ignition Coil
Disconnect the ignition coil wiring harness
Remove the two 8mm bolts from the ignition coil
Pull the ignition coil up and out
2. Removing the Spark Plug
Loosen the spark plug with a 9/16 inch spark plug socket
Remove the spark plug
3. Installing the New Spark Plug
Put the new spark plug into place
Tighten the spark plug with a 9/16 inch spark plug socket
Tighten the spark plug to 18-20 foot-pounds of torque
4. Installing the New Ignition Coil
Push the new ignition coil into place with the wiring connector facing the rear of the vehicle
Insert the two 8mm bolts into the ignition coil
Connect the ignition coil wiring harness
Repeat Steps 2 through 6 for the remaining coils
Brought to you by 1AAuto.com, your source for quality replacement parts and the best service on the Internet.
Hi, I'm Mike from 1A Auto. I hope this how-to video helps you out, and next time you need parts for your vehicle, think of 1AAuto.com. Thanks!
In this video, we're going to show you how to replace the spark plugs. This is a 2006 Ford Explorer. It has the 4.6-liter 3-valve motor, same motor that's in a lot of different Ford products from Mustangs to F-150s. The items you'll need are 7mm or 8mm socket. It kind of depends on the size of the bolts that hold the ignition coils in. Then you'll need a 9/16 spark plug socket, or we do it with a deep socket stick magnet and a paper towel. We'll show you how that works. Then you'll need a ratchet and extension for both of those.
Open up the hood, and in the engine there are four coils on each side: one, two, three, and four here on the driver side. You'll need to unplug the harness. There's just a little tab that you can press with your thumb and then pull. Pull and wiggle it a little bit to get it off. Then either a 7mm or 8mm bolt that holds the coil down. You see the ones on the driver side. Passenger side is obviously located somewhat in the same position on the other side.
I'm going to remove the second one back. It's just the easiest one to video. Again, push the tab with your thumb. Pull off the connector. 8mm socket with a ratchet and extension, remove that bolt. Then once the bolt is off, make sure you retrieve it. Then the coil will pull out with just a little bit of a half turn, as well as just moving it back and forth and it pulls up and out. With the coil out you can see each spark plug is down underneath the coil. The right tool is a 9/16 spark plug socket. Spark plug sockets have a little cushion in them that grips the spark plug so that when you pull it up and out, the spark plug comes with the socket. You can see I'm using just a 9/16 deep socket and carefully keeping it lined up. You can hear these plugs probably had never been out before so they're making some noise. Then they eventually come out. If you had a spark plug socket, once you get it loosened up you just pull it right out. As you can see here, I don't have one so I just used a stick magnet to go in there and pull the old spark plug out.
To put them in without a spark plug socket, just take a little piece of paper towel and wrap it just once around the spark plug. This does what a spark plug socket should do. You put it in there and then it will stay in the socket inverted. At this point you just put the plug down in there. Make sure that that extension is lined up right in the center of the hole as you start it out, and you should be able to thread the new plug in there basically until it's just about seated, as you can see there. If you have any trouble, you want to back off. You don't want to cross thread your spark plugs. Then you tighten them up to about 18 to 20 foot pounds. Then I'm just using a little pick to pull that piece of paper towel out.
The new coil from 1A Auto is going to go right down in just like the original one. You want to push it down in and give it a good firm push. Make sure that the hole lines up with where the bolt goes into the intake manifold or head. Start that bolt on and tighten it up. Obviously you'll repeat this procedure for all eight, or however many you want to replace. Make sure you reconnect all of your coils, and you're all set.
Thanks for tuning in. We hope this video helped you out. Next time you need parts for your car, please visit 1AAuto.com. Also check out our other helpful how-to and diagnosis videos.
Tools used
Socket Extensions
8mm Socket
Ratchet
1. Removing the Ignition Coil
Disconnect the ignition coil wiring harness
Remove the two 8mm bolts from the ignition coil
Pull the ignition coil up and out
2. Installing the New Ignition Coil
Push the new ignition coil into place with the wiring connector facing the rear of the vehicle
Insert the two 8mm bolts into the ignition coil
Connect the ignition coil wiring harness
Repeat Steps 1 and 2 for the remaining coils
Brought to you by 1AAuto.com, your source for quality replacement parts and the best service on the Internet.
Hi, I'm Mike from 1A Auto. I hope this how-to video helps you out, and next time you need parts for your vehicle, think of 1AAuto.com. Thanks!
In this video, we're going to show you how to replace the ignition coils on this 2006 Ford Explorer. It has the 4.6 liter V8, and the only tool you'll need is an 8 millimeter socket with a ratchet and extension.
Open up the hood, and in the engine, there are four coils on each side: one, two, three, and four here on the driver side. You'll need to unplug the harness. There's just a little tab that you can press with your thumb and then pull. Pull and wiggle it a little bit to get it off. Then either a 7mm or 8mm bolt that holds the coil down. You see the ones on the driver side. Passenger side is obviously located somewhat in the same position on the other side.
I'm going to remove the second one back. It's just the easiest one to video. Again, push the tab with your thumb. Pull off the connector. 8mm socket with a ratchet and extension, remove that bolt. Then once the bolt is off, make sure you retrieve it. Then the coil will pull out with just a little bit of a half turn, as well as just moving it back and forth and it pulls up and out.
The new coil from 1A Auto is going to go right down in just like the original one. You want to push it down in and give it a good firm push. Make sure that the hole lines up with where the bolt goes into the intake manifold or head. Start that bolt on and tighten it up. Obviously you'll repeat this procedure for all eight, or however many you want to replace. Make sure you reconnect all of your coils, and you're all set.
Thanks for tuning in. We hope this video helped you out. Next time you need parts for your car, please visit 1AAuto.com. Also check out our other helpful how-to and diagnosis videos.
ENG00077
In Stock
Product Reviews
Loading reviews
There are no reviews for this item.
Customer Q&A
No questions have been asked about this item.
Customer service
877-844-3393
Monday - Friday 8:00am - 9:30pm ET Saturday - Sunday 8:00am - 4:30pm ET
Mercury is a registered trademark of Ford Motor Company. 1A Auto is not affiliated with or sponsored by Mercury or Ford Motor Company.See all trademarks.
Enter Vehicle Year Make Model
Specify your vehicle's year, make and model to guarantee fit.
Year
Make
Model
Options
Drivetrain
This part doesn’t fit a . Select from parts that fit.