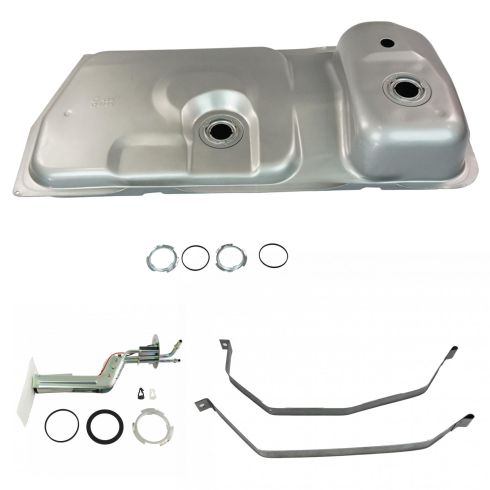
Kit Includes: (2) Fuel Tank Straps (1) Fuel Tank (1) Fuel Pump Hanger with Pump
Fuel Tank Capacity: 15.4 Gallon
Specification
Engine Fuel Supply
with Fuel Injection
VIN Code
8th Vin Digit F
Engine Displacement (Metric)
V8 5.0L
Item Condition:New
Attention California Customers:
WARNING: This product can expose you to chemicals including Di(2-ethylhexyl)phthalate (DEHP), which is known to the State of California to cause cancer, and birth defects or other reproductive harm. For more information, go to www.P65Warnings.ca.gov.
Lifetime Warranty
This item is backed by our limited lifetime warranty. In the event that this item should fail due to manufacturing defects during intended use, we will replace the part free of charge. This warranty covers the cost of the part only.
Scratches and Dings
Due to the nature and size, a fuel tank may incur minor dents or scratches from handling and load shifting during shipping. These damages do not affect the fit or function of the part. Neither our 60 Day satisfaction guarantee, nor the manufacturer's warranty, cover these insignificant damages.
FREE Shipping is standard on orders shipped to the lower 48 States (Contiguous United States). Standard shipping charges apply to Hawaii and Alaska.
Shipping is not available to a P.O. Box, APO/FPO/DPO addresses, US Territories, or Canada for this item.
Expedited is available on checkout to the United States, excluding Alaska, Hawaii.
Final shipping costs are available at checkout.
How To Replace Fuel Tank 1983-97 Ford Mustang PART 1
How To Replace Fuel Tank 1983-97 Ford Mustang PART 2
Created on:
Tools used
13mm Socket
Hammer
Flat Blade Screwdriver
Rust Penetrant
Jack Stands
8mm Socket
Chisel
Drain Pan
10mm Socket
Ratchet
Floor Jack
Needle nose pliers
1. Raising and Securing the Vehicle
Raise the vehicle with the jack
Secure the Vehicle on jack stands
Consider replacing the tank, straps and sending unit at the same time
2. Preparing the bolts
Spray penetrating oil on the tank strap bolts
Spray penetrating oil on the filler neck bolts
Let the bolts soak
3. Unbolting the Tank
Remove the tank bolts with the 8mm socket
Remove the filler neck bolts with the 10mm socket
Remove the filler neck bolts near the gas cap with the 10mm socket
4. Disconnecting the Wiring
Undo the electrical connector with a screwdriver
5. Disconnecting the Fuel Lines
Prepare a drain pan
Pry out the tab on the first fuel line with a screwdriver
Pull the first fuel line out by hand
Pry out the two tabs on the second fuel line with a screwdriver
Pinch and twist the fuel line ears
Remove the white nylon lock
Pull the second fuel line off by hand
Twist the third fuel line with pliers
Pull off the third fuel line by hand
6. Removing the Strap Bolts
Support the tank with a jack
Apply more penetrating oil to the tank strap bolts
Remove the strap bolts with a 13mm socket
7. Removing the Tank
Pull down the straps
Slowly lower the jack to let the tank down
Carefully work out the fuel filler neck
Brought to you by 1AAuto.com, your source for quality replacement parts and the best service on the Internet.
Hi, I'm Mike Green. I'm one of the owners of 1A Auto. I want to help you save time and money repairing or maintaining your vehicle. I'm going to use my 20-plus years experience restoring and repairing cars and trucks like this to show you the correct way to install parts from 1AAuto.com. The right parts installed correctly: that's going to save you time and money. Thank you and enjoy the video.
In this video we're going to replace the tank in this '92 Mustang, really the same procedure for any car. Unhook the lines, the electrical connections and then pull the tank. Tools we'll need are pretty basic and in addition to this you will need jack and jack stand we'll need to raise the car up.
If you think about replacing a tank or you have to replace a tank in an older car like this . this is an old Mustang . you really want to consider the tank, the straps and the sending unit. The reason I'm replacing the tank in this car is because it's starting to rust out and it's leaking. I definitely am going to replace the straps because they're going to be rusty. I want to make sure that they don't break. I also want to think about replacing the sending unit because as you pull it down chances are if that sending unit is rusty and the lines on it are rusty and crusty, they may break and just spring a leak. The owner of this car has supplied me with the tank and straps, but no sending unit, so I'm going to try and do it without hurting the sending unit.
The first thing I'm going to do is I'm going to take some penetrant with one of these red tubes and spray like crazy and hopefully I get a lot on to the other end of this bolt and then also the other one that's up over here and then there's another bolt for the fuel filler neck. While we're letting those bolts soak, we're going to take out 5 bolts here. This is an 8mm. You can also use a 5/16th inch wrench. Now, there are four 10mm bolts right up here and even though this car is a little crusty they do come off pretty easy.
Here on the top side, there are three more 10mm bolts up here. Now I'm using a screw driver here, I'm doing the electrical connection at the rear of the car. You can see I'm near at the bumper where the Mustang insignia is. There are two fuel lines up here. I'll do my best to show you how to disconnect them.
The first one has got this little tab in it that you could kind of pry out with a screwdriver and then you can pull it with your hand and when you pull this one off . I'm going to change around here. When you pull this one off you're going to get a lot of gas, so you want to have a catch palm underneath. And then your second one is this one here. What it is, is on two sides is these little tabs and you want to force a screwdriver between that tab and the black bezel here. I'll do them on this side first. You push it really well and work your screwdriver between there and pull that black a little bit and then on the other side same thing, push. Once you push it up there's actually ears up here that you grab on to and then twist and this little white nylon lock comes out and then you have to pull that one off. Then there's your white nylon.
Right here, there's a line right behind the wheel. I'm kind of looking from the other way. There's a line right here. What you want to do is put a pair of pliers on right here, twist it, and then it will pull off.
Okay, so we get our jack, pretty much right in the center of the tank here. That's just the plastic that I'm lifting on right now. We will lift it up pretty good to hold the tank right in place. Our penetrating oil has had some time but we're not going to be shy here with it. Spray a little more up in there. Same with the other side. These are 13 mm bolts. Let's hope for it to do something good, that it doesn't rust and just break. That looks pretty good. These actually are designed that if they break off, there's just a little clip here and you would ask either a hardware store or Ford to give you a clip that works.
I'm going to speed things up here a little bit and then the other side. Okay, so I'm pleased with that, no breaking. I've got my straps, the tray here and I've got my fuel lines undone, my electrical connections undone, so now I can just star slowly Letting the tank down. Now it's a matter of basically letting the tank down slowly and working that fuel filler neck out.
There's my tank out.
We hope this helps you out. Brought to you by www.1AAuto.com, your source for quality replacement parts and the best service on the Internet. Please feel free to call us toll-free, 888-844-3393. We're the company that's here for you on the Internet and in person.
Tools used
13mm Socket
Hammer
Jack Stands
Block of Wood
Flat Blade Screwdriver
8mm Socket
Drill
Chisel
10mm Socket
Ratchet
Wire Brush
Floor Jack
Needle nose pliers
1. Beginning the Repair
This is Part 2 of a two part video
Please consult Part 1 for earlier instructions
Follow the steps outlined in Part 1
2. Preparing the Tank
Use a wire brush to clean the fuel sending unit settings
Unplug the sending unit lines
Use a hammer and chisel to loosen the lock ring tabs
Remove the lock rings
Remove the sending units
Remove the sending unit grommet
3. Installing the Sending Units in the New Tank
Attach the grommet, keeping dirt out of the tank
Insert the new O-ring for the first sending unit
Line up the sending unit tabs with the tank slots
Put in the sending unit
Attach the lock ring underneath all three tabs
Use the hammer and chisel to push the lock ring tabs into place
Insert the new O-ring for the second sending unit
Line up the sending unit tabs with the tank slots
Put in the sending unit, making sure the hoses are placed correctly
Attach the lock ring underneath all three tabs
Use the hammer and chisel to push the lock ring tabs into place
Insert the fuel filler neck grommet
4. Replacing the Fuel Tank Straps
Hold the first fuel strap
Use needle nose pliers to remove the rear fuel strap bolt
Remove the fuel strap
Repeat for the second strap
Insert the longer fuel strap on the passenger side
Insert the rear fuel strap bolt
Insert the shorter fuel strap on the driver side
Insert the rear fuel strap bolt
5. Installing the New Fuel Tank
Reattach the plastic protector and fuel tank padding
Position the fuel tank
Hold the tank in place with a jack
Feed the hoses through the appropriate clips
Reattach the electrical connection
Hold the tank in place
Position one tank strap
Hold the strap in place with the jack
Position the second tank strap
Tighten the front bolt on the strap held by the jack
Move the jack to the other strap
Tighten the front bolt on the second strap
Finish tightening the bolts
6. Attaching the Connectors
Insert the fuel line nylon lock
Reattach the fuel lines
Attach the lock clamp
Drill a hole in the fuel tank weld
Bolt the tank to the clamp
Bolt the filler neck in place
Add fuel to the tank
Brought to you by 1AAuto.com, your source for quality replacement parts and the best service on the Internet.
Hi, I'm Mike Green. I'm one of the owners of 1A Auto. I want to help you save time and money repairing or maintaining your vehicle. I'm going to use my 20-plus years experience restoring and repairing cars and trucks like this to show you the correct way to install parts from 1AAuto.com. The right parts installed correctly: that's going to save you time and money. Thank you and enjoy the video.
This is part 2 of reinstalling the tank in this Ford Mustang, and again this repair is the same for most vehicles; it's basically disconnecting the fuel lines and electrical connections to the tank, pulling the tank down, then changing over anything you want to change over or installing new items, and then replacing the tank and here's a look at the tools you will need.
Remember I talked about putting new settings in? You can see this is a little crusty here so what I'm going to do is use a cold chisel and a wire brush and clean up around these, here and here. After that I'll figure out where the lock rings are and I'll show you how to undo the lock rings. This can unplug. Once you clean up here pretty good, you can see the little bend over there and then there's a little tap of metal sticking up right there. You want to take your cold chisel or a screwdriver or something and actually contact this right here. It's good to get all three to try and get it going. Now it's moving pretty well. There's the ring, and there's my sending unit on this one. This just pulls right up, the grommet. Grab that as well as this, on this side.
Put the grommet back on, get the sending unit back in here. What is going on? Obviously I'm trying to get as little dirt in there as possible, hopefully none. Okay our new tank comes with a new lock ring and an O-ring so you want to make sure you put the O-ring down in there. The sending unit does have tabs that line up with slots so you can't really put it in the wrong place. I guess you could but you would really have to force it. Put the sending unit down in there, take the lock ring and make sure it's going underneath all three tabs.
Okay so that one is started. I'll do this one; we'll take the old lock ring off. This sending unit is a little fun, okay, how it goes in, so I'm going to take it all the way out so I can sure you here. Like I said, think about replacing your sending unit when you do this. You're going to put it down in. When you get to here, you want to pull it up and turn it around. This is my rubber gasket. So put the rubber gasket down into its groove and here are the spaces of the tab there. It goes down into that slot. Sometimes it can be challenging to get these down in beyond the ears. Put the lock ring on, get it started, and then it's just like taking them out.
Then we'll do that to the other side. Then we've also taken our grommet over here for where the fuel filter goes in. I've cleaned it up a little bit, and we'll put it back in.
Okay so now we want to get the straps out. Basically, you kind of lift up and then probably get a pair of needle-nose pliers in here and get hold of the bolt here and just pull it out. There are two different straps; you want the longer one on the passenger side. Put it up in there, and then push that in there. Same thing for the other side.
We got a new tank. It's all set in the little plastic protector. I put all the pads I transferred all the pads and duct tape and everything. They just help to reduce noise and vibration so we're ready to put it up in.
Feeding my hoses through their clip over here, hook up this hose, pull these hoses down a little more, looks pretty good, hook up my electrical connection. Next thing I'm going to do is I'm going to hold the tank up; these down here. I'm going to put my jack right under my strap. You don't want to be shy with the jack; you want to jack the strap right up in there, and then get the bolt going. Once you got one side, then you can move the jack over to the other side. Then once you got both of them in then you want to tighten them right up nice and snug. It might help you there too. I got a block of wood right up under the strap to help me with that. Okay now we're going to re-hook up our lines so we're going to put this little lock nylon up in there. Put the line up in, bring the lock down, push that up on, and pull the lock down into it. On this one, put it on the filter, push on it nice and tight and then put this lock right through. This one's all set. Tank's tight, connections are hooked up, and all we have to do, is we need to drill a little hole right here and we're going to drill it right on the outside of the weld here. You can see where the weld is right here; we're going to drill it on the outside so we can bolt that back up and then put our bolts back into the filler neck, the four down below, the three up top. Put some gas in it and we should be all set.
We hope this helps you out. Brought to you by www.1AAuto.com, your source for quality replacement parts and the best service on the Internet. Please feel free to call us toll-free, 888-844-3393. We're the company that's here for you on the Internet and in person.
FKA09366
In Stock
Product Reviews
Loading reviews
5.00/ 5.01
1review
5 Stars
4 Stars
3 Stars
2 Stars
1 Star
1
0
0
0
0
James
January 11, 2022
Don't risk a bad day because of a fuel problem. Instead install a new fuel tank kit and breathe easy.
Customer Q&A
Does this kit include a fuel filler pipe/neck? Apologies for being new to mechanic work. Kind Regards, CharityMay 26, 2021
Charity H
10
The fuel filler pipe is not included with this kit.
May 26, 2021
Emma F
Does this include the sending unit?September 5, 2021
Donny B
10
does this tank come also with the fuel tank sending unit to the fuel gauge on my dash?
September 6, 2021
Pete C
Is the float included?January 11, 2022
Ed Z
10
Yes, the float will be included.
January 11, 2022
Emma F
Customer service
877-844-3393
Monday - Friday 8:00am - 9:30pm ET Saturday - Sunday 8:00am - 4:30pm ET
Ford is a registered trademark of Ford Motor Company. 1A Auto is not affiliated with or sponsored by Ford or Ford Motor Company.See all trademarks.
Enter Vehicle Year Make Model
Specify your vehicle's year, make and model to guarantee fit.
Year
Make
Model
Options
Drivetrain
This part doesn’t fit a . Select from parts that fit.