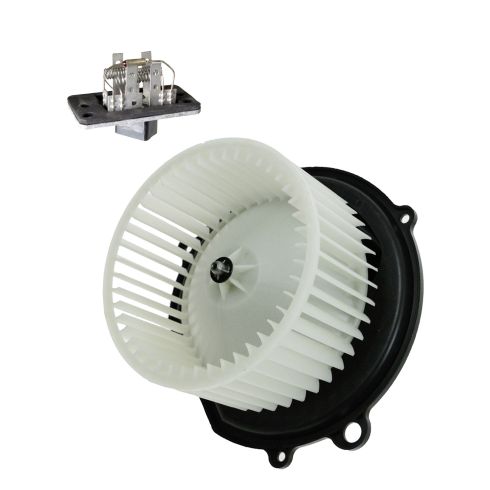
Kit Includes: (1) Heater Blower Motor (1) Heater Blower Motor Resistor
Specification
Vehicle Heating & A/C Option
with Manual Air Conditioning
Highest Quality Materials
Made from highest quality materials that meet or exceed OEM standards
Quality Tested - built to a strict level of product standards.
Item Condition:New
Attention California Customers:
WARNING: This product can expose you to chemicals including Di(2-ethylhexyl)phthalate (DEHP), which is known to the State of California to cause cancer, and birth defects or other reproductive harm. For more information, go to www.P65Warnings.ca.gov.
Lifetime Warranty
This item is backed by our limited lifetime warranty. In the event that this item should fail due to manufacturing defects during intended use, we will replace the part free of charge. This warranty covers the cost of the part only.
Returns: Parts with electrical components cannot be returned once installed.
FREE Shipping is standard on Orders shipped to the lower 48 States (Contiguous United States). Standard shipping charges apply to Hawaii, Alaska and US Territories. Shipping is not available to Canada.
Expedited is available on checkout to the United States, excluding Alaska, Hawaii and US Territories as well as P.O. Boxes and APO/FPO/DPO addresses. Final shipping costs are available at checkout.
How to Replace Blower Motor Resistor 1996-2007 Ford Taurus
How to Replace Blower Motor with Fan Cage 1996-2007 Ford Taurus
Created on:
Tools used
Socket Extensions
8mm Socket
Ratchet
1. Remove the AC Fan Speed Resistor
Remove the trim panel below the glove box by pulling near the pins.
Open the glove box and pull the tabs in to allow the glove box to come down.
Disconnect the connector.
From the bottom remove the bolts on the resistor using the ratchet.
Pull the resistor down and out.
2. Installing the New AC Fan Speed Resistor
Put the resistor into place.
Replace the bolts.
Reconnect the resistor.
Push the tabs in on the glove box and put it back into place.
Push the bottom trim panel back into place.
Brought to you by 1AAuto.com, your source for quality replacement parts and the best service on the internet.
Hi. I'm Mike Green. I'm one of the owners from 1A Auto. I want to help you save time and money repairing and maintaining your vehicle. I'm going to use my 20 plus years of experience restoring and repairing cars and trucks like these to show you the correct way to install parts from 1AAuto.com. The right parts installed correctly, that's going to save you time and money. Thank you and enjoy the video.
In this video, we're going to show you how to replace the blower motor resistor in this 2001 Ford Taurus. It should be similar for most '96 to '07 Taurus. All you'll need is an 8 mm wrench or a socket with an extension and ratchet.
Looking at the glove box, then up underneath, there's a big trim panel and you can see the two pins, one there and one there. You just going to want to reach in and pull them down. They're going to come out easy. They'll probably be difficult for you, especially this one over here. If you open your glove box then you take the little ears, and force them in, then the glove box will come down. This here is your blower motor resistor. Best to reach it is to use an extension and the 8 mm socket. First, you're going to reach in here with your thumb and there is a little tab right here. You press on the tab and pull your connector down and out.
Then I'm going to go up from the bottom. We took that bottom trim panel off. With my extension and my ratchet, it makes it easy. I can see it really well. Remove those two bolts and then the resistor comes down and out. What can happen on these resistors is things can get corroded or some of these wires can break. It's actually working fine so let's get that back up in. Put your glove box back up in. It goes back up. Now, we could put our trim plate back up.
We hope this helps you out. Brought to you by www.1AAuto.com, your source for quality replacement parts and the best service on the internet. Please feel free to call us toll-free, 888-844-3393. We're the company that's here for you on the internet and in person.
Tools used
Socket Extensions
Phillips Head Screwdriver
8mm Socket
Ratchet
1. Access the blower motor resistor
Remove the lower vanity panel under the glove box and set aside.
2. Remove the Heater A/C blower motor
Use your 8mm socket and extension and ratchet to remove the three bolts around the motor.
Pull down your glove box by opening it and pushing in on the sides to access the bolts easier.
Pull the motor down.
Unplug the wiring harness from the motor.
3. Install the new Heater A/C blower motor
Install the blower motor and plug everything back in.
Bolt the motor back in with your 8mm socket and ratchet.
Plug everything back in.
Test and replace the vanity cover, clicking the push clips back into place.
Brought to you by 1AAuto.com, your source for quality replacement parts and the best service on the internet.
Hi, I'm Mike Green. I'm one of the owners of 1A Auto. I want to help you save time and money repairing and maintaining your vehicle. I'm going to use my 20 plus years of experience repairing and restoring cars and trucks like this to show you the correct way to install parts from 1AAuto.com. The right parts installed correctly, that's going to save you time and money. Thank you and enjoy the video.
In this video, we'll be showing you how to remove and install the blower motor, the sand heater and AC blower motor on this '01 Ford Taurus, the same as pretty much '96 to '07 Taurus. The only tool you'll need is an 8 millimeter socket and ratchet or a wrench. Usually the symptoms of a blower motor going bad is the blower motor starts making noise, high pitch squealing or a low pitch tum. Generally if your blower motor doesn't work at certain speed, you need to check your blower motor resistor.
Looking at the glove box and go underneath, there's a big trim and you can see there's two pins, one there and one there and you're just going to want to reach in and pull them down and this is going to come off pretty easy. It will probably be a little difficult for you as opposed to this one over here. Now, as you can see right here our motor, and there are three screws holding it in, one there and then two up top, there's one over there and then this one right up in there and those are 8 millimeter so we'll remove those.
If you open your glove box, and then you take the little gears and push them in and pull it down, your glove box will come down. You can see that you can, if you need to access those bolts with a wrench, you can access it from in here. This is just a little note to show you in case you have to use an 8 millimeter wrench. I actually use a socket and ratchet so I just go from underneath but you can reach it here through the glove box. The best thing is to have an 8 millimeter socket with a ratchet and an extension. Just before you go too far, here's your connector. You're going to want to stick your hand in there, pry it apart and pull it off.
Okay, once you have the three bolts out, you'll just kind of want to grab on it pretty good to get a little bit and it will come down. You don't want to get stuck in the carpet and stuff, then out. Here's a new motor from 1A Auto and here's the original. You can see everything is the same. The connection is the same. You can have the bolt up and go in just like the original. Okay, actually on this car, the original is working fine. I just want to show you for comparative purposes so you know you're getting the right stuff from 1A Auto.
Okay, putting it back up in is just the reverse. You want to make sure you got the slot part near the dash here. Get your wire out of the way, push up and in, there are guide pins here that help you make sure it goes in there correctly. Please excuse my head here. It's not exactly easy to film without getting in the way. Drive one of our bolts in there and we'll start with the other and start another bolt here. Then reconnect the harness. Now we can put our trim plate back up.
We hope this helps you out. Brought to you by www.1AAuto.com-- your source for quality replacement parts and the best service on the internet. Please feel free to call us toll-free, 888-844-3393. We're the company that serves you on the internet and in person.
Product Reviews
Loading reviews
5.00/ 5.05
5 reviews
5 Stars
4 Stars
3 Stars
2 Stars
1 Star
5
0
0
0
0
Ford Taurus blower motor
Darlene
April 6, 2020
It fit perfectly and works great.
Jeffrey
August 3, 2021
Item was delivered in the specified time frame. It was a exact duplicate/replacement for the original. Love the videos showing what is required to change the part. You have a good idea of what you are getting into.
Exactly what I needed
Steve
March 3, 2022
As always, the part from 1A Auto was packed well, looked great and fit perfectly. I always watch the 1A Auto videos for useful tips to make installation easier.
What I needed
Dr.
July 31, 2022
Great price and totally fixed my problem!!
Barry
August 11, 2022
Easy repair, no concerns.
Customer Q&A
No questions have been asked about this item.
Customer service
877-844-3393
Monday - Friday 8:00am - 9:30pm ET Saturday - Sunday 8:00am - 4:30pm ET
Ford is a registered trademark of Ford Motor Company. 1A Auto is not affiliated with or sponsored by Ford or Ford Motor Company.See all trademarks.
Enter Vehicle Year Make Model
Specify your vehicle's year, make and model to guarantee fit.
Year
Make
Model
Options
Drivetrain
This part doesn’t fit a . Select from parts that fit.