Brought to you by 1AAuto.com, your source for quality replacement parts and the best service on the internet.
Hi, I'm Mike Green. I'm one of the owners of 1A Auto. I want to help you save time and money repairing and maintaining your vehicle. I'm going to use my 20+ year's experience restoring and repairing cars and trucks like this to show you the correct way to install parts from 1AAuto.com. The right parts installed correctly that's going to save you time and money. Thank you and enjoy the video.
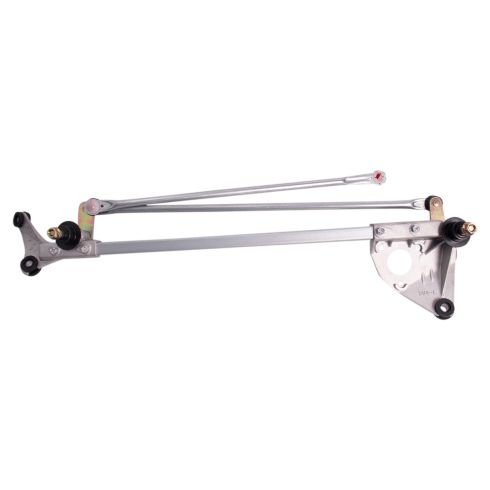
In this video we're going to show you how to remove and replace the wiper transmission on this 95 Accord same as any '94 to '97 Accord. Tools you'll need are some various millimeter size sockets, Phillips screwdriver, flat blade screwdriver, and a hammer. These are the sizes on this vehicle. Your vehicle may differ a little bit.
I'm removing the wiper arms on this '95 Accord. You see I've got the hood open and these little knobs are actually 14mm nuts, and you can just take them off. And then what you'll want to do is press down and work the arm off like that. So on the top here there's one, two, three, four, five, six, seven of these little clips, and what you do is just unscrew, and you don't want to be pressing down hard, and you unscrew and in that middle screw is like a little clip that holds the pin in place. Once you have that out you can easily pry this clip up and out of the way. So I'll do that for all seven. Once you've got the Phillips screw kind of coaxed out, there's a bunch of clips right here that are just flat head. What you can do is kind of grab on to the plastic here and pull up nice and gently at each one and kind of pull them up and out. And what you heard fall down here was this little grommet. Before you start pulling on that too hard take that off. Don't make the same mistake I did.
The grill is kind of glued on here at least it is on this car maybe not on all cars, but pull it off. Kind of pull it up and out. To remove the wiper transmission you're going to remove four 10mm bolts. There's two right there so this one, and this one. And then there's one, sorry, right down in here, and then you're going to want to remove this bolt here too which allows you to move this over and unplug the wiper motor.
It may be a little hard to see, but right down in here there's a little pin. I'm grabbing the wiring harness on this side with my hand and pulling and then unclipping that pin with a screwdriver and pulling it through. So here's the pin right here, and then on this connector you just pry up a little holder there and then the whole connector come off and then there's a little thumb tab right here and you pull it apart and then you can push your harness on through. So you take your three bolts off and your harness disconnected, you just want to slide the assembly this way, and then pull your harness through, and then bring it up and out.
Swapping your motor from the old linkage to the new linkage and I'm kind of going to do this virtually because I'm going to install the old linkage because there's nothing wrong with it. The important thing to note is your indicator for park position. If you look right here there's an arrow and it's pointing to three little lines on the linkage. That's indicating the center of your park position. You want to make sure that when you pull this bracket off the motor, that the motor's in the park position, and then when you put it back together you put it back together the same way.
So how you do that is first you want to pry off your linkage from the motor. Next you want to remove this nut from the motor, and you can just take it out of your park position. Now move the arm right back around actually a little further. Now you can remove this bolt, 10mm. Now you move this right back to your park position and line that arrow up as best you can with that middle line and now remove your other two bolts. Now this arm is pressed on to the motor so basically what you want to do is just kind of have it like that and give it a good tap with your hammer. The motor and the arm are off and then you can transfer on to the new one.
You can see the new linkage from 1AAuto is actually the same as the old. Everything is going to bolt up the same. A lot of times what happens on these is these get stripped or they get full of die cast and then the arms won't go on the windshield, but I am going to reinstall this one into the car because it's in good shape. So what you would want to do is remount the motor with these three bolts, remount your arm and make sure that that arrow is lined up as best as possible with those lines pointing right at that middle one and your washer and bolt. Like that. Reline it up there. Take this pop it on and you're ready to put it back in the car.
Reinstallation, you can see that there's a little post that sticks out here. That's where this goes on to. So you want to put that end in first, the underneath, and then I'll put this down, work your harness through, and then put this down in, and now you can see the grommet from this angle and so we put it on there, bring this harness through the rest of the way, grommet. I'll set the firewall, our three bolts. We'll fast-forward through putting all those bolts back on and tightening them up, and then after that you want to make sure that you get your grommet all the way through on the wiring harness. Plug the harness back in and put the clip back on to this resistor and bolt it back on.
Now we can test the wipers. Make sure you stop set the switch right and then shut the key off so that the park is in the correct position. Now we can put this grill back on and I'm really going to take fast-forward on this, basically just working it into the side moldings and then putting it down and then pressing all the front clips back in, and then putting all your top clips back in. Once you get this part out it's usually pretty easy to get back in.
Now to put your arms back on you want the driver's side has the more angled bend in it. You want to put it down, and it has the longer blade on it as well just above, put it down on. The passenger side angles up more, shorter blade. Put it down, and then get these bolts nice and tight.
We hope this helps you out. Brought to you by www.1AAuto.com, your source for quality replacement parts and the best service on the internet. Please feel free to call us toll free 888-844-3393. We're the company that's here for you on the internet and in person.