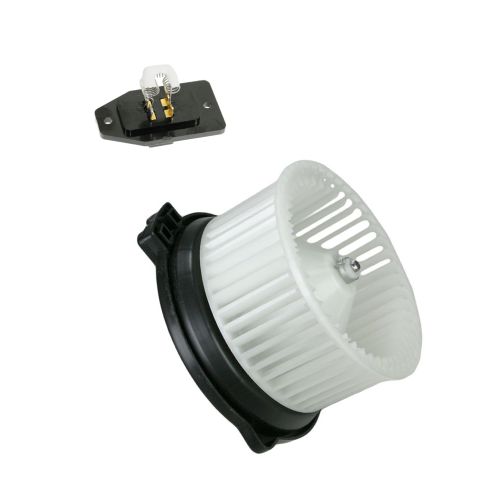
Kit Includes: (1) Heater Blower Motor (1) Heater Blower Motor Resistor
Highest Quality Materials
Made from highest quality materials that meet or exceed OEM standards
Quality Tested - built to a strict level of product standards.
Item Condition:New
Attention California Customers:
WARNING: This product can expose you to chemicals including Di(2-ethylhexyl)phthalate (DEHP), which is known to the State of California to cause cancer, and birth defects or other reproductive harm. For more information, go to www.P65Warnings.ca.gov.
Lifetime Warranty
This item is backed by our limited lifetime warranty. In the event that this item should fail due to manufacturing defects during intended use, we will replace the part free of charge. This warranty covers the cost of the part only.
Returns: Parts with electrical components cannot be returned once installed.
FREE Shipping is standard on Orders shipped to the lower 48 States (Contiguous United States). Standard shipping charges apply to Hawaii, Alaska and US Territories. Shipping is not available to Canada.
Expedited is available on checkout to the United States, excluding Alaska, Hawaii and US Territories as well as P.O. Boxes and APO/FPO/DPO addresses. Final shipping costs are available at checkout.
How to Replace Heater Blower Motor 1994-97 Honda Accord
How to Replace Blower Motor with Fan Cage 1992-2000 Honda Civic
How to Replace Blower Motor Resistor 1992-98 Honda Civic
Created on:
Tools used
8mm Socket
Ratchet
5/16 Inch Socket
T25 Torx Driver
1. Remove Fan
Press and pull down to disconnect the lead. Remove the three screws holding it in using your T25 torx bit or a 5/16 socket or a flat blade screwdriver.
Pull it back towards the back of the car, down and out.
2. Install new fan
Install your 1A Auto Heater/AC Blower Motor by positioning it so the fastening points line up, then push up and out ward to seat the blower motor correctly.
Then use your tool of choice to screw it in.
Brought to you by 1AAuto.com, your source for quality replacement parts and the best service on the internet.
Hi, I'm Mike Green. I'm one of the owners of 1A Auto. I want to help you save time and money repairing and maintaining your vehicle. I'm going to use my 20+ years' experience restoring and repairing cars and trucks like this to show you the correct way to install parts from 1AAuto.com. The right parts installed correctly, that's going to save you time and money. Thank you and enjoy the video.
In this video we're going to replace the heater and AC blower motor on this '95 Accord, same as any '94 - '97 Accord. The only tool you'll need is a T25 Torx bit or an 8 mm or 5/16 socket with a ratchet driver.
Symptoms or signs of your fan motor going bad is you're hearing squealing or grinding or clicking noises when you turn your fan on and they change with the speed. Sometimes that will lead to just your fan not working or your fan gets weaker.
To remove the fan, here's your lead back in here. I'm just pressing this way with my thumb and pulling down. It came out easy because I've taken it apart before. The first time you do it, it'll probably be a little difficult, but you just press it and pull it down.
There's three screws, one over here, one here, and then one way up in here - that guy back there. Actually that one's the easiest to see right from about here. This is the foot well right under the door jamb area, and you can see it right through there. That's the best place to look at it when you're trying to undo it. These screws can be removed with a T25 Torx bit, which is what I'll use; a 8mm; or a 5/16 socket; and actually a flat blade screwdriver works as well. I'll take those fasteners out. You can see it come down. Pull it back towards the back of the car, and down and out.
To get the fan back in, you want this part right over here towards the console or towards the driver's side of the vehicle, and then push the cage in, pull your wire out. And a little bit of force. I'm pushing up and rotating the motor this way at the same time. And up, and start to screw, second screw, and your third screw. That's going have to do by feel a little bit. Once you have those other two in though, you just put it in the hole and it goes right up in. And using your tool of choice Again, for this screw I'm looking from over here. That's really my best angle to see it. Just check them by hand and make sure they're as tight as I want them to be and not tighter. You don't want to strip the plastic. And plug in the lead.
We hope this helps you out. Brought to you by www.1AAuto.com, your source for quality replacement parts and the best service on the internet. Please feel free to call us toll free: 888-844-3393. We're the company that's here for you on the internet and in person.
Tools used
Flat Blade Screwdriver
8mm Socket
Ratchet
Needle nose pliers
1. Removing the Blower Motor
Pry the plastic clips out of the kick panel with pliers or a flat blade screwdriver
Pull off the kick panel
Remove the three 8mm bolts from the blower motor
Pull the blower motor down and out
Disconnect the blower motor wiring harness
2. Installing the New Blower Motor
Put the new blower motor into place
Insert the three 8mm bolts into the blower motor, being sure not to over-tighten them
Connect the blower motor wiring harness
Push the kick panel into place
Push the two plastic clips into the kick panel
Brought to you by 1AAuto.com, your source for quality replacement parts and the best service on the Internet.
Hi, I'm Don from 1A Auto. I hope this how-to video helps you out, and next time you need parts for your vehicle, think of 1AAuto.com. Thanks.
In this video, we show you how to replace the blower motor on this 1998 Honda Civic and it's the same part and process for these Civics from '92 to 2000. The items you'll need are a new blower motor from 1AAuto.com, a flat blade screwdriver or pair of pliers, and an8 mm socket and ratchet.
Underneath the glove box on your passenger side, you'll see this panel with two clips on it. I'm going to just pry those out either using a flat blade screwdriver or pair of pliers. Once those are removed, this panel just pulls right out. Now, up underneath your glove box, your blower motor is located right here. It's held in with these three 8mm bolts: there and the third one is right back here. We'll just fast forward as Don removes each of those. Once those are removed, the blower motor pulls right down, and you can just disconnect this harness and just push in the tab. Pull it out.
Now, the old blower motor is on the right; the new blower motor from 1AAuto is on the left. You can see they're identical, and they will mount up exactly the same. Feed your new blower motor up into place and replace those three 8mm bolts and just tighten them up. You can see he starts each one by hand and then just tightens them up with a socket and ratchet. Be careful not to over tighten as you are just going into plastic. Reconnect your harness, and replace that panel and those two clips, and then you're all set.
We hope this video helps you out. Brought to you by www.1AAuto.com, your source for quality replacement parts and the best service on the Internet. Please feel free to call us toll-free, 888-844-3393. We're the company that's here for you on the Internet and in person.
Tools used
Phillips Head Screwdriver
1. Removing the Blower Motor Resistor
Open the glove box, push in the sides, and pull it down
Push the tab and disconnect the resistor harness
Remove the two Phillips screws from the blower motor resistor
Pull the blower motor up and out
2. Installing the New Blower Motor Resistor
Insert the blower motor resistor into place
Insert and tighten the Phillips screws
Connect the resistor harness
Insert the hooks on the glove box onto the bars and push it into place
Brought to you by 1AAuto.com, your source for quality replacement parts and the best service on the Internet.
Hi, I'm Mike from 1A Auto. I hope this how-to video helps you out, and next time you need parts for your vehicle, think of 1AAuto.com. Thanks.
In this video, we're going to show you how to replace the blower motor resistor on this 1998 Honda Civic. It's the same for any 1992 to 2000 Civic. Basically, you'll know when your resistor is going when you lose fan speeds. For example, your fan works on speed one and speed four, but not two or three; that's basically the symptom of a bad resistor. The items you'll need for this include a new blower motor resistor from 1AAuto.com and a short Phillips screwdriver.
Open up the glove box, push in both sides, and just pull it down. Behind here is your blower motor resistor. Push in on the tab on the harness and pull it up and off. Then remove these two Phillips screws. We'll just fast-forward as Don does this. The resistor lifts right up and out.
On the right is the old blower motor resistor; on the left is the new one from 1A Auto. You can see they're identical, and they'll mount exactly the same. Put your new blower motor resistor down into place, and replace those two Phillips screws. It's easier to just twist them in by hand until they're lower so you can fit the screwdriver in there and then just tighten them up. Now, reconnect your harness, push in the sides on your glove box, and you're all set.
We hope this video helps you out. Brought to you by www.1AAuto.com, your source for quality replacement parts and the best service on the Internet. Please feel free to call us toll-free, 888-844-3393. We're the company that's here for you on the Internet and in person.
HMA80258
In Stock
Product Reviews
Loading reviews
4.50/ 5.02
2 reviews
5 Stars
4 Stars
3 Stars
2 Stars
1 Star
1
1
0
0
0
Blower works now
Thomas
October 18, 2021
Works fine.
Eliott
January 12, 2024
thank you very much for the part and it fit like a glove. just like you showed on line. thank you
Customer Q&A
No questions have been asked about this item.
Customer service
877-844-3393
Monday - Friday 8:00am - 9:30pm ET Saturday - Sunday 8:00am - 4:30pm ET
Honda is a registered trademark of Honda Motor Co., Ltd. 1A Auto is not affiliated with or sponsored by Honda or Honda Motor Co., Ltd.See all trademarks.
Enter Vehicle Year Make Model
Specify your vehicle's year, make and model to guarantee fit.
Year
Make
Model
Options
Drivetrain
This part doesn’t fit a . Select from parts that fit.