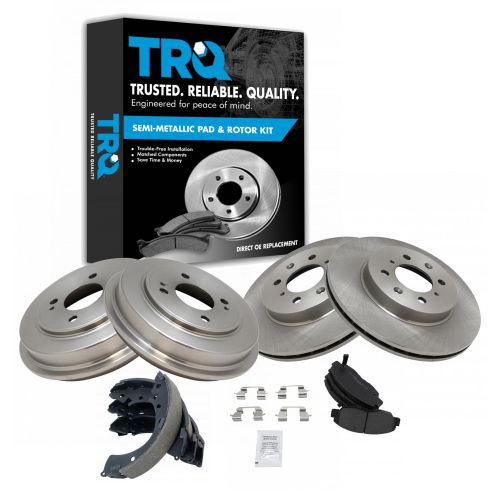
Kit Includes: (1) Rear Brake Shoe Set (2) Rear Brake Drums (2) Front Brake Rotors (1) Front Semi-Metallic Brake Pad Set with Contact Point Grease & Hardware
Brake Pad Bonding Type: Premium Posi
Wheel Lug Count: 4 Lug
Brake Pad Friction Material: Semi-Metallic
Front Brake Rotor Diameter: 10.30 in. (262mm)
Front Brake Rotor Venting Type: Vented
Specification
Location
Front & Rear
Replacement Brake Kits Features & Benefits
Longer life - Positive molded to ensure even wear and enhanced performance
Less dust - Cleaner, quieter, smoother braking
Reduce vibration and noise - Balanced, finished surface
Cast from premium G3000 alloy for strength and durability
Front Brake Rotor Venting TypeVentedWheel Lug Count4 LugFront Brake Rotor Diameter10.30 in. (262mm)
Item Condition:New
Attention California Customers:
WARNING: This product can expose you to chemicals including Lead and Lead Compounds, which are known to the State of California to cause cancer, and birth defects or other reproductive harm. For more information, go to www.P65Warnings.ca.gov.
Lifetime Warranty
This item is backed by our limited lifetime warranty. In the event that this item should fail due to manufacturing defects during intended use, we will replace the part free of charge. This warranty covers the cost of the part only.
FREE Shipping is standard on orders shipped to the lower 48 States (Contiguous United States). Standard shipping charges apply to Hawaii and Alaska.
Shipping is not available to a P.O. Box, APO/FPO/DPO addresses, US Territories, or Canada for this item.
Expedited is available on checkout to the United States, excluding Alaska, Hawaii.
Final shipping costs are available at checkout.
How to Replace Brake Kit 2001-05 Honda Civic
How to Replace Front Brakes 1994-2005 Honda Civic
Created on:
Tools used
A Piece of Pipe (for leverage)
Torque Wrench
Jack Stands
19mm Socket
White Grease
Lug Wrench
Ratchet
Floor Jack
1/2 Inch Breaker Bar
1. Removing the Wheel
Loosen the lug nuts with the vehicle on the ground
Raise the vehicle with a floor jack
Secure the vehicle on jack stands
Remove the lug nuts
Pull of the wheel
2. Removing the Brakes
Pull off the brake drum
Remove the springs with locking needle-nose pliers
Push the piston in by hand and lock the rubber in place
Remove the tabs with the pliers
Pull the brake shoes apart
Remove the front brake shoe
Remove the separator bar
Pull the rear brake shoe off the emergency brake cable
Remove the emergency brake lever from the rear brake shoe
3. Installing the Brakes
Connect the emergency brake lever to the new rear brake shoe
Attach the rear brake shoe to the emergency brake cable
Apply white grease to the contact areas on the backing plate
Put the rear shoe into place
Insert the tab
Make sure the separator bar adjusts freely
Insert the separator bar
Attach the front shoe to the rear shoe via the spring
Put the front shoe into place
Insert the tab
Reattach the springs with the pliers
Slide the brake drum on
4. Reattaching the Wheel
Slide the wheel into place
Put the hub cap on
Start the lug nuts by hand
Tighten the lug nuts preliminarily
Lower the vehicle to the ground
Tighten the lug nuts to between 100 foot-pounds in a crossing or star pattern
Reattach the center cap
5. Testing the Brakes
Pump your brakes repeatedly until they feel firm
Test your brakes at 5 miles per hour and then 10 miles per hour
Road test the vehicle
Brought to you by 1AAuto.com, your source for quality replacement parts and the best service on the Internet.
Hi, I'm Mike from 1A Auto. I hope this how-to video helps you out, and next time you need parts for your vehicle, think of 1AAuto.com. Thanks.
In this video we're going to show you how to remove and reinstall the rear brakes on this 2003 Honda Civic, pretty much the same as any 2001 to 2005 Civic with the rear drum brakes. The brakes are actually pretty good in this vehicle so we just show you how to take them apart and put them back together. We do one side. Obviously, you always want to replace your brakes in pairs.
The tools you'll need are a jack and jack stands, a tire iron, or a 19mm socket with a breaker bar, or even you could use your ratchet with a piece of pipe for some leverage just to get the lug nuts started, some needle nose locking pliers, and a torque wrench.
These lug nuts are 19 millimeters. You can either use a socket with a breaker bar or your tire iron. If you don't have the benefit of air tools, you'll want to start with your wheel on the ground. We'll loosen the lug nuts first. Then raise and support your vehicle and remove the wheel and tire. Just speed it up here as I remove the wheel and tire. Hopefully, your brake drum will come right off.
You see these springs right here, now there are special tools that you can use to get these apart. If you own a garage and work on cars all the time, it might make sense, but it also could make sense to buy a tool like this that has many uses. It's a locking jaw or vice grip pliers that has kind of a needle nose to it. Get it in there, lock it onto that spring, pull the spring over and release it. There's also a spring right here that's much easier. Pull it down and release it. Before you go too far, push your piston back in here and just lock this rubber boot back on. Just kind of pry it and pull it up and over. Pull it up and over, and then just kind of rotate it around as you push it right on. Change the size of your pliers here. You push on this little tab. Push it in, twist and let that out. Do the same thing on this side. It should untwist. Let that off. Your front shoe comes off. Rear shoe comes off, and the rear shoe is connected to the brakes here, the emergency brake cable. We just have to take this off. Right down here, your rear shoe is connected to your emergency brake cable. Pull it forward on the spring. Then pull your cable through like that. If you were putting on new shoes, what you would want to do is take this apart here. You basically just spread this clip apart, slip it off and then this arm comes off of the back shoe. You would want to put it onto the new shoe that you install, obviously, and then the reinstallation is just pretty much a reversal of the procedure. It's kind of upside down here. Clip the arm in place. Just slide that right down and in. Put the rear shoe up and in.
Before I go to reinstall that, I use a little bit of white grease right here on these contact points. There's three in the back and three in the front.
I've already got to get my clip on here. Put the shoe up into place and lock that on. This is the separator bar. It's what adjusts so you want to make sure this is all nice and free. This spins on there and that spins easily inside there. That goes right in there. Now you take your front shoe you put the spring on. Put it on down here. This shoe should be pushed right in there and then this one goes in behind. There's a little bracket that's holding the bottoms of them on. Pull our stud back. Make sure this goes into place. Now take your clip for the front shoe and make sure the front shoe is up in place. Hold the pin on the back side of the backing plate and then push the clip in and turn it. Rotate it with the pliers to lock it on.
Now you want to push these together. This little bracket goes right in there. I'll just show you that bracket from the other side so you can see. We'll put that there and stretch it right across. Put it in there. Make sure you push it right in. This spring goes right in. It goes on there and down into there.
Reinstall the rear brake drum. Then really kick it into high gear as I put the wheel on. Then on this vehicle you put the hub cap on, start the lug nuts and then preliminarily tighten them with either your ratchet or in this case my impact wrench. Then I'll torque them when the vehicle is on the ground. Then once the vehicle is on the ground, then torque your lug nuts to 100 foot pounds kind of using a crossing pattern as you go. Last, but certainly not least, always make sure you pump the brake pedal a bunch of times. Firm it up. Make sure the brakes are working correctly before you road test the vehicle.
We hope this helps you out. Brought to you by www.1AAuto.com, your source for quality replacement parts and the best service on the Internet. Please feel free to call us toll-free, 888-844-3393. We're the company that's here for you on the Internet and in person.
Tools used
12mm Socket
Large C-Clamp
Torque Wrench
17mm Socket
Jack Stands
19mm Socket
Flat Blade Screwdriver
Phillips Head Screwdriver
Anti-Seize Grease
Ratchet
Wire Brush
Floor Jack
1/2 Inch Breaker Bar
1. Removing the Wheel
Loosen the 19mm lug nuts with the vehicle on the ground
Raise the vehicle with a floor jack
Secure the vehicle on jack stands
Remove the lug nuts
Pull off the wheel
2. Removing the Brake Pads and Rotor
Remove the two Phillips screws from the rotor
Unbolt the two 12mm caliper bolts from the caliper bracket
Pry the brake pads into the caliper with a flat blade screwdriver to push in the pistons
Pull the caliper aside
Remove the brake pads
Unbolt the 17mm bolts from the caliper bracket
Remove the caliper bracket
Remove the rotor
3. Installing the New Brake Pads and Rotor
Clean the rotor with brake parts cleaner
Mount your new rotor onto the hub
Apply a dab of anti-seize grease to the Phillips screws
Tighten the Phillips screws to the rotor
Clean the brake pad slides with a wire brush
Mount the caliper bracket onto the rotor
Apply grease to the brake pad tabs
Use a large C-clamp and the old pad to push the pistons back
Put the caliper on
Apply grease to the caliper bolts
Thread bolts by hand
Torque the caliper bracket bolts and the caliper bolts to 74 foot-pounds
4. Reattaching the Wheel
Slide the wheel into place
Start the lug nuts by hand
Tighten the lug nuts preliminarily
Lower the vehicle to the ground
Tighten the lug nuts to 100 foot-pounds in a crossing or star pattern
Brought to you by 1AAuto.com, your source for quality replacement parts and the best service on the internet.
Hi, I'm Jeremy from 1AAuto. I'm going to help you fix your car today, and the next time you need parts for your car think of 1AAuto.com. Thank you.
In this video, we're going to show you how to replace the front brakes on a 2003 Honda Civic. It's pretty much the same for a 2001-2005 Honda Civic. The tools that you'll need for this job include a jack and jack stands, 19mm socket and breaker bar, 12mm wrench, 17mm wrench, Phillips screwdriver, large c-clamp, wire brush, some anti-seize, and a torque wrench.
The first step is to break the lug nuts loose, and you do that by leaving the car on the ground so that the wheel doesn't spin when you lift up on it. Here we go. Now we're going to raise the car up and take the wheel off. Now we're going to pull it off.
The next step is to pull these two screws out of the rotor. Normally they're stuck in there really tight, so I try to use a screwdriver first, and then go on to more drastic measures if need be. These are actually coming out.
The next step is to remove these two 12mm bolts that hold the caliper to the caliper bracket. You can use a ratchet or the style wrench. One trick is to connect the two wrenches together, and then bump them with your fist so you can pull them out. The next thing I like to do is pull the caliper really hard toward me so that it compresses the piston inside the caliper. It makes the caliper loose, making it easier to remove. Remove the caliper.
Now we can take the brake pads out. These ones are in pretty good shape, so we'll probably end up putting these right back in. Then you're going to take off the caliper bracket, which, once again, you can use the same method of linking the wrenches together to break it loose. Now the caliper bracket is off.
Now that we have the caliper bracket off, we can take off the rotor, as you can see.
For reinstall, place the rotor back on the hub. Apply a little anti-seize to the Phillips screws, and put them back in the rotor. Clean up the brake pad slides to make sure that they're not going to make the brake pad bind up and cause uneven brake pad wear. Now we have the caliper bracket that needs to go back on.
Then we can put the bracket right back on after it's nice and clean. We are now ready to put the brake pads in. Normally, they're brand new and you can just slide them in, where this one is used. I'm probably going to put a little anti-seize on this as well. It does exactly what it is called, and it prevents the brake pads from sticking in the slides. You can see the squeaker right here. This is the thing that makes all the noise whenever you need new brake pads. That goes right here on the inside. You're going to need to compress this caliper. The best way to do that is actually with a giant C-clamp. As you can see, as you tighten the C-clamp, it pushes the piston in. Pretty awesome, right? Now it's completely compressed and you can pull the C-clamp out.
Like I said before, put the caliper on. Here's the caliper bolts. Once again, anti-seize. If you live in a dry climate, these things won't be rusty, but in New England, they're always rusty. Voila, your brakes are back together again.
It's now time to put the tire back on. Slide the wheel into place and tighten the lug nuts preliminarily. Lower the vehicle to the ground. The last step is to torque the wheels. I usually a hundred foot-pounds on pretty much all the wheels that I tighten. Basically, grab your torque wrench, always do it in a cross pattern so that the wheel goes on straight. Now the pedal's pumped and the brakes feel good again.
Hopefully this video has helped you out. You can visit us at 1AAuto.com for replacement parts and the best service on the internet.
BKA11960
In Stock
Product Reviews
Loading reviews
4.65/ 5.020
20 reviews
5 Stars
4 Stars
3 Stars
2 Stars
1 Star
17
1
0
2
0
Great
Stephen
January 20, 2018
Everything fit perfectly........................ ..
EXCELLENT SERVICE AND DELIVERY
T
October 15, 2018
All parts were reasonably priced, high quality and fit as promised. Will be a 1A AUTO customer from now on.
ALSO, LIGHTNING QUICK DELIVERY!
Tom Lyons
Wooster, OH
Not right size
Anthony
April 28, 2019
I ordered this product because replacing all of it is easier, come to find out this one not so easy. The pads and shoes were to thick, the thickest pads I have ever seen. Luckily my old pads still had life left and I could use those but the shoes I had to literally grind down to make them fit. Also maybe when someone gets a setup like this you should put all the hardware that’s needed with it.
Great Brake kit
U
June 21, 2019
Love the brake kit for my father in law's 02 Honda Civic. They we're easy to install, perfect OEM replacement parts. Will be buying them agian really soon for my 04 Honda Civic. Thanks 1AAuto
It's good to have brakes
C
August 5, 2019
The brakes came on time, the parts worked perfectly. I would order from A1 Auto again.
part fit really good
K
August 28, 2019
bought it the the part fit really good , im recomending all my friends to buy from this website ..
front and rear brakes
E
September 19, 2019
It was excellent, I got whaT I need. All the brakes for a good pric and great quality.. Quick and efficient. Thanks
Brake pads didnt fit!
John
September 22, 2019
Everything else worked but the front brake pads would not fit over the rotor once in the caliper. Had to go buy a thinner set.
Great for the price
John-Eric
October 6, 2019
Cant beat it, worth of buying with a nice quality!
Good Brakes for a good Price
D
December 21, 2019
Happy with my purchase from 1AAuto. Bought front and rear brakes from 1A for my 04 Honda Civic. Installed them myself, had a hiccup just from my own doing and looked up a video from their website on YouTube and it clarified what I needed to do. My parents will now be buying brakes for their lexus. Thanks
Easy and Fast
R
January 13, 2020
The easiest process I've ever done online. Safe, secure checkout. Parts came exceptionally fast, three days before expected. Parts were perfect fit for my vehicle. Also very nice to have a hyperlink to a video online to help with repairs. One last added bonus, the parts I ordered were the best priced i could find online. 1AAUTO has gained a new loyal customer. Thank you.
Amazing
C
April 3, 2020
Perfect In Every Way . Everything Fixed ; Every Screw And Attachments Was Included. I Am Totally Amazed . My Car Function Better Then I Has Imagine . Its Worth It Buy It You Wont Be Disappointed.
perfect fit
D
May 2, 2020
Got this set because my ceramic pads warped my rotors. Everything fit perfectly. Seem to be high quality - hoping that they'll last a good amount of time. The included grease/silicone/whatever it is was appreciated.
Perfect fit and great quality!!
B
May 3, 2020
Parts came super fast and are a perfect fit and awesome quality for my car!!! Also told my brother in law about 1a auto and now it's the only place he gets parts from too! We both still support our local small time auto parts stores but for bigger jobs and more costly jobs, can't beat 1a auto for real!! Highly recommend
As expected
Q
May 6, 2020
Great service, high quality auto parts, and super fast shipping!! Have NOT had a bad experience with 1-A auto. Also watch in-depth how-to videos to make your experience easier!!
Great product at a great price.
nick
November 25, 2020
Bought this kit for my 04 civic sedan EX. I work for an auto parts store and this is cheaper than I can buy it from work with a discount by almost $100. Everything fit great and seemed to be good quality.
Shipped Same Day
Logan
January 26, 2021
Items shipped same day with competitive pricing through 1A Auto.
Nice part at a good price.
Rick
February 3, 2022
Nice parts and a good price
Complete Brake Set
Russell
August 28, 2023
I purchased the drum, rotor, pad, and shoe kit for a complete brake job on my 2004 Honda Civic. I received all the parts ordered in one box. However there was some shipping damage. This could be have avoided with better packaging.
Works great
Jerry
September 6, 2023
Break refresh on an old car. Worked great
Customer Q&A
Does this kit come with springs for rear?April 1, 2019
Caleb G
10
No
April 1, 2019
T O
10
This item will not come with springs in the rear.
April 1, 2019
Emma F
Who is the manufacturing company who makes this product?June 28, 2019
Jasmine H
10
NAKAMOTO
June 28, 2019
F A
10
1A Auto's house brand parts are manufactured by various aftermarket companies specifically for us and built to your vehicle's exact OEM specifications. These are sold under our Nakamoto Brand name. Thanks!
June 28, 2019
Adam G
Hey 1a auto, do these brakes fit for 2006 Honda civic lx? I see they go till 05 but is the 06 variation different? ThanksDecember 10, 2021
Saad O
10
This is not the correct part for your vehicle, but we do carry the one you need. The correct part number is: 1ABFS04375.
December 10, 2021
Emma F
What is the life expectancy of the rotors?April 18, 2022
Napsc N
10
The parts should last 40,000-50,000 miles.
April 18, 2022
Emma F
Will this kit fit an 2005 civic hx model?August 21, 2023
Paul P
10
Currently, we do not carry this part for your vehicle. We're always updating our inventory so please check back soon!
August 23, 2023
Emma F
Customer service
877-844-3393
Monday - Friday 8:00am - 9:30pm ET Saturday - Sunday 8:00am - 4:30pm ET
Honda is a registered trademark of Honda Motor Co., Ltd. 1A Auto is not affiliated with or sponsored by Honda or Honda Motor Co., Ltd.See all trademarks.
Enter Vehicle Year Make Model
Specify your vehicle's year, make and model to guarantee fit.
Year
Make
Model
Options
Drivetrain
This part doesn’t fit a . Select from parts that fit.