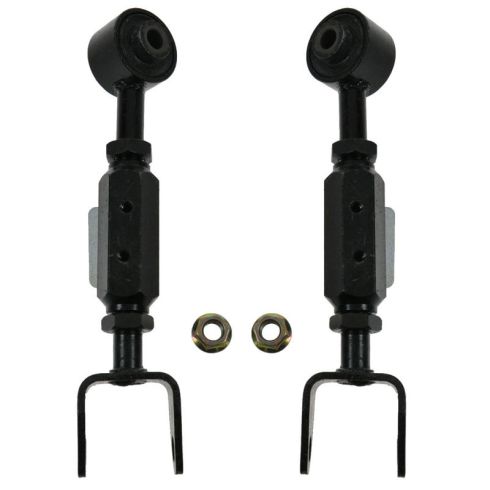
Kit Includes: (1) Rear Driver Side Upper Control Arm (1) Rear Passenger Side Upper Control Arm
Design: Adjustable
Quantity: 2 Piece
Specification
Side Location
Driver & Passenger Side
Location
Upper
Rear
Our control arms are designed to be direct replacements for the original factory parts. They are 100% brand new and require no modifications for installation. No special tools are required because all of the bushings come pre-installed.
Our steering and suspension components are pre-greased and sealed for long life and do not require the extra maintenance typically required by greaseable versions.
Item Condition:New
Attention California Customers:
WARNING: This product can expose you to chemicals including Lead and Lead Compounds, which are known to the State of California to cause cancer, and birth defects or other reproductive harm. For more information, go to www.P65Warnings.ca.gov.
Lifetime Warranty
This item is backed by our limited lifetime warranty. In the event that this item should fail due to manufacturing defects during intended use, we will replace the part free of charge. This warranty covers the cost of the part only.
FREE Shipping is standard on Orders shipped to the lower 48 States (Contiguous United States). Standard shipping charges apply to Hawaii, Alaska and US Territories. Shipping is not available to Canada.
Expedited is available on checkout to the United States, excluding Alaska, Hawaii and US Territories as well as P.O. Boxes and APO/FPO/DPO addresses. Final shipping costs are available at checkout.
How to Replace Rear Upper Control Arm 2003-11 Honda Element
Created on:
Tools used
Hammer
17mm Wrench
Rust Penetrant
Pry Bar
17mm Socket
Jack Stands
19mm Socket
1-1/16 Inch Wrench
8mm Socket
1-1/4 Inch Wrench
Ratchet
Floor Jack
1/2 Inch Breaker Bar
1. Removing the Wheel
Raise the vehicle with minimal weight on the wheel
Loosen the 19 mm lug nuts
Raise and support the vehicle
Remove the lug nuts
Remove the wheel
2. Removing the Rear Upper Control Arm
Remove the ABS wire retaining bracket from the upper control arm
Remove the outer 17 mm control arm bolt
Remove the 17 mm nut from the inner 17 mm bolt, then remove the bolt
Remove the upper control arm
3. Installing the Adjustable Rear Upper Control Arm
Remove the control arm ends to coat them with anti-seize grease, then reinstall them
Set the adjustable control arm length by aligning the bolt holes to the old control arm using the bolts
Tighten the jam nuts
Install the inner upper control arm
Install the 17 mm bolt and 17 mm nut loosely
Install the outer 17 mm bolt and 18 mm nut loosely
Raise the wheel so the control arm is at its natural resting position
Tighten the 17 and 18 mm nuts
Tighten the 1-1/16 jam nuts while holding the adjustment nut with a 1-1/4 wrench
Mount the ABS wire retaining bracket to the adjustment nut with the 8 mm screws
Mount the abs wire retainer to the bracket
4. Installing the Wheel
Install the wheel onto the wheel studs
Install the lug nuts and tighten them by hand
Lower the vehicle with minimal weight on the wheel
Torque the lug nuts to 80 ft-lb
Hi. I'm Mike from 1A Auto. We've been selling auto parts for over 30 years.
Hi everyone. Sue here from 1A Auto. And today on our '06 Honda Element I'm going to show you how to install an upper control arm that is an adjustable type. The manufacturer is non-adjustable. If you need this part or any other part for your car click on the link below and head on over to 1AAuto.com.
19 millimeter socket and we're going to break free the lug nuts. We've got the pressure of the vehicle on the tire still so it doesn't turn. I use the two post lifts. At home you can use the jack and jack stands. I'm going to take all the lug nuts off and remove the tire. I'm going to spray down all the nuts and bolts to the upper trailing arm.
I'm going to dismount the ABS sensor harness plate. Just pinch those plastic ears, slide it down and then I'm going to pinch this side, so the same. There we go. So the bottom air piece that comes out on this control arm, this is a welded nut on that bracket piece that is part of the drill arm so you just have to remove the bolt on this lower part. I have a 17 millimeter wrench on there and if this doesn't work we might have to break out the air.
So I'm going to take my 17 millimeter impact socket and I'm going to break this bolt out. I'm going to try and get my long ratchet wrench in there with a 17 millimeter socket. See if I can break this free. There we go. It's so rusted in here. Here goes nothing. I think I'm going to add a smidge of heat to that. We cannot break the suspension nut free so I'm going just heat it up a little bit because we have to reuse that. So let's see if we can heat it up enough to free it.
Now with my 17 ratchet wrench and a regular 17 wrench. Don't forget that's hot. For me it is. So you can see that the body, the body goes like this over the bolt so you can't get the bolt out. But the good news is once you keep working the bolt down the bushing you can just pry it. The bushing moves with it so you can get the bolt out. Here we have the new adjustable upper control arm for the rear on this '06 Honda Element and it came from 1A Auto.
Here is the factory. You can see it's an '06 so this thing is 12 years old and the bushing's worn out really quite a bit. I mean it held on for 12 years. That's doing pretty good. So it has the bracket for the ABS. They solved that on the adjustable by putting two threaded holes and it comes with a kit with a bracket in it. Two mounting bolts for that and a new nut for this bracket because this is a welded nut from the factory so you'll reuse a locking nut bracket.
If you need this part or any other part for your car click on the link below and head on over to 1AAuto.com. So now that we got the upper control arm out and we have the new one we're going to install. It's adjustable so to adjust it to the best that we can before we get it to the alignment shop I'm just going to line it up with the original one and lock the jam nuts in place. So that way I can get there and it should be close enough.
So it's reverse thread on different angles. The other thing I'm going to do before I assemble this and line it up and everything is I'm going to take care of it by putting some anti-seize on the threads because I don't want the poor alignment guy getting this in two years and having this frozen. That defeats the point of replacing all of this. Plus it's a good idea, now you can see exactly how long that bolt is. Heaven forbid it's a small one and you backed it out to here, unaware that you only had two more threads left.
That won't support that. That will snap off going down the road so let's fill that up with some nice anti-seizing paste and then we'll line it up, measure it and install it. I like to use the copper because it has a higher temp rating to it. Not that this part gets hot but ... So now I can thread that in and the jam nut will be lined with the anti-seize. Let's do the top half. And just like any suspension parts, sometimes tie rod ends, adjustable control arms like this they have opposite thread.
Usually lefty is loosening it up but you have have opposite threads for a reason and that's why because this is the adjuster in there so these two in the vehicle. Solid mounted and when you have to break it to adjust it and pull it in and out they have to be opposite threads. Okay, I'm going to break that jam nut free. There we go. Our brain says no. It's going the opposite way of what I'm used to.
So to assure that I'm going to be as lined up as accurately as possible before that goes to the alignment shop I just put a punch in all through the top there and line those holes up. And I'm going to use the bolt to line this up. Well I'm pretty there so let me show you what I did. So holding this, the ear tab you can turn this and you'll see that the alignment on that moves. So I'm going to turn it the opposite way and get the threads, the bolt holes to line up.
I like that right there. That's as close as I'm going to get it to the factory setting so the alignment person can adjust this and set it to specs. So I made sure that I lined up my mounting bolts for the ABS bracket and now I'm just going to snug down on the jam nuts because I don't want this to move while it's in, getting installed. Now I'm getting ready to install my upper control arm. Line those bushings right up, see if I can get that in.
Now the bolt came out this way. I don't see pros and cons to it so it's easier for me to put it back in this way. I don't have to move anything around. And now I can put the nut on that. I'm going to grab and mount this up. All right, I'm going to use my body. Take a hammer and tap that in. There we go. Now the bottom bolt has a new nut that 1A supplies. Then we have the actual bracket for this. I'm going to put that on last because I'm going ...
Now that this is mounted once I tighten these up I'm going to grab my wrench and really tighten up those jam nuts. So I got my 17 socket and 17 wrench and I'm just going to tighten this inner bolt tight as I can because I can't get an air gun in there and there is no specifications for torque. Now I'm going to move out to the outer bolt. So I lowered the car down on a jack stand and I put the jack stand right under that lower body support.
So I can get the suspension, you want to tighten the bushings not with it like this because you want it to be on where the weight would go down the road with the proper load on it and the load means the weight of the vehicle on this particular section of the car. So if I was to tighten it in the air it would be like this and the bushing would be off at an angle so when you lower it, it would be twisting that bushing and that causes premature wear.
The new nut is an 18 millimeter and I'm going to use my air gun. I'm just going to tighten this up because there is not torque specs. Now we're ready to raise it back up and we'll tighten up the jam nuts and mount the ABS sensor. So now I'm going to tighten the jam nuts and the big adjuster in the middle here is 1-1/4 as you can see. And I got to hole that steady. I want it to be lined up properly for the ABS wire bracket.
So the outside jam nuts are 1-1/16 and I'm going to make sure I'm going to go the same way. It's very important to tighten jam nuts before you drive a vehicle. Perfect. So now I'm going to mount the ABS plate and it's not the ABS plate, it's the harness for the sensor and it comes with the two little flat mounting bolts and these are 8 millimeter head. So once I get them started I'm going to snug those up. Make sure you put it on facing the right side, the correct side because of the way that the bracket's designed.
It will bottom out on the other side. Like I said that's an 8 millimeter socket. Snug those right up. Now you can see how this bracket's going to fit. The old guide pins are going to snap right in and there we go. Now let's put the lug nuts back on. It's a 19 millimeter socket. I'm just going to tighten them all down and then I can lower it down and torque it. So I'm going to torque the wheels to manufacturers spec which is 80 foot pounds. Always do it in a star pattern. And double-check.
Thanks for watching. Visit it at 1AAuto.com for quality auto parts, fast and free shipping and the best customer service in the industry.
PSA62908
In Stock
Product Reviews
Loading reviews
4.79/ 5.029
29 reviews
5 Stars
4 Stars
3 Stars
2 Stars
1 Star
26
1
1
1
0
Rating upon service, installation, upgrade, price
Nathan
April 13, 2018
This product is a great upgrade from the non-adjustable oem product. Service and delivery was good, installation was easy, the fact that its adjustable so that if i decide to lift or lower the vehicle i can adjust accordingly, and for the price i purchased it was wayyy beyond fair. It was a steal. Thanks guys
Perfect fix
Bruce
October 22, 2018
The control arms where easy to replace and fixed the camber issues.
Awesome
Ray
June 12, 2019
I believe if you own a Honda Element you should definitely upgrade to these adjusters they are great!
Best product, best price. Even better service!
W
July 11, 2019
The adjustable control arm for my 2006 Honda CRV was just what I needed. And, what Honda shouldve installed in the factory. After I installed them, My Honda dealer was able to do the best 4-wheel drive alignment the car has ever had. Prior to the new control arms, nobody could even get the rear end within the specs limits much less spot-on!
Did I mention the best price on the net? And ... shipping got to me in 3 days! I barely had time to gather my tools and borrow jack stands!!!
On the same day I ordered from 1A, I made an order from another online car parts vendor - think a big stone and an auto. By far the worst buying experience Ive made in a long time. Nuff said.
1A is my new go-to site for all my automotive needs.
BEAUTIFUL
Chris
September 7, 2019
There control arms were simple to install, fit perfect and made correcting the camber on the rear wheels extremely easy. Highly recommended for anyone wanting to fix the high camber problems in CRV's with tired springs.
Element adjustable rear control arms
Jesus
October 6, 2019
Very easy and straight forward install. Highly recommend
great products from 1A Auto
S
April 9, 2020
the rear adjustable control arms for my honda element went on flawlessly and work great, better than original parts. 1A Auto great place to get auto parts.
The adjustability I need
G
April 25, 2020
Very solid, well made, and now I can have the wheels properly aligned. Excellent!
06 crv rear control arm
R
April 25, 2020
After finding the nut that is welded on and loosening from the bolt end with a breaker bar ,replacement was good to go. Adjustment corrected the camber issue for now
Great upgrade for worn stock parts
J
May 11, 2020
Great replacement for worn stock parts. Have had them on for a few weeks now with no issues. Excellent upgrade to allow for camber adjustment. Shipping was fast and accurate. Would definitely recommend.
fit my 2003 honda crv
Laurie
June 30, 2020
fit perfect nice adjustability option. fairly easy install only complication is inboard bolt location. watch video on Honda element rear uppercontrol arm replacement. I didn't need heat to loosen mine but did it by hand. impact wrench could get to inboard either. lots of penetrating pb blaster or liquid wrench and a few bruises later they came off.
Great upgrade over OEM part
Robert
September 11, 2020
This solved the rear end camber issue that was causing tire wear. Id give this part a 5-star rating had the ABS bracket bolts been a hardened bolt. They are small and will strip if overtightened. I used a 1/4 ratchet to ensure they did not strip but they never really felt tight...just too soft for me. Ill replace them with a higher grade bolt soon. Otherwise a great upgrade to the OEM non-adjustable arm.
Thank you
Jonathan
September 11, 2020
Parts came in great shape. No more uneven tire-wear. Thanks so far so good.
Quality parts
Mark
September 28, 2020
This is a known necessity to replace the upper rear control arm on all Honda Elements. The manufacturer has a lot of really awesome parts but the upper rear control arm is one glaring weakness and this part fixes the issue of having your rear wheels looking like a tepee magnificently: much beefier part which is adjustable. Definitely recommend this part, in part because its absolutely necessary.
Fits 2006 Honda CRV SE AWD
A
December 30, 2020
Everything fits well. Seems to be made of good materials. Fixed my negative camber issue in my car after shop alignment. Use anti-seize on the thread then everything is good to go.
Amazing quality and price
Alberto
February 17, 2021
Same as original, really worth bang for your buck. This is a great place to shop for auto parts.
Awesome cheap car parts
T
March 27, 2021
Fast delivery good prices and you can normally find the part you need for your vehicle. Going through 1A Auto Definitely save you money they are cheaper than AutoZone or OReilly
first time purchasing on 1 A Auto
Rudolph
June 13, 2021
This is my first time purchasing on 1 A Auto i have seen their videos on YT and that's how i found out about this auto parts store. i seen mix reviews on them so i took a chance. the chance was not about if they are legit web site but of the quality parts they sell. so far the parts i purchased look good as good a a Moog parts, the fit is like plug in play, the durability of the product is still in question because only time will answer that. for the quality & price of the product as far as i can tell it's good. there for i have given it 5*, not to mention the delivery was much faster than expected. i would definitely buy again at 1A Auto.
2005 crv camber
W
July 15, 2021
Make my 2005 crv to bounce to the sides. Probably because i extended to much. I dont know but not did wlrk for me.
Better than OEM
Marian
November 23, 2021
Exactly what I needed, easy to install, and shipped extremely fast!
Perfect fit, on time arrival
Michael
January 8, 2022
The parts arrived on time and exactly as they appeared on the website. They were truly a perfect fit and fix the problem.
Nieymore
September 14, 2022
reliable
Slow shipping means I wont get the parts installed until next Spring.
Jonathan
October 1, 2022
Havent been able to install the parts because they took so LONG to get to me, I lost my heated work space (Im in Alaska). I think the website estimated arrival about Sept 19 and I got the parts on Sept 28. Thats not a terribly long delay but timing was critical for me. Autozone parts usually get to me within 2-5 days.
Reasonably priced must have.
Derrick
October 28, 2022
Worked like a charm...especially being able to adjust them... the price was the hook line and sinker for me. Other places were charging 80bucks for one unit...wowza
Relatively easy install. Need breaker bar and correct socket to remove the inner bolt. Awesome price.
Fits perfectly
Skyler
January 17, 2023
Correct part for 04 element ex
The fix is in.
Forest
February 3, 2023
Corrected my rear tires to straight again
Solid parts
Sean
November 30, 2023
Nice part.
Amazing quality!!
[{"url": "https://images.turnto.com/media/pNISJll75W64CYGsite/b8e07160487f881d4b36342829dce24b_1712536032637_0.jpeg", "caption": "Old (oem)"}, {"url": "https://images.turnto.com/media/pNISJll75W64CYGsite/eb420b7d0e1a58a94fc4a422a4e581d3_1712536032637_1.jpeg", "caption": "New (1aauto)"}]
John
April 7, 2024
Amazing product. Had to change my oem rear upper control arm from my 2003 honda crv. As soon as I opened the box I notice the quality in these camber arms, looked amazing plus there adjustable. Installed them and felt great. Thanks 1aauto
Customer Q&A
What brand are they?September 27, 2017
Anthony B
10
These are our 1A Auto brand parts which are backed by a limited lifetime warranty as long as you own the vehicle, and are made to meet or exceed OE specifications.
September 27, 2017
Alex P
10
I don't think it has a brand. I use these and have had no problems.
September 27, 2017
Y A
10
No idea, but they worked great on my element 2003. paid 75$ with shipping instead of 250$ a piece at the local rip off garage. good luck.
September 29, 2017
Keith K
how to install?December 26, 2017
James S
How is the camber adjustment made if the ABS bracket is attached like that?October 22, 2019
Antonino M
10
After your done with the alignment you have to zip tie the brackets because most of the time it wont line up
October 22, 2019
Ramon M
10
Take off the ABS bracket adjuster, adjust it and then put it back
October 22, 2019
W B
10
Since both ends are threaded and adjustable, you can line up all 3 sections and tweak as necessary for proper final fitment.
October 23, 2019
Daniel F
Did this come with the metal plate? It's not listed in the description but featured in the video.October 27, 2023
Hello S
10
Yes.
October 27, 2023
Alex K
Will this fit 4WD models?April 14, 2024
John D
10
Absolutely. The OEM is fixed. You need to upgrade so adjustments may be made during an alignment.
April 15, 2024
Daniel V
10
Assuming 4WD is the same as AWD, then yes. I used these to fix camber/cant of my rear wheels on an 05 real time AWD model
April 15, 2024
Adam W
10
Yes, this will be able to fit for 4 wheel drive vehicles.
April 15, 2024
Emma F
Customer service
877-844-3393
Monday - Friday 8:00am - 9:30pm ET Saturday - Sunday 8:00am - 4:30pm ET
Honda is a registered trademark of Honda Motor Co., Ltd. 1A Auto is not affiliated with or sponsored by Honda or Honda Motor Co., Ltd.See all trademarks.
Enter Vehicle Year Make Model
Specify your vehicle's year, make and model to guarantee fit.
Year
Make
Model
Options
Drivetrain
This part doesn’t fit a . Select from parts that fit.