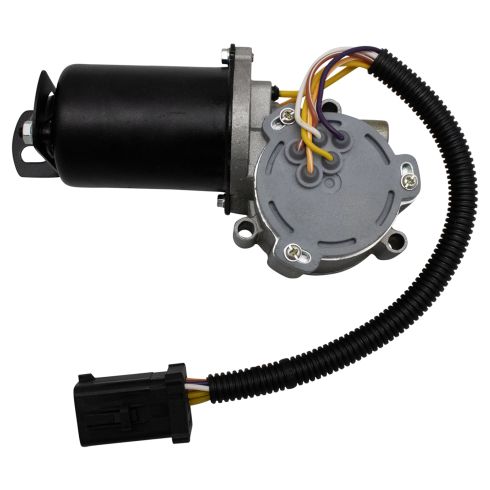
How To Replace 4x4 Transfer Case Shift Motor 2004-08 Ford F150
Created on: 2014-12-14
Watch this video to learn how to fix your four-wheel drive if it's stuck or you can't shift into or out of 4wd. The experts at 1A Auto show you how to replace the 4WD transfer case shift motor on your 04-08 Ford F150 or Lincoln Mark LT.
-
step 1 :Removing the Transfer Case Shit Motor
- Disconnect the transfer case shift motor wiring harness
- Remove the two 10mm bolts from the shift motor wiring harness bracket
- Pull down the wiring harness
- Remove the locking clip from the harness with pliers
- Disconnect the wires from the harness with a pick
- Remove the three 10mm bolts from the transfer case shift motor
- Thread the lower 10mm bolt partially in
- Tap the shift motor with a hammer loosen it
- Remove the lower 10mm bolt
- Pull off the shift motor
-
step 2 :Preparing the Transfer Case Shit Motor
- Pry the bracket off the shift motor with a flat blade screwdriver
- Clean the shift motor mounting area
- Apply RTV to the shift motor mounting area
-
step 3 :Installing the Transfer Case Shit Motor
- Put the shift motor into place
- Insert the three 10mm bolts into the shift motor
- Push the wires into the wiring harness
- Push the locking clip into the harness
- Put the bracket into place
- Insert the two 10mm bolts into the bracket
- Tighten the five 10mm bolts
- Tighten the two 10mm bolts on the side of the shift motor
- Push the wiring harness into the bracket
- Connect the wiring harness
Tools needed
-
Flat Blade Screwdriver
RTV
10mm Socket
Ratchet
Needle nose pliers
Pick
Brought to you by 1AAuto.com, your source for quality replacement parts and the best service on the Internet.
Hi, I'm Mike from 1A Auto. I hope this how-to video helps you out, and next time you need parts for your vehicle, think of 1AAuto.com. Thanks.
In this video, we're going to show you how to replace the transfer case shift motor on this 2005 Ford F150. It's the same part and similar process on these F150s from 2004 to 2008. The items you'll need for this are a new transfer case shift motor from 1AAuto.com, a 10 millimeter socket and ratchet, needle nose pliers, a flat blade screwdriver, a pick, and RTV.
Your transfer case shift motor is located right here. Just push the tab on this harness and disconnect it. Then, remove this 10 millimeter bolt and this 10 millimeter bolt. We'll fast forward as Mike does that. Now just pull that bracket free and pull the harness down.
Pull your harness down and this brown and black wire come from another sensor. Just note the brown one's towards the outside and black is on the inside. You need to remove these from this harness. You look in. There's this red locking clip here. Take a pair of needle nose pliers, and pull that out. Now take a little pick or a electrical screwdriver, and there's just little tabs here you have to pry up and pull on the wires. Sometimes it helps to just pull on them a little bit and make sure they're free. Pry up on the tab. Pull the wire at the same time. That comes out. Then pry up on the tab and pull the wire that comes out.
Now remove the other three 10 millimeter bolts holding your transfer case shift motor in place. Replace this lower 10 millimeter bolt just half way. Then using a rubber mallet just hit your transfer case shift motor, and that'll help break it free. Then remove that 10 millimeter bolt and pull the motor free.
Using a flat blade screwdriver, pry this bracket off your transfer case shift motor. Then clean up the area where the transfer case shift motor used to go, and replace the gasket with some RTV. You want to make sure that you trace all the way around with no gaps.
On the bottom, is the old transfer case shift motor. Above it, is the new one from 1A Auto. You can see they're identical and will fit exactly the same. Take your new transfer case shift motor and push it into place. Just line it up. Then replace this 10 millimeter bolt and the 10 millimeter bolt up here in the bracket, just to hold it in place.
Put the black one, again, on the inside. Just to push it in. You should hear it click. Then do the brown one. Then this locking clip goes in. Now, feed that bracket back up into place and then replace the two 10 millimeter bolts that went through the bracket. Now go through and tighten up all five of the 10 millimeter bolts that hold your transfer case shift motor into place. Then tighten up these two bolts on the side of your transfer case shift motor. Push the harness into that bracket. Then reconnect it.
We hope this video helps you out. Brought to you by www.1AAuto.com, your source for quality replacement parts and the best service on the Internet. Please feel free to call us toll-free, 888-844-3393. We're the company that's here for you on the Internet and in person.
Shop Products

How to Replace Transfer Case Shift Motor 1997-2002 Ford Expedition
Watch this video and learn how to replace the transfer case shift motor on your 97-01 Ford Explorer or Lincoln Navigator. The 1A Auto experts will show you

