
How to Replace Fuel Pump 2000-06 GMC Yukon
Created on: 2020-05-01
Watch this video to learn how to install a new fuel pump with sending unit in your 2000-06 GMC Yukon.
Tools needed
-
Torque Wrench
Hammer
15mm Socket
8mm Wrench
Safety Glasses
Pick
Gloves
Flat Blade Screwdriver
8mm Socket
Air Compressor
Brass Punch
Ratchet
Cloth Rags
Needle nose pliers
Disconnect the negative terminal on the battery using 8-millimeter wrench. Slide that off and out of the way. Now, if you have a cover on here, you wanna take that cover off. Normally, there's an 8-millimeter bolt. And then pull this cover off here, off of the fuel line, this little cap. And you wanna take a rag and a straight-blade screwdriver. You just wanna push on this right here, but if you use a rag, then the fuel won't spray. Just relieve the pressure. And that's good, there's not much pressure in this system, but just like that. You put the cap back on. The back of the tank, we're just gonna take this line off right here. You just squeeze this connector and twist it back and forth a little bit. Got a little fuel out of there. Squeeze that, and that comes up.
I wanna take this connector off right here, that goes to the vent canister. You can either squeeze it with your fingers or just use some pliers. Just try to twist it off. Sometimes you got to get underneath there. You could use a pick, also. Yep, slide that one off. And then right above it, yeah. Now I wanna remove the filler neck hose. Use 8-millimeter socket or you can use a straight blade screwdriver. Loosen up this one plant. Right. Now, I'm gonna use a pick. Just get underneath here, just try to loosen this up, just twist it. You might not be able to pop this off until we start lowering the tank down, which is okay. You just wanna make sure it's loose. And that's loose. That's good. Now I'm gonna use a transmission jack to support the fuel tank. Has a special adapter just for fuel tanks.
Now we're gonna take this strap down. We're gonna take this bolt out. I'm gonna use a 15-millimeter socket. You wanna make sure you do this by hand because if you use an impact gun, then you're gonna wreck the nut on the top. Loosen this up because it is a J-nut. Just break. Take that bolt out and slide the strap down. Then you can slide it out up here. Slide it down. Now, under normal circumstances, you could just take and do the same on this side. Take the strap out just like that. Use a hand tool. Our J-nut has broken on the top, so what we can do is take a 15-millimeter wrench. Now, we did take the wheel off and we supported the rear axle to make this arm go up a little bit. And with the wrench in there, I can loosen up the bolt. Hold the nut. All right, take that bolt out and slide the strap down. Same as the other one, just lift it up, pull it out of that slot.
Now, we can lower the back of the fuel tank down a little bit just try to pry this hose off. Just keep in mind you want as little fuel in the tank as possible. So you might have to siphon some of the fuel out. Slide that off. Great. Now, we wanna disconnect the lines on the front of the tank. Now, this is the e-EVAP vapor line. You can just push on these two tabs and disconnect the connector. It's not easy to see, but the fuel pressure line goes right over this cross member, right here and on the backside, you kind of got a feel for it. And I'm gonna have to remove that clip. This is the clip that I had to lift up. Now, I'm gonna take a rag just so it doesn't spray everywhere. Just wrap it around and then disconnect it. And there it is disconnected, just like that. So you need to make sure there's not a lot of gas in here, and you're gonna tip the tank down in the back. Once this, the filler, gets past the rear differential, then we can back the tank up a little more. It's looking good. That looks good.
Just slide the tank back a little bit and lower it down some more. And we need to disconnect the electrical connector before we go any further, and disconnect this connector right here, tab. And then this connector has a little lock on it. Slide it back on the lock and slide that out. Now, we can lower the tank all the way. All right, so the top of the tank has a lot of dirt and debris and stuff, so I'm just gonna take a blowgun, just blow it off. And we wanna take these connectors off. Just under here, there's a lock tab you just push on the two sides and slide that up. We got the line off. There's a little bit of fuel coming out. Just use a rag wipe that off, and push on the little lock tab right here. Slide this line off. And this line, just squeeze these two tabs and wiggle this off, just like that. You can use a special tool to take this lock ring off, or if you have a brass punch, you wanna use brass so that you don't get any sparks, and hit with a hammer. Just try to loosen it up without ruining the tank. Just be careful. Slide that ring off. Just grab the pump and slide it up.
This hose needs to be disconnected right here, so you're just gonna push on the tabs and slide it off, just like that. And same with this one right here. Push on those two tabs. Slide that off. So it should slide out. Let some of the fuel drain. And you can slide that out and just have a bucket nearby, put it in the bucket. All right, so I clean this up with a rag and I'm just gonna put the new seal on there, get that ready. And take the new fuel pump, take a level sensor, just line this up. And just carefully, push this down. Lock it in place, just like that. Slide the level sensor in first. Slide the tanking position. Slide the pumping position, I mean. So we need to transfer this to the new pump. Here's a pick. Just get behind these little tabs and slide that off. This can go right here. Lock it in place and grab the hose. Lock that in place and grab the other hose. Might be easier to use a pick to grab the hose, just like that. And just slide that in position. Lock it in place. Make sure the seal's all lined up and take the lock ring. Just go on the front of this. just raise this above it. It's good. Get the ring lined up and take my brass punch and lock it down. All right, that lock tabs all the way down. Just make sure that looks good. I'm gonna take these protectors off and reconnect the hoses, and lock that in place. Then do the same with this one and this one. When that one's all the way down, push down on the lock.
All right, now I'm gonna reposition the tank back in. Just make sure it's pretty far back so you get underneath that crossmember first. Remember once we get close, we're gonna connect the fuel pump and gotta get up a little more. All right, now connect that fuel pressure sensor. Make sure it locks in place. That's good. That's pretty good. Remember, on this back side, that you wanna get this hose lined up. All right, that's good. Come to the front, get this vapor line hooked up. Lock it in place, and the fuel line. So it's kind of hard to see. Now, these straps are different, the one with the shorter part in the back goes in the back, right here, and that up there. And then put the other one in the front side and take the bolts. Keep the bolts lined up, and tighten these up. Torque this bolt to 30-foot pounds. Then we're gonna do the same on the other one.
At this point, we can lower the transmission jack. Then we're gonna hook these lines up. Line that one up, lock it in place. Just lower e-vap line. Lock that in place. And then this line right here, get that locked in. That's good. And we can tighten up this worm clamp and snug it up, not too tight. This is plastic, just make sure it's not loose. That's pretty good. All right, connect the negative battery cable and snug it down. Make sure it's tight. Now, before you go to start the vehicle, just take the key, turn it into the on position, wait three seconds, turn it off. Just do it again in about two or three times. And that's just priming the fuel up. I'll do it one more time, and then I should be able to start the vehicle. Good to go.

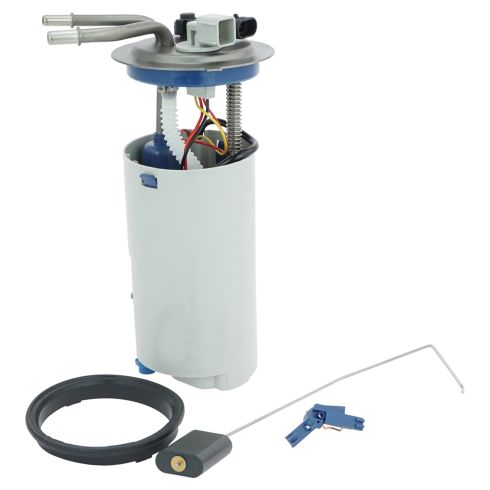
2002-04 Chevrolet GMC Fuel Pump Module Assembly TRQ FPA61914
- Yes
- Yes
- Gas
- Strainer
- Yes
- Electric
- 9.49 mm
- In Tank
- 251 Ohms
- Yes
- 47.55 gph
- 1
- 1
- 41 Ohms
- 40 gph
- Quick Connect
- No
- No
- 44 gph

How to Replace Fuel Pump Relay 2009-12 Ford Escape
How to replace a bad, broken, or failing fuel pump relay on 09, 10, 11, 12 Ford Escape

