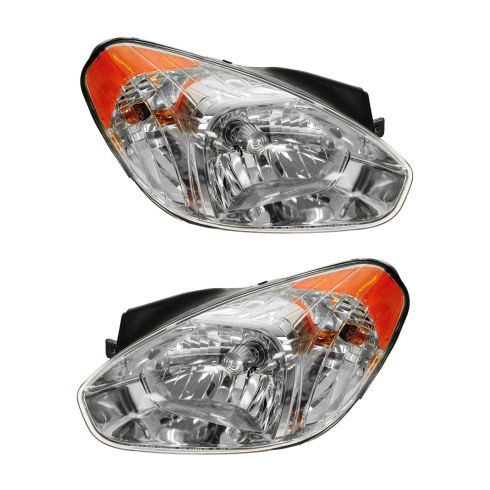
Kit Includes: (1) Passenger Side Headlight (1) Driver Side Headlight
Quantity: 2 Piece
Specification
Side Location
Driver & Passenger Side
Product Features
Direct Fit - No vehicle or wiring modification necessary
DOT, SAE, and FMVSS Compliant - Meets on-road use regulations
Matching set for a restored look
Complete Repair in One Purchase - Stop searching for parts individually and complete your repair with a customized kit or set from DIY Solutions.
High-Quality Parts from Trusted Brands - DIY Solutions' kits and sets are selected from the best automotive brands and include hard-to-find and even obsolete parts you may need for your vehicle.
Guaranteed Fit - DIY Solutions ensures its selected parts are quality-tested to guarantee fit and function.
Assemblies may include halogen or incandescent test bulbs that should be replaced before installation.
Item Condition:New
Attention California Customers:
WARNING: This product can expose you to chemicals including Chromium (Hexavalent Compounds), which is known to the State of California to cause cancer, and birth defects or other reproductive harm. For more information, go to www.P65Warnings.ca.gov
Lifetime Warranty
This item is backed by our limited lifetime warranty. In the event that this item should fail due to manufacturing defects during intended use, we will replace the part free of charge. This warranty covers the cost of the part only.
FREE Shipping is standard on orders shipped to the lower 48 States (Contiguous United States). Standard shipping charges apply to Hawaii and Alaska.
Shipping is not available to a P.O. Box, APO/FPO/DPO addresses, US Territories, or Canada for this item.
Expedited is available on checkout to the United States, excluding Alaska, Hawaii.
Final shipping costs are available at checkout.
How to Replace Headlights 2005-10 Hyundai Accent
Created on:
Tools used
Socket Extensions
Flat Blade Screwdriver
Phillips Head Screwdriver
10mm Socket
Ratchet
1. Removing the Headlight
Open the hood
Remove the seven plastic rivnuts from the grille cover with a Phillips screwdriver
Remove the two 10mm bolts from the grille cover
Remove the 10mm bolt from the back of the headlight
Pull up the grille cover
Remove the 10mm nut from the front of the headlight
Disconnect the electrical connectors from the light
2. Installing the Headlight
Remove the plastic shipping cover from the light
Line up the headlight mount on the radiator support
Connect the headlight electrical connectors
Pull the grille cover around the headlight
Install the 10mm bolt for the front of the headlight
Install the 10mm bolt at the rear of the headlight
Install the two 10mm bolts into the grille cover
Install the seven rivnuts into the grille cover with a Phillips screwdriver
Close the hood
3. Aiming the Headlights
Make a dot at the center of your low beam light with a dry erase marker
Measure from the ground to the center of the dot
Line up your vehicle with a dark flat surface
Mark the center of each headlight on the aiming surface
Draw a straight line between the two marks
back the vehicle up 25 feet from the aiming surface
Turn the headlights on
Adjust the passenger side aiming screw until the focus of the passenger side light beam is two inches below the line on the aiming surface
Adjust the driver side aiming screw until the focus of the driver side light beam is four inches below the line on the aiming surface
Open the hood. The prop rod is on the underside of the hood. I'm going to use a Phillips head screwdriver to unscrew these seven rivnuts. Once you unscrew them, it releases the tabs. Just pull them straight out.
Use a 10 mm socket to remove this bolt here and repeat for the other side. Remove this 10 mm bolt here with 10 mm socket. Peel this plastic up. It'll actually pop out of a little clip there. There's a 10 mm bolt hidden back here. I'll use my 10 mm socket ratchet and extension. The headlight will now move out from the fender.
You may have to remove this plastic here to get it around the tab. It's still connected to the connectors in the back. Disconnect the connectors from the lights, pushing the lock tabs down, working the connectors off. It might help to reach in this way and wiggle. Pushing the lock tab down, wiggle the connector back and forth to work it off. The headlight will lift out.
Here's our old, yellowed, discolored headlight from our vehicle and our brand new headlight from 1AAuto.com. It comes with a protective plastic on it during shipping. I'll just peel this off real quick so you can see it. It's nice and pristine and clear. If we flip these over, there's the same mounting tabs on both, the same lower mounting tab, and the same connectors, and the new one comes with bulbs installed. This will fit great in your vehicle and really help you see down the road.
If you need to adjust the aim in your headlights, this is the left and right, and this is the up and down adjustment. Turn them clockwise, counter clockwise, depending on how you want to set your headlights. From the front of your headlight, there's also an adjusting reference point dot molded into the plastic.
This mount here is going to go into the mount here on the radiator support. It will just slide in and clip. We'll lower the headlight down in here. I'm going to connect the bottom connector and make sure it clicks. Move the headlight in a little closer to the top connector, and we'll slide the light in and move this trim plastic here around.
Install the bolt that's hidden behind the plastic trim here. When I feel them get tight, I'm just going to stop. Install the top bolt. When I feel it get tight, I'm going to stop. If you're going to replace the opposite side, just follow the same exact steps. Reinstall the 10 mm bolts on the front of the bumper.
These are similar to a push-in style clip except they're a threaded screw, and as you screw it in, it pushes these tabs out. The easiest way to reinstall them is to have them threaded out a bit. This way the prongs can be squeezed in and then reinserted into the spot where they go. So there's seven of these. One was actually missing, so I've only got six to replace, but normally you should have seven across the front of your grille here. So we'll slide them in with a Phillips head screwdriver. They don't have to be tight. You just get them down. Just insert them so the head is flush, and then they'll lock in. Then close your hood, and the job is complete.
This is a basic tutorial on how to aim the headlights on your vehicle. Find the axis of your headlights. This is usually indicated with a small dot or the headlight bulb size on the lens. If not, it's the actual center point of your headlight bulb. Transfer this mark to a vertical wall with a preferably dark color that will allow you to back up 25 feet.
Pull up and find the center line of your vehicle, as well as the center line of your headlight axis. Mark the wall with the height of the headlights and a straight line going across at that axis height. Back your vehicle up 25 feet from the wall to the front edge of your vehicle's headlights.
Turn your headlights on and locate the adjusting screw, usually on the backside of your headlights. You'll want to rotate this until the passenger hotspot or focus of the beam is approximately 2" below the line and the driver side is 4" below the line. We change the heights on each side so you can still get a good beam to the offside of the road on the passenger side and have the driver side low enough to not blind oncoming traffic.
Thanks for watching. Visit us at 1AAuto.com for quality auto parts, fast and free shipping, and the best customer service in the industry.
LHT03579
In Stock
Product Reviews
Loading reviews
4.57/ 5.07
7 reviews
5 Stars
4 Stars
3 Stars
2 Stars
1 Star
5
1
1
0
0
Jesse
June 18, 2017
Affordable prices, fast shipping service, and correct items shipped. Thank You. Continue your good service.
Great Quality
L
February 4, 2018
These headlights are really great quality and are so pretty. A1 parts also has a video of how to install your new headlights in. It was very simple and easy to install. It only took me less then 30 minutes to install and all i needed was a screw driver and 1 socket with a ratchet
09 ACCENT
T
July 30, 2019
PURCHASE D PAIR OF HEADLAMPS FOR $109.00
DEALER WANTED $180.00 APIECE
GREAT PRICE EASILY INSTALLED
THANK YOU 1A AUTO PARTS
Hyundai Accent Headlights
Karl
March 30, 2020
Received promptly & they make my car look newer!!! Awesome Purchase!!!
OUTSTANDING
DAVID
October 20, 2020
I RECEIVED MY HEADLIGHTS AND SO IMPRESSED HIGH QUALITY AND WELL PROTECTED INSIDE BOX SHIPED, INSTALL WAS A SO EASY. MINOR ISSUE SO I CALLED THERE CUSTOMER SERVICE, THAT ACTUALLY CALL YOU BACK WITH ALL THE RIGHT ANSWERS . SO NICE AND FRIENDLY, THIS COMPANY TREATS YOU LIKE A PERSON NOT AN ORDER NUMBER... THE BEST GREAT JOB A 1 .
Nice lights
Julius
July 29, 2021
Beautiful headlights. Low beams were dim, switched out to original wiring harness, problem solved. Easy install, quality product, would buy again.
Bad wiring harnesses.
Travis
September 22, 2023
While they looked great, didn't cost a lot, and fit well, I have to take away at least 2 stars for the fact that the bulb wiring harness was mismade. It took a few days to figure out and was solved by using the old harnesses, but I'm lucky I understood enough about what was going on. Most people would have just been stymied. And it was the harness on both units. So not just a one off mistake.
Customer Q&A
Why is it that now that I have changed my headlight pair the high beam indicator stays on anytime the lights are on regardless of if the switch is in the high or low beam position?March 14, 2019
Richard L
10
I ran into the exact same problem. A1 Auto was great in trying to help. After nothing worked, they sent a 2nd set of headlights. The didn't work any different either. My usual mechanic shop ordered a pair from a different supplier...nope...didn't work either. Called Hyundai Dealership parts department and was told Hyundai original headlights are the only ones that will work. I hadn't kept my old lights, so I had no choice but the order OEM headlights. $600 later I have headlights that work perfect and look great. Hope you still have your old headlights. A1-Auto was super. They refunded my purchase price very quickly. Good luck!
March 14, 2019
DAVID J
10
There could be multiple reasons why you're having this particular problem. We suggest taking your vehicle to a nearby reputable shop to identify the cause. Once you know the cause, we'll be happy to see if we carry the parts and how-to videos needed for your repair.
March 14, 2019
Emma F
10
This is EXACTLY what happened to me. It turned out that the wiring harness was put in backwards at the factory. My auto mechanic took the wiring harnesses from my old headlights and put them on the new headlights. It worked perfectly...but he charged me $20.
March 14, 2019
Bob C
10
I also had the same issue and did what another reviewer said. I switched the new wiring harness with the old ones and now I don't have an issue anymore.
September 23, 2020
Guadalupe C
10
I just swapped around my wires. Original brown, pink/white, pink/green. So new lights wiring wrong. Black, red, blue. Using a meter found which wire was in plug. Popped wires out of connector and put in like original. Now looking from back, left: red top: blue right: black. Works like a charm.
August 26, 2023
Jason H
Are these led bulbs? And are they plug and play?September 28, 2022
John D
10
No. These are not LED. Plug and play yes, but mine were cross wired so high beams were actually low beams and low beams were actually high beams.
September 28, 2022
P H
10
These headlights will be plug-and-play but will not be LED bulbs. They will use halogen bulbs.
September 28, 2022
Jessica D
10
Yes, I was very happy with the headlights
September 29, 2022
Arthur M
Customer service
877-844-3393
Monday - Friday 8:00am - 9:30pm ET Saturday - Sunday 8:00am - 4:30pm ET
Hyundai is a registered trademark of Hyundai Motor Company. 1A Auto is not affiliated with or sponsored by Hyundai or Hyundai Motor Company.See all trademarks.
Enter Vehicle Year Make Model
Specify your vehicle's year, make and model to guarantee fit.
Year
Make
Model
Options
Drivetrain
This part doesn’t fit a . Select from parts that fit.