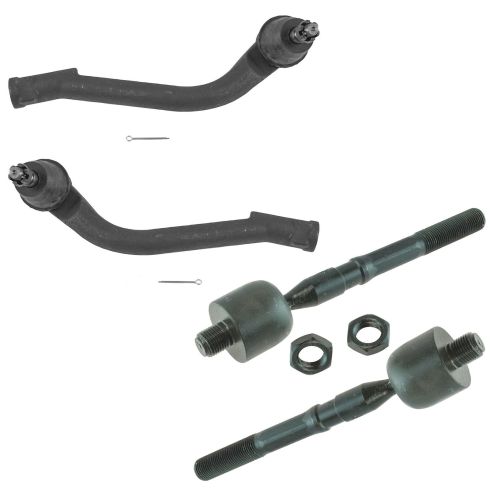
Hey, friends. It's Len here at 1A Auto. Today, we're working on a 2011 Hyundai Sonata. We're going to be doing an inner tie rod end. It's going to be a very easy job. I want to be the guy that shows you how to do it.
If you need this part or any other part, you can always check us out at 1A Auto dot com. Thanks.
Okay, friends, first thing we have to do is make sure we have our vehicle supported. We're going to raise it a little bit off the ground, but what we want to do is make sure that the wheel is still on the ground at least barely touching with minimum weight of the vehicle on it because we want to start loosening up these lug nuts while it's still on the ground. If you're using an airgun, well, you don't have to do any of this. But for the purpose of this video, we're going to go caveman style.
So now I've got those loose. Let's make sure that the vehicle is properly supported, as it should be, and then we'll go up. We're going to continue with our 21mm. We're going to remove all these lug nuts. What I like to do is I'll get one so it's almost all the way off, maybe just a few threads on, and if you're not sure how far on it is, you can just take it all the way off and then go a few threads on.
Now I'm clear to remove all the rest of the four. I can take those right off, and I don't have to worry about the wheel falling off, and then I can hold onto it without my tool in my hand, take off the last lug nut, put it down safely. So that one's on pretty good, so now I'm holding my wheel so it can't fall down and hurt me. I'm going to take off this one last lug nut. There it is. Take down that. Hold my wheel with two hands. Going to put it aside so it's nice and safe.
So I'm going to grab my safety glasses, put them on. This right here is a tie rod jam nut. All right? I'm going to take some long pliers. I'm going to get it on, just going to turn it. There we go. What you're going to need to do is you're probably going to need to... Well, I sprayed it down, so came loose pretty easy. It's always a good idea to spray down everything you're going to be working on, too, by the way. I used some penetrant. I just sprayed right here, and I'm going to spray up here. Everything that I'm going to be taking off, you don't have to worry about anything that I'm not showing on this video, but I am doing multiple videos here.
So I tried to spray down everything ahead of time. So basically, break free the jam nut so it can spin. It's much easier to do now while it's still all attached. Okay? Now I'm going to grab a 14. I'm going to remove this bolt right here. This one right here. Get this out of the way so we can move our caliper. We're going to hang it, so it's not hanging on the brake hose.
What you might notice when you turn this, the inner part turns a little bit as well. So you can use something as basic as pliers or if you have the right size wrench, you can use that. For the purpose of this video, I'm just going to say we'll use pliers because it's easy to have on hand. Most people have that probably sitting right by their side just in case, next to their bed maybe even. Who knows?
That's what it looks like. Just a 14mm head, pretty simple. I'm going to take the next thing, something as simple as this. It's a little hooky-do tool. Okay? Basically, I'm going to be using this to hang my caliper, and I'm going to hang it on whatever I can find that won't move. Maybe I'll go right on the strap coil spring. Okay?
So here we go. Take out this last bolt. There it is. It's the same as the other one, so there's nothing special about it. You don't have to worry about mixing them up. I'm going to grab my small pry bar. You can use whatever you have, screwdriver or whatever, some kind of prying device. Go like that.
While we have our caliper off, we'll just take a peek, see if it looks like it's leaking around this seal, around the piston. This one looks good. If it was leaking, we can go ahead and replace that, but we're not going to worry about that because it's not. Just get it right out of the way.
The reason for removing that to get the outer tie rod end is because it was blocking here, which is where our nut and cotter pin are, so now that the caliper's off, we have a nice clear view of what's going on. I'm going to grab a pair of cutters. I'm going to see about getting this cotter pin out, and then I'm going to use a 17mm and I'm going to remove that nut.
So this particular cotter pin isn't just a regular, straight-through cotter pin peened over. This one's just got a little scoopy thing on it, so yours might be different. Basically, for you, just get the cotter pin out, okay? But for this one, all I'm going to do, pop it out, I'm going to put it on the floor so I can find it later. That's what this particular one looks like. It's nothing special. You lose it or it's broken, just replace it. Easy-peasy.
You're going to use a 17mm right on here. If the pad little thing right here is in the way, squealer, just pull it out, take a look at it. Looks good. If you needed to, you could replace it. I'll show you a video on that if you want.
All right, so now I'm going to take my 17, I'm going to turn it to the left, I'm going to try to remove this nut. There it is. It's a castle nut, it's got all the slots, okay I'll show you what those are about when we're putting it back together.
So to remove this outer tie rod, if you weren't replacing it, let's say you weren't. I am, but if you weren't, you've got the outer tie rod right here. What you would want to do is you'd want to hit right up here. This is the knuckle, the part that's connected up to your strut and everything. It's called the knuckle. This is your tie rod, and there's your boot, okay? You would want to hit right on the knuckle itself and not on the tie rod stud. Just keep bonking this with your hammer. Bonk, bonk. You want to go harder, of course, and you'd want to get it to break free and come on down. Okay?
For me, I'm replacing it, so I'm really not worried about messing anything up, so I could go with something like this, basic pickle fork. It just slides in between the knuckle and the tie rod, and you bonk on the end, and it'll break free. Or you could go even easier than that because once again, I'm replacing this, so I'm not worried about the condition of anything at this point.
I'm just going to put on this nut so when I bang on it, it'll fall down but it won't go too far, and then I'm just going to take my hammer. Just like that. And we'll just take that nut off. I get my ratchet again. Bring it down. There we go.
So now we're clear to remove this. Just go ahead and turn it to the left so it'll unscrew. Boy, this thing's bent. Just kidding. That's the way it's supposed to be. So I guess in that instance, it would be considered curved. There we are. Now we've removed our outer tie rod end.
So here we go. We're going to get ready to remove this inner tie rod end. We're going to need to remove this jam nut, so we're just going to spin it to the left, take it completely out of the way. Show you what it looks like here in a sec. Nothing really too crazy about it. There it is. Very nice.
Next, we're going to remove this clamp right here. All we're going to do is we're going to squeeze this, slide it off, we'll put it aside, we'll give our boot a little wiggle, try to break it free. There's our clamp. If it's stretched or for some reason, it doesn't want to work right, you can go ahead and replace it with something as simple as a wire tie of some sort or whatever you have access to, but you definitely want to make sure that it's nice and tight up against your tie rod end, okay?
So now I'm going to take something as simple as a pick. You can use a small screwdriver or whatever you have. I'm going to try to very carefully not ruin the boot, but go in between the boot and the tie rod. Just kind of squeeze it in there. I'm going to take my penetrant, whatever you happen to use. I don't know your style. There's lots of different types. Some people swear by one over the other. You do you, boo boo. Here we go. Just going to bring it around, make sure I get my penetrant all the way around. My boot moves very freely now. Perfect.
Now we're going to remove the inside clamp. Sometimes they have a clamp. Sometimes somebody's already been in there and they have a wire tie of sorts. I'll grab my flashlight, I'll take a look. This one looks like somebody already put a wire tire in there. I can use my cutters see if I can get in there. If I can't, I can even just use something like a pry bar. I'll grab that, I'll show you real quick.
So what you could do, you could just take your pry bar, set it right up against it, then use your hammer. Just give it a couple... Sorry about that. Couple little loving bonks. And we want to try to break it free and or just get it off the boot. Flashlight seems to want to come off more than the boot or than the wire tie. So that's on there pretty good. We'll keep trying. Like I said, you could try to grab it with cutters, whatever you have access to, but essentially, we just want it off so we can get the boot off of here.
There we are. Little bit of brute force. Love it. There it is. Now I'm just going to grab my boot, going to give it a tug, see if I can get it pulled off the power steering rack. Perfect. Now I'm going to grab it even firmer. I'm going to try to pull it off at the inner tie rod end. Give it a little twist. There we are. This I can just push back through nice and easy.
Now you just want to check it. It's got a little rip there. That's okay. You want to make sure that it doesn't have any rips on the inside area, right along her, okay? If it has any rips any place along where the clamp's not going to be covering, well then, you're going to want to replace this boot. This keeps moisture out of the inside of your rack and out of the inner tie rod end area. As you can tell, this one has issues. It's really stiff, clunky, garbage. We're going to replace it. Easy-peasy. Here we go.
So here we are, friends. Now it's time to take off our inner tie rod end. We got this really cool tool that we sell here at 1A Auto. It's an inner tie rod end tool. It's very simple to use. All you would do, you would slide it over your inner tie rod. You can loosen it. I'll show you really quick. It can be tight, or it can be loose. You just got to kind of work it to make it the size that you want just with using these 14mm head nuts. Okay?
We're going to slide it over, and we're going to bring it like this. We're just going to tighten up these nuts, get them so they're nice and tight. And the teeth on this are supposed to grip right in, so as long as they do their job, we can do our job, and hopefully everybody wins. Well, except for the inner tie rod, right?
But I do want to make sure it's tight so these teeth can grip in. Super important. It's the whole point of it. If you have it too loose, it's just going to spin on your tie rod. So we're going to go with the assumption that that's pretty tight, could use a long ratchet with a 14mm socket, whatever you have access to.
Now I'm going to go with something like this. I like to have something with plenty of length when I'm doing these, so have my half inch long ratchet, half inch drive extension, and I just have a reducer. I'm to go ahead and get it in there. It's 3/8 drive, by the way, so if you have a 3/8 drive ratchet, you can go ahead and use that. I'm going to try to turn it to the left. Break it free. Now once it's free, I can remove our tool, and then we can spin that puppy right out. That worked great. Thank you, 1A.
So now I got my tool out of there. I'm just going to continue turning it to the left, might take a minute to completely unscrew it. There we are. There's our inner tie rod end. We can go ahead and replace that with a quality 1A Auto part.
All right, everyone. So here we go. We've got a quick product comparison for you. We have our old inner tie rod end from our 2011 Hyundai Sonata. I just removed it. It's pretty easy. So here it is. I'll put the new one down. In here, this is the ball and socket area, okay? As you can tell, it's very rusted in there, it's really cruddy, so that's not great. This is the reason why we're actually replacing it because it's junk. We've got the threaded area, we have the part where the boot rides, okay? And we also have the threaded area back here, so that's what that one looks like.
We're going to grab our new one, set this one aside. Hopefully, it'll stay at some point. Here we go. We've got our threaded area where it threads into the rack, okay? We've got our ball and socket right in here. It's got a neopreme seal inside there, so it's going to be stiff to start, but once you get it going, it's nice and lubed already. You don't have to worry about that, so that's always nice. We've got our spot that our boot's going to ride on. Came with a brand-new jam nut. Thank you very much, 1A. And of course, we get our threaded area for adjustment and putting our outer tie rod handle on.
So as you can tell, this is a quality part. If you need this part or any other part, you can always check us out at 1A Auto dot com.
So we've got our inner tie rod end. We're going to go ahead and put this in. One thing I like to do is I like to put a little bit of thread locker. If you have red, you could red. If you have blue, you could use blue. I wouldn't go with anything like green and definitely don't use any type of thing like a Never-Seez, okay? You want this to go in and stay in until it's time to come back out someday. I don't know, 100,000 miles from now or whenever it needs to be replaced again.
So I'm just going to take it, get it straightened out a little bit closer here, hopefully. And I'm just going to turn it in to the right. Now I can just go like this. We'll get it bottomed out, and then we're going to go ahead and use our 1A Auto tool. We'll put it on here again. We're going to snug it right up, and we'll move along.
So I've got our tool again. I'm going to go ahead and get it on here. I'm going to try to set it up so it's kind of sitting at a sideways angle like this because if I put it down like this and I go to tighten to the right, sway bar's going to be in the way. I'm going to tighten these up with my 14mm again. Same thing we used to take it off, we're going to use to put it on. Easy enough to figure out. Just going to go ahead. Just go like that, okay? We don't need to go super tight, but we do need to make sure that it's going to be able to loosen up.
If you are maybe a heavyset person and you're putting all your weight into it, you want to be careful because this screws into the inner portion of your rack, your power steering rack, so if you mess up the internals of your power steering rack, you're really wasting a lot of time doing this because you're going to be replacing them with your rack anyway. Now I'm going to remove that tool. We'll set it aside, and we'll move along.
Okay, next what I like to do, little bit of silicon paste, or you can use whatever you've got for grease. I'm just going to go right along here, okay? And this is where the outer portion of the boot's going to ride, but the reason for doing this is so even with the clamp on, this will be able to spin because this is how the alignment specialist is going to set your alignment by turning hour inner tie rod in or out from the outer tie rod end, so if you don't put grease there and you clamp it on, the person's going to have an issue.
Next, we've got our boot, okay? It was on with a wire tie, so I'm just going to go ahead and put on another one, so I'll get it started. I'm going to keep it semi-loose so it won't fall off while I'm trying to get it in there but not tight enough that it's squishing it down. I want to get it on there, and then I'm going to go ahead and trim it down, and we'll go from there.
I put the outer boot so it's sitting inside our little groove right there, okay? Now I'm going to try to slip the outer portion of the boot over the power steering rack. You want to make sure that it's completely over, though, so take your time, and just get it on there, okay? Can wiggle it, spin it, do whatever you need to do. Make sure you look at it from different views, so it is completely on. If it's not, and you wire tie it down, it might not make a good deal, and you're going to have moisture inside there.
So now I just grab some long nose pliers, needle nose pliers, call them what you want. All I'm going to do is I'm going to try to tighten up this clamp as much as possible. I want to try to make sure that I keep the moisture out of there, essentially. Okay? You could trim that piece off if you want. It's your prerogative. It's really not bothering anybody in there, but if you want to spend the time and try to get your cutters in there, make magic happen, you can do that.
I'm going to use my little clamp, okay? I'm going to slide it over the inner tie rod end, and I'm just going to go ahead and slide it over that. There we go. Now we get that installed, we can go ahead and trim that off, and we'll go ahead and put on the jam nut and the outer tie rod end.
Okay, friends. Here we go. I'm going to use a little bit of copper never seize up on here. Just like that. Easy-peasy. Got my nut. Just going to turn this in quite a bit because now I'm going to put my outer tie rod on here. I'm going to screw it in until it lines up with this hole right here. We didn't move the knuckle or anything like that. Try to turn it so the wheel should still be straight the way it was. If you were worried about that way back in at the beginning when you were taking off your outer tie rod end, you could have counted the threads. That's completely up to you. This is going to an alignment specialist, so to me, I just have to have it as close as possible, and then the person doing the alignment can take care of the rest.
So I'm going to grab my outer tie rod end. Just going to turn it to the right, take my nut off. brand new nut. Looks like it's a little smaller than the other one, so we'll be using a different tool to put it in. Let's see. Looks like I can maybe go in another thread or two, or turn or two. See how that looks. There we are. Just put it in the bin there. I'm going to tighten up this nut right here. I'm just going to bottom it out. There is a torque specification for it. I'll get it for you.
So for our new nut, it's a 16mm, so it's a little smaller than the original one we had. That's okay. It just has to tighten onto that stud. So I'm just going to bottom it out, then I'm going to go ahead and grab my torque wrench. Feels pretty good for now. I'll grab my torque wrench. It's set to 32 foot pounds. That's the torque for this. All right. See if I can get it on here. And now I'm just going to torque it down to 32 foot pounds, and then I'll have to line up the hole where the cotter pin goes through.
There we are. Okay, so as of now, the way that this is sitting, the slot in the nut is not matched up with the hole through the stud, so now, at this point, you don't want to loosen it to get it there. You want to just go to the next available hole. That's close. There we are. Got my cotter pin. Just going to go right through. Just like that. Push it all the way. I'm just going to grab it if I can here. There we go. I don't even need my cutters for this. Just going to bring it up, wrap it around. Doesn't have to be anything special. It just has to be bent so it can't make its way out because that's what's going to hold this nut nice and tight. Okay?
So now we've got this right here. This is our jam nut. I'm just going to turn it in so it bottoms out with the tie rod. All right. I'm going to use my pliers. I'm just going to tighten it up real quick. There we are. Nice and snug. Perfect. Here we go. We'll just get our caliper on here. We'll be good to go.
So we've got our inner pad. We're going to put that in where it belongs. See if I can get it. There we are. Slid in nice and easy. If it was stiff, you'd want to clean up the pad, make sure it goes in. Get our caliper back on there. We've got our two caliper bolts. Just going to take them, start them in. There is a torque specification for these, so I'll just get them bottomed out, and then we'll go ahead and torque them down.
Okay, so the torque on this is between 16 and 23 foot pounds. So I'm just going to grab my pliers. Just going to get this on here. There we go. Going to do the same thing for the upper one. Once that's torqued down, we'll move onto the next step.
So here we go. I'm going to lift up this wheel. I'm going to be careful not to go like this and lift with my back and hurt myself. I'm just going to take it, roll it right up my leg, I'm going to use my ab muscles, lift it up. Put it on here. Pick up my hubcap. Going to put it up on here. And the I'm going to hold these all together, so it can't fall down. I'm going to grab a lug nut, get them all started on. We'll snug them down a little bit, and then we'll torque them.
Okay, here we go. We're going to torque these up with our 21mm socket to 80 foot pounds. I'm doing a star pattern. Super important. When you go around the second time, if you choose to, you can go however you want. But to do the star originally is so that when you go like this, you tighten it here, it goes on. If I was to go here, it would push this side on, but what if it was kind of sitting off kilter, right? That'll be bad. So I went here, here, sucked it all in. Boom, boom, boom. Make a nice pretty star, and off we went. 80 foot pounds with a 21mm socket.
Thanks for watching. If you want the parts to do it yourself, check out 1A Auto dot com, the place for DIY auto repair.