Let's get this cover off of here using our 8-millimeter socket. What we need to do now is remove this right here. To do that, you would loosen this clamp right there using either a flat-head screwdriver or an 8-millimeter. You can come over here, do the same thing, loosen that right up. You don't necessarily need to take them off completely. And then if you were to look right under here, you're going to see where these hoses should be kind of mounted in and held securely. You would just pop that free. Let's start taking this off. Okay. Mine's already free. We'll grab onto this, slide it off. Slide that up and out of here. Now, we're going to get this out of the way. We're going to remove these three 10-millimeter bolts. Let's grab this right back here. Grab that tab, lift it up, and then you should be able to slide it off. Come right over here. Same thing. Lift that tab, slide this off. Set this aside. I'm just going to get this right off of here. I'll just grab my small pocket screwdriver, come right in between here. A little twist, slide that out of there. Now, let's remove this 10-millimeter nut. Grab this, lift it up. Gives us a little bit of slack. Now, we're going to disconnect the wiring for our throttle body assembly. Just come right along here right in between this area and give it a little twist. What we want to do is try to push this gray piece out. That's what's locking this in.
Okay. Press right here. Draw that off. Get this hose off of here. Sometimes you can wiggle them around. You might have to twist it. I'm going to try to press a little bit with my screwdriver. Obviously, I want to be careful not to damage the hose. Get that off of there. Let's continue on to this area right here. You're going to notice there's a little cap. Go ahead and take that off of there. Behind here, you're going to see a Schrader valve. It's almost like a little piton that's going to be sticking out in the center. What we're going to want to do is relieve the fuel pressure that's going to be inside the system. To do that, we're going to press on that centerpiece. You just want to be careful because it's going to be under pressure. You need to have gloves, eye protection. And it's probably a great idea to have a rag around to try to catch the majority of any fluid that might come out. Okay. So, nothing came out of there. That's great. That means that there wasn't any fuel pressure waiting in the system for me, but you definitely want to make sure that you do that anyways. Now, I'm just going to take that cap, put it right back on there because I don't want to lose it. Up along the top of the intake, you're going to see this rubber hose that leads down to a plastic line. Let's go ahead and get that off of there. Give it a little wiggle if you need to. Try to get underneath and just try to break it free.
We need to get this lock off of the fuel line where it connects onto the fuel rail. To do that, I reach my hand in. We need to come through with our small pocket screwdriver, get underneath right here, lift this up. Once you do that, you can slide it forward. Set this aside. To get the hose or the fuel line off of the rest of the fuel rail here, we're going to use this tool. I'm going to use the 3/8 side, which is the bigger side. I'm gonna put it around the line, and then it should go through and it's going to press up against the teeth that you can see inside. I'm going to press this in and just kind of twist it so it works its way along the teeth. If it looks as though yours is very rusted up, you probably want to put some penetrant in there. Now, I'm going to grab that hose, try to give it a little push at the same time as I do this. All right. I just felt the tool go in quite a bit. At this point, I should be able to draw this off. There we are. A little bit of fuel coming out. That's okay. Now it's going to be time to get the fuel injector wiring harness off of here. If you were to look at it, you're going to see a big old plastic piece that's going to look kind of confusing. Why is it like that? Well, if you just take your small pocket screwdriver and press right in this little piece, you can grab onto this lip where my fingers are and draw this up. It's a lock.
Okay. Pull that right up. Now, we're going to go ahead and press on this tab again. Give this a little wiggle and it should want to separate. We're going to do the same to all the fuel injectors. Okay. So, I got the four off over on the passenger side there. And now, I made my way over to the driver side, I'm going to remove the four that are on this side as well. This side might be a little bit harder to get to, but you can do it. I'm going to get the wiring off for this purge valve here. There's a little clippy-do. You can grab onto that. Now, we're going to get this hose off of here. If you were to take your small pocket screwdriver and press right here, you should be able to twist and lift. And that comes right out. Now, we're going to remove our throttle body assembly. You're going to find that there's three mounting nuts, one on top, one on the bottom driver side, and then one on the bottom passenger side as well. Remove all three. Looks like it actually pulled out the whole stud for us. It's not necessarily something to worry about. I'll show you how to put it back in. I'm just gonna see if I can work this off of here. Here we are. We'll just set that aside.
Next, we're going to remove the hose that comes over to here. This just goes right to the backside of the intake. I find that this side's easier to get off. Remove that clamp, grab your hose, give it a little twist to break it free, and then draw it right off. Let's just take a nice rag. We're going to cover the hole for the intake. The next step that we want to do is grab compressed air with a blow gun, and we're going to blow out the dirt that's in between where the intake connects onto the engine itself. Next, we're gonna remove the 10 8-millimeter bolts that hold the intake to the engine. You're going to notice there's five on the passenger side, and then there'll be five more over on the driver side. I'm just gonna grab onto this, try to give it a little wiggle. Try to lift it up. If you feel as though it's sticking in the middle, well, check those bolts. See if they're up all the way. Okay. So, just lifting up now. Just wiggle it around, take a double-check around. Make sure that there isn't anything that you might've happened to miss. You don't want to have any hoses or wiring connected to this in any way. Anything that might pose an issue. Something to remember is as we're starting to lift this up and draw it out, this piece right here has to come through and under this area right here.
So, as we come up, it might want to get caught. This is the area it's going to be stuck. Just go ahead and pull it right through there. Okay. There it is, friends. Now with that intake out of the way, we have a clear view of a big old mess. Any of this stuff that looks like that could be a contaminant that's going to make its way down into the engine. We obviously don't want that to happen. I'm going to grab a vacuum cleaner, you can use whatever you have, clean this out the best you can, and then, of course, you need to take a peek inside of each of these ports to make sure there's no debris in there, clean those out as well. Now, it's going to be time to clean down the engine where the gaskets are going to ride. They're going to be along each one of these ports. Before you go ahead and scrape them down though, take a rag, fold it up, put it inside the port so it'll catch any of the debris that might fall inside. Take a nice flat razor blade, and I always just try to scrape away from the hole. Okay. So, this one looks great. Go ahead and grab onto that rag. I always try to drag it along the engine so I can pull out any of the debris that might've tried getting inside. Continue wiping it down. Now, do the same to all.
We've got the intake over on the bench. The first thing I like to do is make sure no fuel can get out of this line. I'm just going to use a little bit of electrical tape because that's something that I have on hand and most likely everybody does. I'll just kind of tape it up. That's decent enough. Now, once you tilt it up, you'll be able to see where the gaskets are going to be. Obviously, we don't want any of this crowd getting inside there. So, make sure you vacuum it out, get it as cleaned up as possible, and then we'll get the gasket off. Okay. So, we've got that cleaned up decently. Now, if you just grab onto that gasket area, you can see that it tries to lift up and off of there. Right along here, there's going to be an area that latches on, just kind of pry it away. That'll help you along. We have another latch right here, pull that up. And then, of course, there'll be one at the far end as well. We'll get that out of here. Move along. Now, when I clean this up, I like to use that razor blade. When I do it, I'm going to kind of tilt this down like that. That way there, any crumbs or any debris that I happen to peel off of here will fall away and not in.
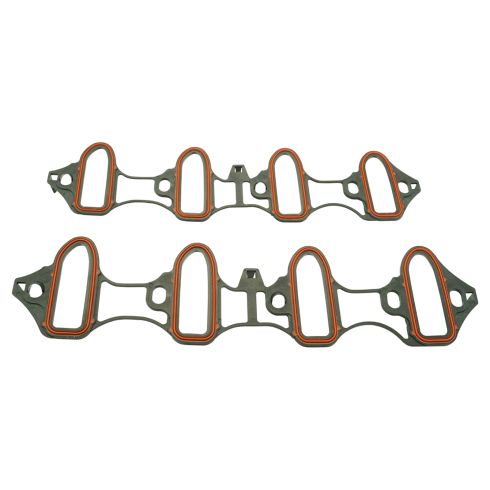
Be very careful in this area right here. That's the lower portion of your fuel injector. We want to make sure that the gasket area on all these ports is nice and clean. And then, of course, we'll do the same to the other side of the intake. Now, I'm going to take a rag with some parts cleaner directly on it, and I'm going to wipe down the mating surface here. Get it nice and clean. Do the same to all, of course. Now, it looks great. Let's go ahead and turn it over and do the same to the other side. Now that we have this cleaned up, let's go ahead and put on our new gasket here. You can see you've got your little clippies, you got one right there. Set it on here just like that. Click right in. Make sure it's nice and secure. Do the same to the other one. Let's take the knock sensor wire. I'm just gonna go straight towards the back of the engine, around this bracket right here and then up and over and leave it right there. You want to make sure that it's not anywhere near any of these ports because obviously we don't want to put a kink on this and we also don't want to make an issue for the gasket. I got it right here. We've got our hose coming in down at an angle.
Now that we have the intake resting here, we're going to grab onto this. Make sure we put it through there before we go too much further. There we are. Okay. This looks pretty great. Now that we have it semi-lined up, the next thing we need to do is make sure that there's no wiring, there's nothing that could have fallen and has stuck underneath the intake before you start tightening anything down or even studding in those bolts. Just kind of wiggle it around, you should almost kind of feel this want to slide right into place. It's going to go up the thunk and slide right in. If for some reason you notice that it doesn't seem like it's lined up but it doesn't want to slide forward and back, it's probably because one of your bolts right here maybe fell down into one of those ports a little bit and it's causing it not to move. If that's the case, just go ahead and lift up a little bit, wiggle it around, and you should be able to get it lined up. Before you go ahead and tighten any of them down completely, I always try to make sure that I stud them all in at least a few good threads. Now, it's going to be time to bottom out our bolts for the intake. When we do that, we're going to be studding from the center two bolts, and then we're going to work our way out in a criss-cross pattern.
So, I'm going to start with the center on the passenger side here. Okay. Just bottom it out. We're going to be torquing them, so don't worry about overtightening it now. Come from the other side here. Last one number 10. Okay. Let's torque them to manufacturer specifications. Now, we're going to torque down these bolts to 44-inch pounds in the same sequence, starting from the center on the passenger side. Okay. Three is the one directly behind number 2. Let's get number 4. It's going to be the second one from the front here. Number 5 is going to be the one immediately behind that center bolt there. Number 6 is going to be the second one from the front on the driver side. Okay. Number 7, just scoot right up to the forward one. Now, we're going to go number 8, which is all the way in the back on the passenger side. Number 9 is going to be directly across to the back bolt on the driver side. And number 10 all the way in the front on the passenger side. Perfect. Now, we're going to do a second pass. The second pass needs to be torqued to 89-inch pounds. Perfect. Just double-check everything. It looks like we tightened every single bolt all five on each side of the manifold. This looks great. Let's move along.
Like to get the fuel line on ASAP. Give it a nice tug. Make sure you get that lock on there. Slide it through like this. That should slide in, and then you just clip it like this. Give it a nice tug. Make sure it's completely locked in. Let's grab the wiring for that knock sensor. Bring this up here. We're gonna put it right up onto there where it's supposed to sit. Make sure it's all the way on and it's nice and secure. Go ahead and connect it in. I always like to give them a tug, make sure that they can't come disconnected. If that comes sliding off, you could try to pinch this down a little bit. There we go. Now I got it that time. That feels good. This is definitely not coming off. Let's get this sensor plugged in. Connect that in. Let's grab this hose. It's going to go underneath the wiring harness and then right onto here. Give it a nice tug, make sure it's secured. Now, we can grab onto this. We'll just kind of pull it and we're going to line up the hole with the piece right here, should slide down, and the wires should fall right into where they need to be. Let's get the nut on for there. Let's get this plate back on there. The two-bolt holes go towards the front and the one goes towards the rear. Grab this, connect it right in. Grab this, should push right on. Give them a nice tug. Those feel great.
Let's get this hose back on here. Make sure you fix that clamp so it's situated properly, a little bit further. Give your hose a nice tug and make sure it's completely secured. Over on the other side, let's go ahead and get this hose back reattached. Awesome. Let's move along to the fuel injectors now. You have the area with a little piton. That's going to be facing towards the front if you're on the passenger side and it'll be facing towards the rear on the driver side. I'm gonna go ahead and put that down on there. Make sure it clicks in, give it a nice wiggle, and a nice little tug. You have to make sure that these are completely latched in. If they're loose, you're going to have a runnability issue. Don't forget about the lock. Let's put that back on there as well. You see how this opens up? That's going to slide right over this area here and then this area is going to slide right down in between. Push it so it pushes in that tab and push it right by it. That should lock it in. Give it a nice tug one more time, make sure it's completely latched in. This is super important. Do the same to all four on this side and then do the same to the four on the driver side. Now, when it comes time to put your throttle body back on, if for some reason when you tried to remove the nut, the stud came out, don't worry too much. What I would do is I would use the proper Torx bit that fits on there and then use a 10-millimeter wrench and loosen this up. You don't need to remove the nut fully though. Just loosen it up a couple of good threads.
Let's do that real quick. Okay. So, I loosened that a couple of threads. I'm going to do the same to all of them that came out just like this. Once I do, I'm going to put the throttle body back onto here after I replace the gasket, and then we'll go ahead and tighten up the center. We're going to torque that to manufacturer specifications, and then we'll go ahead and torque up the nut afterward. Next, I would take a nice razor blade and I would clean up the area where the seal's going to ride right on the throttle body. Now I'm just gonna go like that, give a nice scraping. Obviously, we don't want to chisel up the metal in any way, we're just trying to get off any of the leftover residue stuff around here. Make sure you clean out any of the gunk that you might've gotten inside the throttle body area. The next thing we're going to do is make sure we have all this cleaned out in here. And then something that I always like to mention is it's a great idea and it's highly recommended to replace the gasket that goes between your intake and your throttle body before you reinstall. If you don't have access to a new gasket, what you should do is at least make sure you clean it down and inspect it. Make sure that there's no cracks or it's not torn anywhere and give it a little squeeze. Make sure it still feels soft. If it feels dry and brittle and you can't feel any squish, you really should replace the gasket.
This one seems fine. So, I'm just gonna clean it down. Like I said, I would highly recommend replacing it though. Now, once you've either replaced or cleaned and inspected the seal, we can go ahead and put this back over. Okay. That feels good. Now, I'm going to take my stud with my loosened nut, stud it in there. I'm going to stud in the other one as well, we'll get them both studded, and then we'll snug them up and torque them to manufacturer specifications. Now, we're going to torque the studs, the ones that got removed at least, to 53-inch pounds. It's gonna be time to go ahead and put these nuts on there. That one's studded on. Once you have them all bottomed out, go ahead and torque those nuts to 89-inch pounds. Let's get this connected back in here to the throttle body. Make sure you press in on your lock. That should lock it in, give it a nice tug, make sure it doesn't come free. Now, it's going to be time to get the air inlet back on here. Just put it down just like this, you can start in the side that goes over to the air filter box if you want. Take this one, slide it down in there, and then push it right onto the throttle body. That feels great. Let's go ahead and tighten these up. Okay. Just take a look. If you have this and you can attach it back in to secure it, it's great idea. Lock that in. Double-check everything, make sure that it's nice and secure and it definitely can't come free anywhere.
Let's get our engine cover back on. We're going to slide the backside in so it connects into the hooks and just drop this down. Now, you would just tighten up your mounting nut up here, mounting bolt. Give it a nice wiggle. Perfect. Okay. Double-check everything. All our wiring's in, nice and secured. Perfect. The next thing you would want to do is start up the vehicle, let it run for a little while, take it for a road test. Make sure the engine runs right. If it does, you're doing all right.