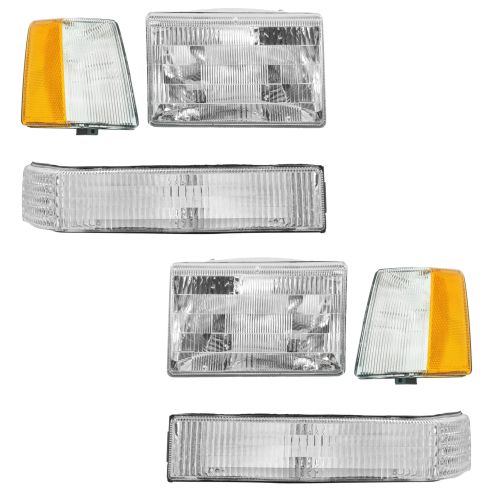
Complete Repair in One Purchase - Stop searching for parts individually and complete your repair with a customized kit or set from DIY Solutions.
High-Quality Parts from Trusted Brands - DIY Solutions' kits and sets are selected from the best automotive brands and include hard-to-find and even obsolete parts you may need for your vehicle.
Guaranteed Fit - DIY Solutions ensures its selected parts are quality-tested to guarantee fit and function.
Assemblies may include halogen or incandescent test bulbs that should be replaced before installation.
Features and Benefits
Direct Fit - No vehicle or wiring modification necessary
DOT, SAE, and FMVSS Compliant - Meets on-road use regulations
Matching set for a restored look
Item Condition:New
Attention California Customers:
WARNING: This product can expose you to chemicals including Chromium (Hexavalent Compounds), which is known to the State of California to cause cancer, and birth defects or other reproductive harm. For more information, go to www.P65Warnings.ca.gov
Lifetime Warranty
This item is backed by our limited lifetime warranty. In the event that this item should fail due to manufacturing defects during intended use, we will replace the part free of charge. This warranty covers the cost of the part only.
FREE Shipping is standard on orders shipped to the lower 48 States (Contiguous United States). Standard shipping charges apply to Hawaii and Alaska.
Shipping is not available to a P.O. Box, APO/FPO/DPO addresses, US Territories, or Canada for this item.
Expedited is available on checkout to the United States, excluding Alaska, Hawaii.
Final shipping costs are available at checkout.
How to Replace Headlights 1997-98 Jeep Grand Cherokee
How to Replace Corner Light 1993-98 Jeep Grand Cherokee
Created on:
Tools used
Number 2 Torx driver
Rust Penetrant
Wire Brush
1. Handling the Bulbs
Note: DO NOT TOUCH the bulbs- the oil from your fingers will burn into the light and foul your bulb.
Clean with rubbing alcohol and a soft cloth if the bulbs do get touched.
2. Removing the side marker light
Use your No. 2 Torx screwdriver to remove the screws securing the side marker light.
Pull the headlight out.
Unplug the harness.
Clean the studs the headlight assembly with a wire brush.
Spray with penetrating oil.
3. Installing the new headlight assembly
Plug in the harness.
Clip the new headlight back into place.
Screw the side marker light assembly back into place with your No. 2 Torx screwdriver.
This video is brought to you by www.1AAuto.com your source for quality replacement parts and the best service on the internet. Hi, I'm Mike Green. I'm one of the owners at 1A Auto. I want to help you save time and money repairing and maintaining your vehicle. I'm going to use my 20 plus years' experience, restoring and repairing cars and trucks like this to show you the correct way to install parts from 1AAuto.com. The right parts installed correctly, that's going to save you time and money. Thank you and enjoy the video.
In this video, we're going to replace the headlights on this 1998 Jeep Grand Cherokee, basically the same as all '93 to '98 Cherokees. Pretty easy, only requires a number two torques screw driver. We're going to help you switch your truck from this to that, and again pretty easy, probably about an hours' worth of time and just a number two torques screwdriver. We'll start out, going to kind of speed this up a little bit.
We're going to remove the side marker light, there's a screw there and you're going to see me use my number two torque screwdriver, remove that screw. Don't pay attention to the fact that the lights are already out, kind of shot this out of sequence. You do have to remove this side marker light first, two screws, one down there and then one up on the top. Also you'll notice that I switch from side to side because I found that the marker light on this car was broken on the other side, so I'm showing you how to remove the side marker on the left side, but how to remove the headlight on the right side.
You got your side marker, all right, and then you just basically pull the light right out and you pull pretty hard and you give it a good tug, all right. Then you can pull the other side, okay and then it comes out and then there's a little locking tab on the headlight and you pull that locking tab off and your headlight is out. Then what you want to do is you want to clean up the studs that the headlight snaps on to. You can see it's a little bit rusty, I'm going to take a wire brush and I'm going to clean that rust and any dirt and gunk off of them. You clean the surface of them and kind of in behind too.
I apologize the lighting is not the best on here. Like I said, it's a nice stiff wire brush, clean those up. Then once they're clean you're going to want to spray them with a little bit of white grease or oil or anything, just to make it easy to kind of push the headlights on there. Then you'll see up here, the clip stayed with the car, okay the new headlights come with that clip installed. For this, I'm going to actually pull that clip out of the headlight because this is how they did it at the factory.
The car came down the line, that clip helped line it up and then they pushed it on. You can always just push it on regularly if that clip comes off with your truck. First, plug in the light and then you kind of have to look down into the holes in the radiator support and line it up. Make sure both the ball and sockets are on and then you'll see me give it a good fist bump basically. You want to use a good striking blow, not just try and push it, you'll end up breaking the plastic. I'm just making sure it's lined up, I'm going to give it a good whack there and it's in place.
Now you can use the torque screw driver also to aim it if it's a little bit off. Then we're going to switch back to the other side, just show you and I'll speed this up replacing that other parking light. You get this parking light in and again don't pay attention to the fact that the headlights aren't in, kind of like I said, shot this out of sequence and putting it together for you the best I can. Basically you remove the parking light, remove the headlight, put the headlight back in and put the side marker light back in.
If all goes right, hopefully your truck will go from this to more like this. Now we hope this helped you out and we appreciate you looking, thank you very much.
Tools used
Number 2 Torx driver
1. Removing the Side Marker Light
Loosen the lower T2 Torx screw from the side marker light
Remove the lower T2 screw from the marker light
Pull out the marker light
2. Servicing the Side Marker Light Bulb
Twist the bulb out of the side marker light
Disconnect the bulb from the socket
Connect the new bulb
Twist the bulb into place
3. Installing the New Side Marker Light
Push the marker light into place
Insert the lower T2 screw into the marker light
Insert the top T2 screw into the marker light
This video is brought to you by www.1AAuto.com, your source for quality replacement parts and the best service on the internet.
Hi. My name is Mike Green. I want to help you save time and money repairing your vehicle. I have 20-plus years experience restoring and repairing cars and trucks. My company, 1A Auto, sells high quality replacement parts over the internet. In this video I'll be showing you how to install these parts. By the end of this video, you'll know how to install them and where to get them. That's going to save you time and money. Thank you and enjoy the video.
In this video, we'll be replacing these side marker lights on this 1998 Jeep Grand Cherokee. It's a very easy replacement. It only requires a number 2 Torx screwdriver. The side marker light is held in by two Torx screws and here is a close up of the first one. It's a little hard to find. It's between the side marker and the lower parking light. Here now you can see, I'm inserting my Torx driver into there and loosening up that screw. I'll loosen it in up some and then I'll actually take the top one off. The top one is just located right inside the fender right there. You'll notice I have the headlight out. You do not have to have the headlight out. Again, you don't have to have the headlight out. I was just doing another project and filming this at the same time. You can remove this marker easily without taking the headlight out. I remove that top screw, and now I am going to finish removing. The reason I did it that way is because when I pull the light out, I want to pull the screw out, too. I don't want to try and reach in there and remove that screw.
You can service the bulb at this point or replace it. Note that you do have to have the orange bulbs. To put it back in, put the screwdriver in there. Keep the screw in its location and then find that area and then start it in. I'll just start it in place and then I'll put the top one in. You always want to do it this way so you can kind of move it around loose. Get that top one started in and then I'll tighten up the bottom one and I'll tighten up the top one. That's pretty much it. Side marker lights on these are pretty easy fix.
We hope this helped you out. I wish you good luck on your Jeep Grand Cherokee project. Your source for quality replacement parts and the best service on the Internet. You call us toll-free, 888-844-3393. We're the company that's here for you on the Internet and in person.
Product Reviews
Loading reviews
4.81/ 5.016
16 reviews
5 Stars
4 Stars
3 Stars
2 Stars
1 Star
15
0
0
1
0
Harry P.
November 4, 2013
Great service,fair price, fast shipping. Very happy. Harry
Videos are very helpful
S
October 7, 2017
This site is awesome and the product seems like a good quality I will definitely buy here again
1996 Jeep Cherokee Light kit
wayne
October 20, 2017
I was just looking for new headlights for my Cherokee and came across this complete light kit at a reasonable cost. The lights came very quickly and are nice quality.
I had them installed in About a half hour and my Cherokee looks great!
Great deal on great parts!
I highly recommend 1A Auto and will purchase parts from them again!
Old Jeep new look
P
November 7, 2017
Receipt parts in a timely manner parts were very good shape look better than new installation was a snap he was very surprised the headlights came with bulbs that was a nice touch everything installed well went well I'd recommend this product
Great Price and fitting.
K
December 12, 2017
Great fitting and looks, overall great price for keeping a OEM look on your jeep.
Very pleased
L
January 28, 2018
The only thing I can think that needs improvement is the seals that are in please of the lights to keep the dust and moisture out are very hard to peel when you wearing globe's aside from that everything else is perfect
Thank you guys
Awesome company!
marie
March 28, 2018
Great price and fast shipping! Will be doing business with you again!
Lightning kit for 1996 Jeep Grand Cherokee
L
July 15, 2018
It was nice to get the kit and how easy to order and replace the old headlights, side markers & blinker lights looks great. Thank you
Great fit
Mike
October 12, 2018
Brings back the new look to my ZJ. Easy to install I used LED lights in the headlights and stand bulbs in the rest.
Exactly what I needed..
D
October 29, 2018
Fit my 1995 Jeep Grand Cherokee Limited perfectly..all 6 pieces and at such a great price!
I had been searching around on Amazon and a couple of other sites, and from the mixed reviews I had read, I didn't want to explore further!
I came across 1AAuto through Google and bought the lights as soon as I saw them! Can't beat the price for all 6 pieces!!
Paired with LED bulbs, my Jeep looks so refreshed!
Thank you 1AAuto!
Head lights
B
December 8, 2018
I love them they work great on my jeep. Thx Merry Christmas.
Replacement Kit
J
December 20, 2018
Great 6 piece item to replace old front lights. Also included the 2 lightbulbs for the headlamps
Looks like new
M
April 12, 2021
I have had these on for some time now with no fading or etching at all. They work fine.
Look great, but...
Sean
May 18, 2021
These look great and made a world of difference in functionality versus the original 1996 housings and lenses on my ZJ, which had been yellowed and holding water for years. However, the clips would not connect to the adjusters as designed. I had to reuse the clips from the stock housings, which were not easy to remove. Also, if I'm being picky, the housings for the front signal light are chromed plastic whereas the OEM were black; as such, the clips are much more noticeable between the lights and the grill.
Great product
Dave
December 25, 2021
Fast shipping great product. Only problem was the mounting clips where to tight drilled the holes a little bigger and they work great.
John
August 22, 2023
It was a perfect fit, lots of chrome, and easy to install. Like all the parts l get from these guys, and the price is always low at 1 A Auto.
Customer Q&A
What size are the bulbs for each part
for a 95 jeep grand cherokee?December 21, 2015
Marcus W
10
Hello, Sorry but the bulb specs are the same as the OE. We do not sell bulbs here so we do not have the correct bulb ID's available. A local auto parts store will have these details available for you.
December 28, 2015
Brian F
Can I put aftermarket led bulbs in these lamp?November 4, 2021
John D
10
We can only guarantee the fitment of the original bulbs or new standard bulbs.
November 4, 2021
Jessica D
Customer service
877-844-3393
Monday - Friday 8:00am - 9:30pm ET Saturday - Sunday 8:00am - 4:30pm ET
Jeep is a registered trademark of FCA US LLC. 1A Auto is not affiliated with or sponsored by Jeep or FCA US LLC.See all trademarks.
Enter Vehicle Year Make Model
Specify your vehicle's year, make and model to guarantee fit.
Year
Make
Model
Options
Drivetrain
This part doesn’t fit a . Select from parts that fit.