Hey, everyone, it's Len from 1A Auto. Today, I'm going to be showing you how to work on a 2001 Lexus GS 300. We're going to be replacing a right front headlight assembly. It's very simple. I'm going to show you how to do it. It's going to be a few easy steps. If you need this or any other part, you can come on down to 1AAuto.com.
We're going to start removing the ten bolts that are under here. They're 10 mm. A couple of them are missing, so we'll just skip onto the next, right here. Very simple. This is what it's going to look like. Should be ten of them under here. Just go all the way around. Here's the last one. All right, put those all safely, so we won't lose any more. Now, we can pull this down. As you can see, it comes down quite a bit, which is perfect. Watch your eyes for any falling debris. I'm going to pull this down a little bit, out of the way.
Behind here, you'll notice there's a fog light, so that means there must be a wiring harness that leads to it. I'll take a look up in there. I don't know if you can see it with the camera, or if I can see it without the camera. If you can't get the wiring harness off, you can also just try to remove the whole bulb assembly from the unit itself. There we go. Remove that, being careful not to mess up the filament, or the bulb. You don't need to touch any of this glass. Any type of oils or anything could become an issue. It's going to decrease the life of your bulb.
On the inside up here, we have a marker light on the side. So that means that inside, there's going to be another little harness. You need to disconnect the harness, or just remove the whole unit from the assembly, itself. And then we're going to go over to the other side and do the same exact thing. All right, so now that we've got those ten out, we've got the bulbs and everything disconnected, I wanted to show you up inside here. Right there, there's another 10 mm head screw. We're going to use our 10 mm socket. Put it on there. If you have an extension, that would be great. Turn it to the left. You're going to remove that fully. And then we're going to work our way over to the other side and do the exact same operation. As you can see, it's the same as the other ten that we removed, so you don't have to keep it separate. It'll match up with all the rest of them.
Continuing with our 10 mm socket, we're going to continue to remove these four screws, one, two, three, four. Starting on one side and working your way over. All right, last one. And there we go. All right, there we go. We're going to give this a yank, being careful because it's only plastic. Let's see, I'm going to come around to the other side, see if I can break this free, and maybe it'll help get that side free. Here we go. Seems to be ... whatever is going on is going on just in this corner. I'm going to come around. There's nothing there. And there we go. Now we're going to put this bumper assembly aside. It's just a plastic cover. We'll put it someplace, so hopefully, it won't get too scratched up. And then we'll get to work.
All right. Next, what we're going to do is, we're going to disconnect these. And if we can't disconnect them, what we can also do is just remove the whole bulb. I'll just remove the whole bulb, just to show you how to do it. Since I'm working from the back side, I'm going to do things in reverse. So normally, I turn something to the left to take it out. I'm actually going to turn this to the right, because I'm working from the back side. Remove that. Try to set it aside as delicately as possible. Next, I'm going to grab this wiring harness. I'm going to separate it by squeezing this tab right in front of my thumb, and gently pulling, to separate the two connectors. While it's apart, it's always a good habit to look inside, see if you see any green, that would be corrosion, or dirt, or rust, or anything that shouldn't be in there. If there is, you're going to need to do some replacement of connectors.
We're going to move along, keeping looking to see what connects into the back of this headlight assembly. We've got one more right here, which should be the high beam assembly. We'll pull that out, rest to the side gently, being careful not to touch the bulb or anything like that, because any oils could lessen the life of the bulb. Next what we're going to do is, we're going to remove the three mounting bolts. There should be one located right here, one located right here, and one someplace down along the bottom. So if we come down, we can take a look. And you'll notice, it's right there along the corner.
So, we'll use our 10 mm socket again. This is great, everything's 10 mm. You don't need a million tools. And our last bolt. Keeping in mind that this is our last mounting bolt, so the headlight assembly will come loose from the vehicle. Set those aside so we won't lose them. Now, we're going to firmly grasp our headlight assembly. Should remove. Do it gently, don't yank it right out, in case there's another wire that's still connected. And now, we've removed our headlight assembly. We can replace it with a quality 1A Auto part.
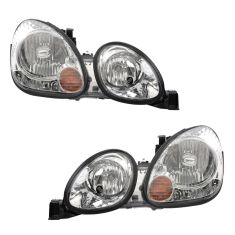
All right, everyone. So, out with the old, in with the new. You're going to notice a big difference, I'm sure, just from where you're sitting right now. This old lens right here, this has seen its better days. It's got a lot of scratches and debris markings on it. That's going to affect light emittance down the road. So, no matter what kind of quality headlight you're using, inside the lens, it's going to block light emittance. That's why we want to switch you up to a quality 1A Auto part. You'll notice that everything is the exact same, same shape. It comes with the headlight and the high beam assembly, all one piece. You'll notice that there's a leveler, so you can check the level of your headlights. You want to do that on a flat surface. If you're parked on a hill, you're never going to get it level.
Also, what I'd like for you to notice, is that it comes with quality headlight bulbs already installed. This thing comes with everything you need, in exception of just the mounting screws, which we already have. So, as you can tell, big difference. You're going to see it down the road. Better safety for everybody.
Before you install this quality headlight assembly, you're going to want to take off the protective layer. This just protects it in case of shipping damage or anything like that. Try to get off as much of it as you can. Keeps your lenses nice and beautiful. All right, and since our new quality assembly comes with new headlight bulbs in it, it's your choice if you wanted to replace the old with the new. I'm going to go with, why not go with the new. So all you do is squeeze the tab. Put that right off to the side. And then, we're going to come over here and do the same thing, squeezing the same tab. Remove it. Now we have both those removed. Once again, taking a look at all your electrical connections to make sure that they're going to be clean and free or debris or corrosion. These look great.
We're going to be clear to install this quality 1A Auto part. Taking our lens assembly, we're going to make sure that we have these harnesses out of the way. You can even try to connect them to the bulbs now if it's easier for you, but for me, I just like to move them out of the way. We're going to notice there's a little prong right here. This fits inside this right here. So we're going to go right up and in, slide it in. Give it a little push, not too hard. That looks great.
Next, we're going to take our mounting bolts. We're going to start one up here, while continuing to hold our assembly so it doesn't fall out. If it falls out, hits the ground, now you don't have a new assembly anymore. So we'll just start that in, give it a few threads. At this point, we're safe to release the assembly, and we can continue on with our work. We come down to the second screw, and then onto the third. And then, once I get all these started, I'll go ahead and tighten them up.
Now, we're going to connect our three connectors. Right here you have a brown connector. Going to listen for a click. Click, right there. You have this connector, click. And then our last connector right over here, just listening for the click noise. No click, but as you can tell, it is locked in. It won't come off. We've got all three connectors in. We've got all three of our mounting bolts in. Last step is, we're going to remount this bumper cover. All right. So now, we're going to go ahead and start putting this bumper cover back on, being very careful not to scratch our lenses with any plastic. Just try to come up and over. We're going to just set it on there, just like that. Hold it with your leg, if you can. Just try to get everything kind of set up so it's pretty close.
And then, we're going to go ahead and grab our bolts. This go on. That looks good. I'm going to grab my bolts, and we'll move onto the next step. All right, so taking some of our fine pitch bolts right here, with a 10 mm head, we're going to go ahead and line up our holes. As you can see, it lines up pretty well. Put it in there. Try to get it a little bit started. I need to give it a little push, just to give it a little coercion. Should start screwing right in. It feels good. Just get it started. So, we're going to want to line up the rest of the holes. Off of there.
Move onto our next hole, once again, lining up the hole. Start it in. All right, those are coming along good. Now we're just going to move onto the other side, doing the same exact thing. Now that I've tightened up the other two, I'm going to go ahead and start tightening all of them down. That feels good. We're just screwing into plastic here, so you don't have to tighten it down too much. Feels good. And we're going to move along to the other side and do the exact same thing.
All right, so now we're going to start the hidden bumper bolt in. See if I can get it lined up with the hole and turn to the right. Should screw right in. All right, leaving it fairly loose, so in case we have to maneuver the bumper at all. We'll just have to remember that we need to go back in and tighten that puppy up. Next, I'm going to go over to other side, do the exact same thing. All right, now that we have the upper part of the plastic bumper mounted in, we're going to go ahead and reinstall the bulbs that we had to remove, one for the fog light and one for the marker light on the side of the bumper there.
So, we're going to take it and come from behind, always with safety glasses, so nothing falls in your eyes. Bring it back down. I'm going to show you, there's three prongs. There's going to be three holes inside the fog light assembly. So, we're going to try to line those up. If you can't get it right off the bat, that's fine, just keep spinning it. At some point, it will line up. There we go. There's one. Next, we're going to grab the marker light assembly. We're going to stick it up in there and do the same exact thing. You're going to try to line up those holes. Latches right in. Now we've got that done, we're going to move on over to the other side of the vehicle and finish up those bulbs. We'll make sure they work, and then we'll go ahead and mount up this undercarriage shield.
All right, so now it's time to start installing the bolts that we have for the bottom side of this shielding system. What you're going to notice is that it has a little clip on this one. It should have one here. It doesn't, but we'll just go with what we've got. We're going to slide this piece into that clip right there. If there was one here we would put it there, but since it doesn't have it, we'll just put it above the plastic part of the fender, of the bumper cover. We're going to slide it in. Clips in. And then we're going to take our 10 mm head bolt, and we're just going to start it in there. And we're going to go all the way along the whole lower area of this, and we're going to put in our bolts everywhere that we took one out. Get that started. All right. Good to go. Let's make sure they work. All right.
This is a basic tutorial on how to aim the headlights on your vehicle. Find the axis of your headlights. This is usually indicated with a small dot or the headlight bulb size on the lens. If not, it's the actual center point of your headlight bulb. Transfer this mark to a vertical wall with a preferably dark color that will allow you to back up 25 feet. Pull up and find the center line of your vehicle, as well as the center line of your headlight axis. Mark the wall with the height of the headlights, and a straight line going across at that axis height. Back your vehicle up 25 feet from the wall to the front edge of your vehicle's headlights.
Turn our headlights on, and locate the adjusting screw, usually on the back side of your headlights. You'll want to rotate this until the passenger hot spot, or focus of the beam, is approximately two inches below the line, and the driver's side is four inches below the line. We change the heights on each side so you can still get a good beam to the offside of the road on the passenger side, and have the driver's side low enough to not blind oncoming traffic.
Thanks for watching. Visit 1AAuto.com, your place for DIY auto repairs, for great parts, great service, and more content.
