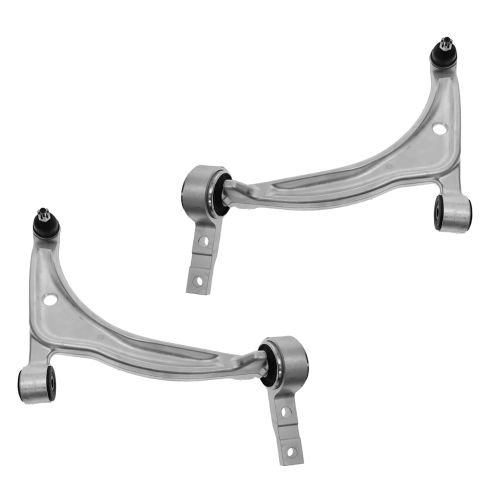
(1) Front Driver Side Lower Control Arm with Ball Joint
(1) Front Passenger Side Lower Control Arm with Ball Joint
Quantity:
2 Piece
Item Condition:
New
Specifications
Side Location
Driver & Passenger Side
Location
Lower
Front
Our control arms are designed to be direct replacements for the original factory parts. They are 100% brand new and require no modifications for installation. No special tools are required because all of the bushings come pre-installed.
Our steering and suspension components are pre-greased and sealed for long life and do not require the extra maintenance typically required by greaseable versions.
Attention California Customers:
WARNING: This product can expose you to chemicals including Lead and Lead Compounds, which are known to the State of California to cause cancer, and birth defects or other reproductive harm. For more information, go to www.P65Warnings.ca.gov.
Lifetime Warranty
This item is backed by our limited lifetime warranty. In the event that this item should fail due to manufacturing defects during intended use, we will replace the part free of charge. This warranty covers the cost of the part only.
FREE Shipping is standard on orders shipped to the lower 48 States (Contiguous United States). Standard shipping charges apply to Hawaii and Alaska.
Shipping is not available to a P.O. Box, APO/FPO/DPO addresses, US Territories, or Canada for this item.
Expedited is available on checkout to the United States, excluding Alaska, Hawaii.
Final shipping costs are available at checkout.
How to Replace Control Arm with Ball Joint 2002-06 Nissan Altima
How to Replace Front Lower Control Arms 2002-06 Nissan Altima
Created on:
Tools used
21mm Socket
12mm Socket
Hammer
Torque Wrench
Jack Stands
19mm Socket
22mm Wrench
Lug Wrench
Ratchet
Floor Jack
1/2 Inch Breaker Bar
1. Remove the wheel
Loosen the lug nuts with your 19 mm socket and breaker bar
Raise and secure the vehicle
Remove the lug nuts and set the wheel aside.
2. Remove control arm
Remove the cotter pin in the control arm joint.
Hit the nut with penetrating oil.
Use a 22 mm wrench to remove the nut.
Remove the first of two 19 mm bolts on the other end of the control arm.
In order to get the second 19 mm bolt, you have to remove the engine bracket.
Jack up the suspension to relieve tension from the control arm.
Unbolt the two 12 mm bolts and the 19 mm nut to remove this bracket.
Now remove the final bolt with your 19 mm socket and ratchet.
3. Install the new control arm
Remove the castle nut and remove the plastic cover from the bushing.
Install the control arm, gently using a hammer to convince the control arm to line up if necessary.
Thread the bolts through and tighten them up.
Install the engine bracket.
Torque the 19 mm bolts in the control arm to 85 ft lbs
Replace castle nut and thread the cotter pin through and secure it.
4. Replace the wheel
Put the wheel back on.
Thread on the lug nuts.
Lower the vehicle
Torque the lug nuts in a star pattern to 100 ft lbs.
Brought to you by 1AAuto.com, your source for quality replacement parts and the best service on the internet. Hi, I'm Don for 1A Auto. I hope this how to video helps you out. The next time you need a part for your vehicle, think of 1AAuto.com. Thanks.
In this video, we'll show you how to replace a front control arm on this 2003 Nissan Altima, it's same process on these Altima's from 2002 to 2006 and we show you on the passenger side but the driver's side is the same process. The items you'll need for this is a new front control arm from 1AAuto.com, 12, 19 and 21 mm sockets and racket with a piece of pipe for extra leverage, 22 mm wrench, penetrating oil, a torque wrench, hammer, pliers and jack and jack stands. After this repair, you will want to have the alignment checked on your vehicle.
Start off by removing your wheel, if you don't have air powered tools you're going to remove the lug nuts while the vehicle is on the ground and jack it up and remove them the rest of the way.
The first thing on the control arm that you want to do is remove this cotter pin. You just want to straighten out the prongs and pull it out from the other side using pliers. Once you get the pin out, spray it with some penetrating oil to break it loose and then remove it with the 22 mm wrench. Once the nut is removed, hit the knuckle with a hammer and that will allow you to pull this down.
Next, you want to remove this 19 mm bolt. Now you do want to put an additional stand underneath your engine here because to remove the last control arm bolt, you're first going have to remove one of these engine brackets. To do that, you just want to remove the 19 mm bolt on the one end and the two 12 mm bolts on the other. Once those are removed, you can just remove that bracket. Now remove these last two 19 mm bolts holding in your control arm. Once all of those are removed, you just want to pry this out.
Old control arm on the left, the new one from 1A Auto on the right, you can see they're identical and they are going to mount exactly the same. Before you install your new control arm, you want to first remove the castle nut and pull off that plastic cover and then feed your new control arm into place. You may need some assistance from a hammer. You want to do this carefully and we are going to fast forward as he does this but you are just trying to line up the holes on the control arm with the holes on the body of the car. Now you can replace that 19 mm bolt and just hammer it in half way and that will hold the control arm in place. Then replace these two 19 mm bolts and then just tighten them up. Tighten up this bolt the rest of the way.
If you replace bracket and the 19 mm nut and the two 12 mm bolts and then you just want to torque each of these 19 mm bolts to 85 foot pounds. Now you can remove that stand now. Now push the stud of the control arm into the hole in the wheel and replace that nut. We do supply you with a new castle nut. Once you've tightened it up, put the cotter pin into place and using pliers bend the prongs in opposite directions. Replace your wheel, hubcap and lug nuts and tighten the lug nuts preliminarily, lower the vehicle and tighten them the rest of way. Then you want to torque the lug nuts in a crossing pattern to 100 foot pounds.
We hope this helps you out. Brought to you by www.1AAuto.com. Your source for quality replacement parts and the best service on the Internet. Please feel free call us toll-free 888-844-3393. We're the company that's here for you on the Internet.
Tools used
Socket Extensions
Torque Wrench
Ball Joint Press
Rust Penetrant
Jack Stands
19mm Socket
21mm Socket
Side Cutters
Rubber Mallet
Dead Blow Hammer
22mm Wrench
Ratchet
Floor Jack
Needle nose pliers
1/2 Inch Breaker Bar
1. Removing the Wheel
Loosen the lug nuts with the vehicle on the ground
Raise and support the vehicle
Remove the lug nuts
Pull the wheel off the hub
2. Removing the Control Arm
Apply rust penetrant to the ball joint nut
Apply rust penetrant to the control arm bolts
Loosen the control arm bolts with a 19mm socket and breaker bar
Turn the hub by hand to access the ball joint cotter pin
Cut the cotter pin with side cutters if necessary
Remove the cotter pin with pliers
Loosen the ball joint nut with a 22mm wrench and a dead blow mallet if necessary
Remove the nut from the ball joint
Attach a ball joint separator to the ball joint
Turn the ball joint separator with a socket and ratchet
Once the ball joint is separated from the steering knuckle, remove the ball joint separator
Remove the 19mm bolts from the control arm
Remove the control arm from the vehicle
3. Installing the Control Arm
Remove the plastic cover from the new ball joint
Slide the control arm into place
Start the 19mm bolts into the control arm
Slide the ball joint stud into the wheel knuckle
Start the castle nut onto the ball joint
Tighten the castle nut with a 22mm wrench
Insert the cotter pin into the castle nut
Bend the cotter pin into place with pliers
Use a jack to raise the suspension
Torque the rear control arm bolts to 93 - 112 foot-pounds
Torque the front control arm bolts to 67 - 88 foot-pounds
4. Installing the Wheel
Lift the wheel onto the hub
Start the lug nuts by hand
Lower the vehicle to the ground
Torque the lug nuts to 73 - 86 foot pounds in a star pattern
Before you lift and support the vehicle, loosen the lug nuts with the wheel on the ground. Use a 21-millimeter socket and breaker bar. Lift and support the vehicle. With the lug nuts loose, you can use the 21-millimeter socket or just your hand. Finish removing the lug nuts. Remove the wheel. Place it aside.
With the vehicle raised and supported, this is your lower control arm in the front. This is the driver's side. It's made out of aluminum. There's two mounting bolts here and this bushing. It's all one piece. There's another mounting bolt here, and of course your ball joint up here.
I'm going to start by spraying some rust penetrant on the ball joint nut and let that sit. These bolts go through and I can see them poking out at the top of the subframe, so I'm going to try to spray some rust penetrant on the top of those to help them come out. This bolt goes into what's probably a captured nut on the inside of the subframe. I can't see it, and there are some access holes in here. I'm going to do my best and just try to blindly spray some rust penetrant in here, and hopefully that will help with getting that bolt out.
Use a breaker bar and a 19-millimeter socket and an extension, and I'm going to break this loose. Remove this bolt here with a 19-millimeter socket and a breaker bar.
With the steering wheel unlocked, I'm going to turn wheel and hub assembly outwards best I can. To remove the cotter pin, I've got some needle nose pliers. I'm going to try to bend it straight. Sometimes you've just got to grab it and wiggle the cotter pin back and forth and you'll start to see the looped end move and it's freed up. Kind of work the needle nose into it. So pry against it. When these cotter pins get rusty it can be a bit of a pain to get them out. The other trick is to use some side-cutting pliers. Sometimes you get a better grip on them on the cotter pin with the side-cutters and just work it out. Or like that. It actually cut the end off of it. Sometimes you can just cut the looped end right off. Then go back to your needle nose pliers and it's easier because you should replace these cotter pins every time you take this off, and try to slide. Grab one part of the cotter pin. This one's just going to break on me. There we go. I've got it out.
With the cotter pin removed, I can take a 22-millimeter wrench and loosen the nut. This one's on here really tight, so I'm going to take my dead blow mallet or you can use a rubber mallet on the end of the wrench. Just going to hit it, break it free. This is almost off. You really can't get a socket and a ratchet in here. If you've got a ratcheting 22-millimeter wrench, you could use that. I just have a regular box wrench, so just turn by turn, get the nut loose and off.
This control arm is made out of aluminum. It's very soft. You can try to hit the knuckle with a heavy hammer to break this out of the taper, but you could hit the control arm and damage the aluminum, so you really should use a ball joint separator tool. With the ball joint separator tool in place, I'm going to use the appropriate size ratchet and socket. Just going to gently push it out. It will snap when it comes free. Now we can pull this down and out of the way. It should come right out of the taper.
Finish removing the lower control arm bolts just using a socket and a ratchet. Just try to pull these out evenly. You can see the arm is coming loose. It won't fall. It's got this brace below it. Take these bolts out. Put them aside. They are the same length so we don't have to keep track of which hole they came out of, but we'll just put them aside so we don't lose them. Now finish taking out this bolt with a 19-millimeter socket and ratchet. You need to move the arm around. Now just be aware the arm is really loose and just keep a hand on it so it doesn't fall. It's pretty light. It's aluminum, but you don't want it to hit you in the face or fall. There it is. Now this is loose. Slide it out. Work it out of the suspension here.
We removed our control arm. Here's our old control arm from our vehicle. If the ball joint has gone bad in your control arm these cannot be pressed out and replaced. You have to replace the whole control arm. Also, if these bushings are bad, the whole control arm has to be replaced. This is the new one from 1AAuto.com. It is marked. This is the left-hand or driver's side. It's got brand new bushings already in. It's got brand new ball joint. It comes with a new castle nut. You're going to want to remove this plastic piece. This is just for shipping to protect the boot. Leave that off. We're going to put the castle nut right here for now so I don't lose it. It has a new cotter pin for the end. As you can see, it's identical in design as the old one, same material. They're both aluminum. This will fit in the vehicle and work great for you.
Take our new control arm. I'm going to start at the back and work it up where it was originally. Might have to flex it a bit. Just like that. I'm going to try to line up the front as best I can. Put it in place. I’ll move the knuckle out of the way so I can play with the alignment of the control arm.
Take our front bolt. It's got a tapered snout to it, so it should help align it. You might have to move the arm around. Let me just start threading it back in with my ratchet. I'm not going to fully tighten this. I just want to get it snug because we'll come back and torque this. Push up on the control arm, line them up.
Put the ball joint back into the knuckle. If you need to you can – there you go. We'll put our nut on here. Tighten our ball joint nut down, 22-millimeter wrench. See, it's pulling these together. It's going to pull the ball joint up into the taper of the hub. That helps to lock it in place. I'll get this nice and tight and then put a cotter pin in. Put our cotter pin in. Take some needle nose pliers. Bend it over. The ball joint is now tight.
To finish installing the control arm, these bolts and this bolt here should be torqued with some vehicle weight on it. You can use a floor jack or you can use a stand-up jack since we're on a two-post lift. Just going to put some weight on the control arm by jacking up on it, just enough so I see the vehicle lift a little bit. The torque for these is 93 to 112 foot-pounds. I'm going to torque them to 100. They go down pretty evenly.
Okay. The torque on this bolt is 67 to 88. I'm going to torque it to 75. Now take the weight off the suspension. We'll reinstall our wheel and we'll torque the lug nuts. Just going to use the socket to get these lug nuts as tight as you can by hand. We'll torque the wheel afterwards once it's on the ground. Torque on the lug nuts is 73 to 86. I'm going to torque these to 80 in a cross pattern. The job is complete.
Thanks for watching. Visit us at 1AAuto.com for quality auto parts, fast and free shipping, and the best customer service in the industry.
PSA62174
In Stock
Product Reviews
Loading reviews
4.95/ 5.019
19 reviews
5 Stars
4 Stars
3 Stars
2 Stars
1 Star
18
1
0
0
0
Auto parts
H
September 2, 2017
I'm satisfied with my shipment thank you..everything came on time and it was perfect
2005 Altima lower control arms
russell
May 13, 2018
My first time using 1a auto.com. After watching 1A auto help videos on YouTube for several repairs I have done recently, I made my first parts order, lower control arms for an Altima. Parts arrived in a very timely manner and were exact replacement parts. I was very pleased with the product, price point and of course the always helpful videos! Will be using 1A again for my future products. Thanks 1A!
Need not look for another.
Dybo
May 19, 2018
Parts are excellent quality for the Best price. If your parts are not urgent, it's worth the wait.
Exact fit!
M
December 9, 2018
Didnt give me one bit of hassle to fit in. Saved me a ton of money and was very easy.
Great buy
S
December 9, 2018
The parts fit perfectly. No issues installing them.
Amazing Price, Fast Shipping, Perfect Fit & Great Quality
Kendall
March 19, 2019
I purchased this product a bit sceptical because of the price being so low. But apon receiving the control arms I was very pleased to see that the construction was perfect, it matched exactly with the OEM parts! With help from the provided tutorial video I was able to install them in a couple hours. Saved me a thousand dollars from going to the shop and getting it done! I've already recommend 1A Auto to friends and family.
THOMAS
July 8, 2019
Fast shipping and easy installment
Nice parts
Arthur
July 14, 2019
Good fit nice price an quality
great product
lamar
October 31, 2019
quick shipping and direct fit no hassle to install.
Great Price, Quality Parts, and Quick Shipping
James
February 24, 2020
This was my first time using 1A Auto. I have previously used some other online parts resellers that were a little cheaper but I have not been happy with the quality of the parts I was receiving. I gave 1A Auto a try primarily because I had watched a number of their how-to install YouTube videos which I found to be well made and very helpful. I was very pleased with the Quality of the Part, the quick shipment. I found other sites that had the part cheaper but I still feel the price vs quality that I received from 1A Auto was excellent. I will use them agin.
Perfect fit and no problems getting installed
Corey
May 22, 2021
I recommend this product and 1AAuto the price was very good and package well for shipping. Had no problems getting installed, now I back to normal. Thanks 1AAuto
1A auto is the best!
JASON
July 24, 2021
Ordered these lower control arms with ball joints. Got them the next day only took me 40 minutes to get both switched out. Also for the pair it cost less then half as much if I would of purchased them at a auto parts store. And they are identical to the origional parts. Thank you 1A auto!
Larry
October 14, 2021
This product worked very good on my altima and was easy to install yes I recommend this to anyone
Darrell
August 23, 2022
exactly like the originals went on super easy
Jaime
June 3, 2023
Yeesss it fit perfectly fine with my vehicle. Thank you 1auto.com
Best company to buy what I need and when I need it
Ramiro
June 24, 2023
Proudly satisfied with the product
Alan
June 28, 2023
perfect fit for my Altima, great price also
Lori
November 7, 2023
Fast shipping. Exactly what was ordered
Jerry
May 15, 2024
The part fit perfectly and it was identical with the same part that can off my vehicle.
Customer Q&A
By pair do you mean passanger side and driver side?June 3, 2016
Lazaro R
10
yes are for both side right and left and fix perfect , great product and price.
I' ll buy it again.
thanks.
June 3, 2016
MANUEL L
10
Yes both. Bought and they were great.
June 3, 2016
Brett M
10
Yea the pair is 1 each passenger and driver side
June 4, 2016
David H
10
Yes, that is both sides. Mine were very easy to put in. Good luck and be safe.
June 4, 2016
Jamie M
10
Yes both sides
June 4, 2016
Jesus B
10
Yes it was for both side driver and passenger
June 7, 2016
Miguel G
What's the difference between the Dorman control arm brand and the house brand?January 27, 2017
Toussaint H
10
The real difference is the manufacturer, but some material used for the bushings or ball joint may be used as well as a possibility in the color of such components. We back our parts up using a limited lifetime warranty as long as you own the vehicle to ensure that you are covered in the event of failure.
January 27, 2017
Alex P
Who make your control arms?April 7, 2019
Clarence A
10
1A Auto's house brand parts are manufactured by various aftermarket companies specifically for us and built to your vehicle's exact OEM specifications.
April 7, 2019
T I
Customer service
877-844-3393
Monday - Friday 8:00am - 9:30pm ET Saturday - Sunday 8:00am - 4:30pm ET
Nissan is a registered trademark of Nissan Motor Co., Ltd. 1A Auto is not affiliated with or sponsored by Nissan or Nissan Motor Co., Ltd.See all trademarks.
Enter Vehicle Year Make Model
Specify your vehicle's year, make and model to guarantee fit.
Year
Make
Model
Options
Drivetrain
This part doesn’t fit a . Select from parts that fit.