Hi, I'm Mike from 1A Auto. I hope this how-to video helps you out, and next time you need parts for your vehicle, think of 1AAuto.com. Thanks.
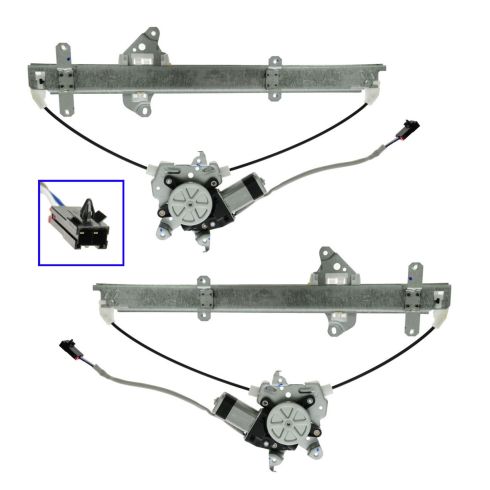
In this video, we're going to show you how to replace the front power window regulator on this 2003 Nissan Frontier. The regulator is the same for Frontiers from '98 to '04, although getting the door panel off may be different for a couple of the years. We're going to show you the driver side. The passenger side is basically the same procedure. The items you'll need for this repair are a new window regulator from 1AAuto.com, a flat blade screwdriver, a Phillips screwdriver, and a 10 millimeter socket and ratchet, or a 10 millimeter wrench would work as well.
Locate the Phillips head screw in the door handle, as well as down there in the door grab, as well as the plastic clip up in the corner. I'm using a small flat blade screwdriver to pry that little clip off, and then I'm going to use a Phillips head screwdriver to remove those two screws. I'll fast forward as I do that. Lift off the rear of the armrest and you'll expose another Phillips head screw right there. I'll go ahead and fast forward as I remove that. Now, remove the portion of the armrest with the switch pack assembly in it. Just pull it up and you'll notice two connectors. They're just removed by pressing the tab in on them and pulling them out. Go ahead and do that. Notice this exposes another Phillips head screw. I'll go ahead and fast forward as I remove that. The panel's now just being held on by the plastic clips that are right behind it, that if you give it a good tug it'll come right off. Lift it and put it out of the way. There are two Phillips screws that hold this bracket in place. Remove those and then carefully pull back your water shield.
This plate has a series of 10 millimeter bolts that hold it on. We'll fast forward here as we use a 10 millimeter socket and ratchet to remove those bolts and that plate. Now, you can see, here, we have good access to the inside of the door. There are two bolts that hold the window to the regulator. You're going to remove those with a 10 millimeter. Most often with these regulators . they're cable actuated ., the cable breaks and you hear a popping and then a grinding noise and you can hear your window motor is trying to work but the window doesn't do anything. When that happens, basically, when you get at this point, you can just grab the window with your hand, and move it up and down, and make it easy to get to those bolts. Then, once those bolts are undone, you can lift your window up, tilt it forward and slide it up and out. Use a small flat blade screwdriver, pry up on a tab and disconnect and then you're just going to pull firmly on the clip until the pins comes out of the door. Four 10 millimeter bolts hold the regulator to the door and you can see, remove the bottom two, remove the top right one and then just loosen the top left one. Three 10 millimeter bolts hold in the window motor, and we'll remove those.
In the foreground is our old, original regulator and there's our new regulator. You can see it's going to replace it exactly, same connectors, same everything. You just need to transfer over the top bolt.
So, just take that bolt from the old regulator, put it into that top slot on the new one, feed the regulator in, bottom first up into place, and then put that bolt through and slide it forward. To get your window motor set up, there are little tabs that hang up on the door. Then make sure you feed your harness through that oval hole. Speed up here as we thread the bolts in. The brighter cad plated ones go on the window regulator and the darker ones go on the motor, and then tighten those seven bolts up nice and firm. Take your window, feed the front edge down in first. Make sure it goes into the track properly, and make sure the back edge goes into the track, and then slide it down to the regulator. I'll fast forward, here, as we just replace, and put those two bolts in. You might have to move the window around a little bit to get the two bolts that hold the window to the regulator in and tighten them up. We'll keep the speed going here as we connect our lead and clip it into place, then put that plate back in place and tighten up the bolts and the screws that hold it in place.
Put your shield back on and put the bracket back in place. Going back on with the door panel, you'll notice the clips and they're going to be going into the holes that correspond into the door. First, we're going to want to pull the wires through the door panel where they go, and then we're going to hang the top of the door panel onto the door, and make sure that the plastic clips line up with the holes. Then, once we know that that's all set, we can give it a couple of taps around the perimeter of the door panel to seat those clips. Start to reinstall your Phillips head screws right there in the inner door handle, and then, the two that were hidden by the armrest, and then the one in the door grab handle, as well as the clip that goes up in the triangular piece that covers the mounting screws for the mirror. I'll go ahead and fast forward as I do that. Now you can take your door handle, there, and switch pack assembly, and reinstall the connectors to it, and then place it down inside of the door there, starting with the backside and then working your way to the front. Now, pushing it down, you'll see the clips clip in. Then you can go ahead with the back portion of the armrest. Slide that in and then down in the back. Then once that's all set you can then reinstall
the final Phillips head screw.
We hope this video helps you out. Brought to you by www.1AAuto.com, your source for quality replacement parts and the best service on the Internet. Please feel free to call us toll-free, 888-844-3393. We're the company that's here for you on the Internet and in person.