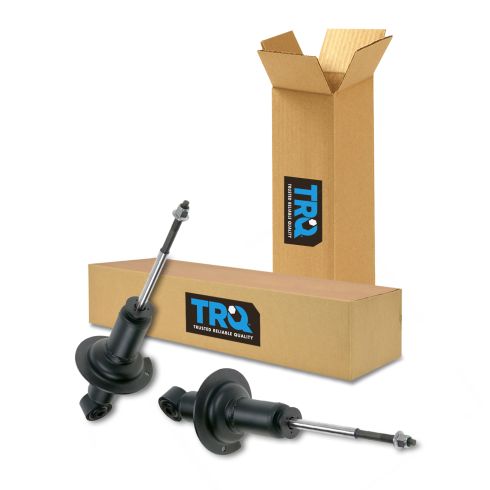
Kit Includes: (1) Front Driver Side Shock Absorber (1) Front Passenger Side Shock Absorber
Specification
Side Location
Driver & Passenger Side
Location
Front
Our direct fit gas-charged strut assemblies help to restore your vehicle’s handling and ride quality to just like new.
No modifications, all the parts needed in one kit Improved ride comfort and longer life
Item Condition:New
Attention California Customers:
WARNING: This product can expose you to chemicals including Chromium (Hexavalent Compounds), which is known to the State of California to cause cancer, and birth defects or other reproductive harm. For more information, go to www.P65Warnings.ca.gov
Lifetime Warranty
This item is backed by our limited lifetime warranty. In the event that this item should fail due to manufacturing defects during intended use, we will replace the part free of charge. This warranty covers the cost of the part only.
FREE Shipping is standard on orders shipped to the lower 48 States (Contiguous United States). Standard shipping charges apply to Hawaii and Alaska.
Shipping is not available to a P.O. Box, APO/FPO/DPO addresses, US Territories, or Canada for this item.
Expedited is available on checkout to the United States, excluding Alaska, Hawaii.
Final shipping costs are available at checkout.
How to Replace Shock Spring Assembly 2004-15 Nissan Titan
Created on:
Tools used
21mm Socket
A Piece of Pipe (for leverage)
Hammer
Torque Wrench
14mm Socket
Jack Stands
19mm Wrench
Center Punch
19mm Socket
Ratchet
Floor Jack
1. Removing the Wheel
Loosen the lug nuts with the vehicle on the ground
Raise the vehicle with a floor jack
Secure the vehicle on jack stands
Remove the lug nuts
Pull off the wheel
2. Removing the Strut
Hold the 19mm bolt at the bottom of the strut with a 19mm wrench
Remove the 19mm nut with a ratchet and a piece of pipe for leverage
Knock the bolt out with a punch and a hammer
Remove the three 14mm nuts from the top of the strut
Use a hammer to knock the strut out of place
Pull the strut down and out
3. Installing the New Strut
Push the new strut up into place
Insert the three 14mm nuts onto the top of the strut
Hammer the lower end of the strut into place
Push down on the wheel knuckle as you push the 19mm bolt into place
Tighten the 19mm nut onto the 19mm nut
Tighten the lower nut to 100 foot-pounds of torque
Tighten the upper nuts to 25 foot-pounds of torque
4. Reattaching the Wheel
Slide the wheel into place
Start the lug nuts by hand
Tighten the lug nuts preliminarily
Lower the vehicle to the ground
Tighten the lug nuts to 100 foot-pounds in a crossing or star pattern
Reattach the center cap
Brought to you by 1AAuto.com, your source for quality replacement parts and the best service on the Internet.
Hi, I'm Don from 1A Auto. I hope this how-to video helps you out, and next time you need parts for your vehicle, think of 1AAuto.com. Thanks.
In this video we're going to show you how to replace a front strut on this 2004 Nissan Titan, and we show you on the passenger side but the driver's side is a similar procedure. The items you'll need for this are a new front strut from 1AAto.com, 14, 19, and 21mm socket and ratchet, a piece of pipe for extra leverage, a hammer, a punch, jack and jack stands, a torque wrench, and a 19mm wrench.
To start off, you want to remove you wheel, so just remove these lug nuts. On this vehicle it was 19 mm, but because they're not stock wheels, yours may be slightly different. If you don't have air-powered tools, you're going to want to loosen the lug nuts preliminarily, raise the vehicle, and the remove them the rest of the way. Once those are removed, your wheel will pull right off.
At the bottom of the strut you'll see this 19mm bolt. You just want to go ahead and remove that. You can see, we use a piece of pipe for some extra leverage. Once it's broken free, you don't need the pipe anymore. We'll just fast forward as he uses a 19mm socket and ratchet on one side and a 19mm wrench on the other. Once you've removed the nut, using a punch and a hammer, knock out the bolt. Then, remove these three 14mm nuts at the top of your strut. We'll just fast forward as Don does this. Use a hammer to knock the strut out of place and then pull it down. Then, angle it up and down and out.
On the left is the old strut. On the right is the new one from 1A Auto. You can see they're identical and they're going to fit exactly the same. Insert the new strut and push those studs up through. Once you've got them up into place, just replace those three 14mm nuts. We'll fast forward as Don does this. Now, carefully hammer the lower end of the strut back into place. Then push down on the wheel knuckle and push your bolt back into place. Then hammer it in the rest of the way. We'll fast forward as Don replaces the nut and tightens it up. You want to torque this lower bolt to 100 foot-pounds and the three 14mm nuts to 25 foot-pounds. We'll fast forward as Don replaces the wheel and replaces the lug nuts and tightens them up preliminarily. Then you want to lower the vehicle and tighten them the rest of the way and torque them in a crossing pattern to 100 foot-pounds.
We hope this video helps you out. Brought to you by www.1AAuto.com, your source for quality replacement parts and the best service on the Internet. Please feel free to call us toll-free, 888-844-3393. We're the company that's here for you on the Internet and in person.
SBA60133
In Stock
Product Reviews
Loading reviews
There are no reviews for this item.
Customer Q&A
with or without off road package?October 7, 2021
Bruce B
10
We do not show this listed as a needed specification for these parts.
October 7, 2021
Cristina P
Customer service
877-844-3393
Monday - Friday 8:00am - 9:30pm ET Saturday - Sunday 8:00am - 4:30pm ET
Infiniti is a registered trademark of Nissan Motor Co., Ltd. 1A Auto is not affiliated with or sponsored by Infiniti or Nissan Motor Co., Ltd.See all trademarks.
Enter Vehicle Year Make Model
Specify your vehicle's year, make and model to guarantee fit.
Year
Make
Model
Options
Drivetrain
This part doesn’t fit a . Select from parts that fit.