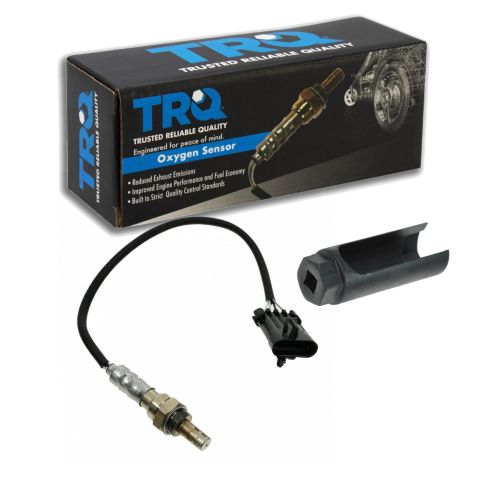
TRQ oxygen sensors are manufactured to precise specifications using premium raw materials to optimize your vehicle’s emission system. Each sensor is isostatically-pressed for improved strength and durability, and plasma-sprayed to improve sensitivity and prolong the service life of the sensors. Oxygen sensors wear out over time and should be replaced every 60,000 miles to prevent poor engine performance. TRQ recommends replacing the oxygen sensors in sets to optimize fuel economy and reduce overall emissions. All products are fit and road-tested in our Massachusetts R&D facility to ensure we deliver on our promise of Trusted Reliable Quality.
Product Features
Application Specific Design: No modifications and pre-calibrated
Isotatic-pressed and plasma-sprayed for extended service life
Double-Layered 310S Stainless Steel: Additional protection from moisture and debris
Restored Engine Performance: Improved fuel economy and lower emissions
What is Upstream vs. Downstream?
Upstream location is between the catalytic converter and the engine
Downstream location is between the catalytic converter and the tailpipe
Install Tip: You may be required to reset the vehicle computer after installation of this part.
Quality Tested - built to a strict level of product standards.
Item Condition:New
Attention California Customers:
WARNING: This product can expose you to chemicals including Lead and Lead Compounds, which are known to the State of California to cause cancer, and birth defects or other reproductive harm. For more information, go to www.P65Warnings.ca.gov.
Lifetime Warranty
This item is backed by our limited lifetime warranty. In the event that this item should fail due to manufacturing defects during intended use, we will replace the part free of charge. This warranty covers the cost of the part only.
Returns: Parts with electrical components cannot be returned once installed.
FREE Shipping is standard on Orders shipped to the lower 48 States (Contiguous United States). Standard shipping charges apply to Hawaii, Alaska and US Territories. Shipping is not available to Canada.
Expedited is available on checkout to the United States, excluding Alaska, Hawaii and US Territories as well as P.O. Boxes and APO/FPO/DPO addresses. Final shipping costs are available at checkout.
How To Replace Upstream O2 Oxygen Sensor 2000-02 Chevy Suburban
How to Replace Downstream O2 Oxygen Sensor 2000-02 Chevy Suburban
Created on:
Tools used
No Tools Needed
Tools used
Flat Blade Screwdriver
Wire Cutters
7/8 Inch Wrench
1. Removing the Upstream O2 Sensor
Identify the upstream and downstream O2 Sensors
Clip the harness pin with wire cutters from the upstream harness
Disconnect the upstream harness
Pry and separate the clip from the upstream sensor with a flat blade screwdriver
Pull the O2 sensor wire free from the clips
Cut the harness connector with wire cutters
Remove the O2 sensor with a 7/8 wrench
2. Installing the New Upstream O2 Sensor
Feed and twist the new upstream O2 sensor into places
Tighten the O2 sensor with a 7/8 wrench
Push the harness over the frame and reconnect the clip
Connect the harness and push the pin in place
Re-clip the harness into the bracket
Brought to you by 1AAuto.com, your source for quality replacement parts and the best service on the Internet.
Hi, I'm Don from 1A Auto. I hope this how-to video helps you out, and the next time you need a part for your vehicle, think of 1AAuto.com. Thanks.
In this video, we're going to show you how to replace an upstream O2 sensor on this 2002 Chevy Suburban. We show you on the passenger's side, but the driver's side is a similar procedure. The items you'll need for this include a new upstream O2 sensor from 1AAuto.com, a flat blade screwdriver, 7/8 inch wrench, and a pair of wire cutters.
To start off, we're going to show you where your O2 sensors are. The driver's side is bank one and this is bank one, sensor one and bank one, sensor two. On the passenger's side, you have bank two, sensor one and bank two, sensor two. Both sensor ones are the upstreams, and both sensor twos are the downstreams. We're going to show you on bank two, sensor one.
The harness is on the other side of this frame. You just want to just clip the harness pin, pull the harness free, and disconnect it. Just pull the tab, pull it free, and then you want to pry at this clip with a flat blade screwdriver and separate it. You want to pull your O2 sensor wire free from that clip and then cut the harness connector at the end from the harness.
Two notes: this is going to allow you to get the closed end of the wrench over the harness and also you can do this without having to jack up the vehicle; the clearance is good enough on these vehicles to get underneath.
Now, using your 7/8 inch wrench, just slide it up into place on the O2 sensor, and, using another wrench for leverage, just break it free. Then loosen it up the rest of the way with the wrench and remove it. We'll just fast-forward as Don does this.
On the left is the old upstream O2 sensor; on the right is the new one from 1A Auto. You can see they're going to fit exactly the same. Feed your new upstream O2 sensor into place and just twist it in. We'll fast-forward as Don does this and then tightens it up with the wrench.
Now put your harness back over the frame and reconnect it into that clip. Then pull it over the other side, reconnect the harness, and push that pin back into place. Then re-clip the harness up here into this bracket, and you're all set.
We hope this video helps you out. Brought to you by www.1AAuto.com, your source for quality replacement parts and the best service on the Internet. Please feel free to call us toll-free, 888-844-3393. We're the company that's here for you on the Internet and in person.
Tools used
7/8 Inch Wrench
Flat Blade Screwdriver
Wire Cutters
1. Removing the O2 Sensor
Pry out the clip and pin from the sensor
Disconnect the O2 sensor harness
Cut off the harness connector and sensor with wire cutters
Remove the O2 sensor wire with a 7/8 wrench
2. Installing the New O2 Sensor
Twist on the O2 sensor to the exhaust pipe
Tighten the O2 sensor with a 7/8 wrench
Reconnect the O2 sensor harness
Replace the pin and re-clip the harness to the vehicle
Brought to you by 1AAuto.com, your source for quality replacement parts and the best service on the Internet.
Hi, I'm Don from 1A Auto. I hope this how-to video helps you out, and the next time you need a part for your vehicle, think of 1AAuto.com. Thanks.
In this video, we're going to show you how to replace a downstream O2 sensor on this 2002 Chevy Suburban. We show you on the passenger's side, but the driver's side has a similar procedure. You'll need a new downstream O2 sensor from 1AAuto.com, a flat blade screwdriver, a 7/8"? wrench, and some wire cutters.
To start off, we're going to show you where your O2 sensors are. On this side, on the driver's side, it's the Bank 1, Sensor 1. This is Bank 1, Sensor 2. This is on the passenger side: Bank 2, Sensor 1 and Bank 2, Sensor 2. Both Sensor 1s are your upstream, and both Sensor 2s are your downstream. We're going to do Bank 2, Sensor 2, which is the passenger side downstream O2 sensor.
You just want to pry out this clip, pull the harness down, pull out that pin, then pry up the tab, and disconnect the harness. Use your wire cutters to cut off the harness connector at the bottom of your O2 sensor. We do this so we can get the closed end of the wrench onto the O2 sensor. Now slide your 7/8-inch wrench into place and using another wrench for leverage you want to pry it and break it free, and then twist it out the rest of the way. We'll fast-forward as Don does this.
Obviously, we have the vehicle up on a lift, but, actually, there's enough clearance on these vehicles that you don't even need to jack them up to do this. On the left is the old downstream O2 sensor; on the right is the new one from 1AAuto. You can see they're going to fit exactly the same.
Take your new downstream O2 sensor, feed it into place, and just twist it in. I'll fast-forward as Don does this and then tightens it up with the wrench. Now just reconnect your harness and then push that pin back into place. Then re-clip the harness to the vehicle. You're all set.
We hope this video helps you out. Brought to you by www.1AAuto.com, your source for quality replacement parts and the best service on the Internet. Please feel free to call us toll-free, 888-844-3393. We're the company that's here for you on the Internet and in person.
OSA61630
In Stock
Product Reviews
Loading reviews
5.00/ 5.01
1review
5 Stars
4 Stars
3 Stars
2 Stars
1 Star
1
0
0
0
0
Brand new
J
March 5, 2019
Works great direct fit and the installation tool is very helpful
Customer Q&A
1999 Chevy Blazer S10 Upstream or Downstream O2 Oxygen Sensor I want to order it. Does it mean it will fit either upstream or downstream?February 26, 2018
S M
10
it fits in either but make sure you have the correct connector. Chevy used a few different connectors for the same year vehicles depending on where it was made.
March 7, 2018
Noah S
Do these sensors come with anti-seize on the threads?April 11, 2018
J M
10
These do not come with anti-seize for the threads.
April 11, 2018
T I
1999 Chev Blazer S10 : What information do I need, to know if this is the correct sensor for my vehicle? Thanx!!April 9, 2019
John S
10
We would be more than happy to check for you. The engine size is a factory in determining the fit; could you please confirm yours?
April 10, 2019
Emma F
10
I'll try to make it easy for you hopefully there's two going towards the front of the engine and 2 going towards the back and they call them upstream and downstream depending on which one you remove you'll be able to tell which is up or Downstream like I said up would mean two towards the front of the vehicle and + 2 towards the back of the vehicle which would be down hopefully that helps
April 11, 2019
Joe W
Customer service
877-844-3393
Monday - Friday 8:00am - 9:30pm ET Saturday - Sunday 8:00am - 4:30pm ET
Pontiac is a registered trademark of General Motors Company. 1A Auto is not affiliated with or sponsored by Pontiac or General Motors Company.See all trademarks.
Enter Vehicle Year Make Model
Specify your vehicle's year, make and model to guarantee fit.
Year
Make
Model
Options
Drivetrain
This part doesn’t fit a . Select from parts that fit.