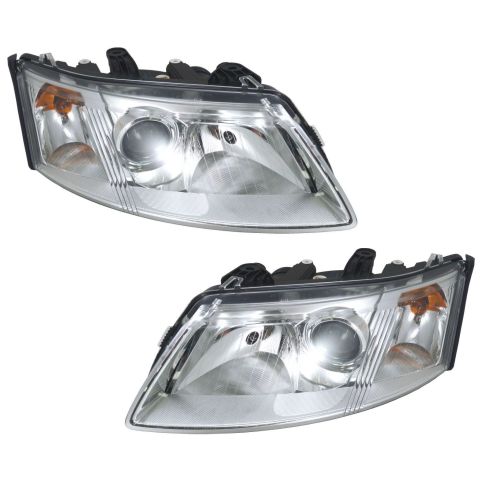
Kit Includes: (1) Passenger Side Headlight (1) Driver Side Headlight
Bulb Technology: Halogen
Quantity: 2 Piece
Assemblies may include halogen or incandescent test bulbs that should be replaced before installation.
Features and Benefits
Direct Fit - No vehicle or wiring modification necessary
DOT, SAE, and FMVSS Compliant - Meets on-road use regulations
Matching set for a restored look
Item Condition:New
Attention California Customers:
WARNING: This product can expose you to chemicals including Chromium (Hexavalent Compounds), which is known to the State of California to cause cancer, and birth defects or other reproductive harm. For more information, go to www.P65Warnings.ca.gov
Lifetime Warranty
This item is backed by our limited lifetime warranty. In the event this item should fail due to manufacturing defects during intended use, we will replace the part free of charge. This warranty covers the cost of the part only.
FREE Shipping is standard on orders shipped to the lower 48 States (Contiguous United States). Standard shipping charges apply to Hawaii and Alaska.
Shipping is not available to a P.O. Box, APO/FPO/DPO addresses, US Territories, or Canada for this item.
Expedited is available on checkout to the United States, excluding Alaska, Hawaii.
Final shipping costs are available at checkout.
How to Replace Headlights 2003-07 Saab 9 - 3
Created on:
Tools used
Socket Extensions
Flat Blade Screwdriver
8mm Socket
10mm Socket
Ratchet
Needle nose pliers
1. Remove the head light assembly
Open the hood and secure it.
Disconnect the negative battery terminal with an 8 mm wrench.
Use a flat blade screwdriver to pry up the clips securing the plastic cover in the engine bay over the head light assembly.
Unclip the push clips and bolts securing the bumper cover.
Disconnect the wiring harness from the bumper cover.
Use a pair of pliers to release the clamp and disconnect the wiper fluid hose.
Remove the bolts securing the head light assembly.
Lift the head light assembly up and out.
Unplug the harness and bulbs.
2. Install the new head light assembly.
Plug the bulbs and harness back in.
Bolt the head light assembly back in using a 10 mm socket and ratchet.
3. Aim the head lights.
Use a Phillips screwdriver to aim the headlights via the two adjusting screws.
Close the hood and enjoy your new 1A Auto headlights.
Brought to you by 1Aauto.com your source for quality replacement parts and the best service on the internet. Hi, I'm Mike from 1A Auto. I hope this how-to video helps you out and next time you need parts for your vehicle think of 1AAuto.com. Thanks.
Okay on this SAAB 9-3 on the passenger side you can get to the back of the headlight, remove the boot, and once you're at that point I'm just going to show you on this light that's out of the car. Here's your socket you would turn counter clockwise and pull the light up and out. Okay. Use a small screwdriver and remove the bulb from the socket here. Okay with that new bulb reinstall it, there's a tab on the bulb here that goes right next to a tab here on the socket. Make sure it's together nice and tight. Avoid touching the bulb with your fingers. Oils from your hand can actually cause the glass to melt.
Okay. Put that down in. Then these other bulbs, if you can reach in there you can twist this one, pull it out. This bulb you don't have to worry about touching it. Just disconnect that. Okay, this one is kind of the same thing. Pull that off, twist counterclockwise, the bulb comes out. Again, you would disconnect the bulb from the socket. Okay. Use a flat blade screwdriver, these little clips here. You will pull up and pull this cover right off. Okay, to remove the front bumper cover first you want to remove a series of clips. You can see on my vehicle they're actually all missing. These clips are pretty easy. What you do, I believe, that they're the style where you push the very center in and then you can pry the clip out. If they're not that style then you just kind of pry the center of it out and pull the clip out.
So you would first remove those six from up there. Now down below you're going to want to remove a series of bolts. Okay there's one right up in here. Okay. Here and one down here. Then right up underneath. Okay. There's one here, and then a few others. There probably should be one there, but it's gone, one here and then the same thing over on this side here, except it looks like most of them are missing on this side. This car has been damaged a little bit and some work has probably been done. Okay right in here there's a connector. Take a little screwdriver and start prying out on this red part. Let's see if I can do this, and then you pull. You pull that out and it disconnects. Okay, and then there are two tabs here on the top. One on the top here and then one same place on the bottom. That then pulls out and then here use a pair of pliers and pinch this clamp and pull it up. Twist this hose and pull it off the thing. Okay. Then you'll want to pull this up. I just tucked the hose right up in here. Okay and it won't leak.
Okay, now three bolts hold in the headlight. Two up on top and then one right down there. Okay, now reach in from this side pull out the tab way back there, pull it out and then your connector here you need to pull this red safety lock out. Use a small screwdriver to get it started. Here's your new headlight. See how much brighter and more clear it is than the old headlight. Will help a lot for night vision as well as just the general looks of your vehicle and the new headlights come with some shipping protection. Believe it or not shipping on these is more difficult on the light than actually being installed in the car. You turn these little rods, pull out slowly, let them go down in and then grab these catches, pull it out. The same thing here. Turn the rod, pull these out and then put this boot on. Okay. Plug the light back in and push the lock on the harness back in. Okay, put it right into place.
Basically just have to kind of look this tab right onto this stud down here. Make sure these tabs are up on top for radiator support. Push it in. Put this bolt in and start two top bolts on. To adjust the lights right here you can use either a large hex bit or a Phillips screwdriver and there's an adjuster there as well as an adjuster through here. One of them moves the beam up and down and one of them moves it left and right. Okay bring the hose down. It's going to leak some. Plug it in quick. Use our pliers. Clip in place. Bring this right up, put it in. Make sure we pull that out. Plug this in. Try and get it started. Push the lock in clip. Plug it in. Now pull our fascia up. Okay. Slide it into place. What you should do is if you have your clips you put your clips on. I'm just going to put the screwdriver right here. Which is going to hold it in place. Okay. Now make sure it fits around the headlight correctly. Okay, lock that in. Other side. Okay make sure it's around the headlight correctly. Hold that on.
We hope this helps you out. Brought to you by www.1AAuto.com, your source for quality replacement parts and the best services on the internet. Please feel free to call us toll free at 888-844-3393. We're the company that's here for you on the internet and in person.
1ALHP00611
In Stock
Product Reviews
Loading reviews
4.75/ 5.08
8 reviews
5 Stars
4 Stars
3 Stars
2 Stars
1 Star
6
2
0
0
0
So far totally worth the money
John
January 29, 2017
They look good , fit good but are marginally adjustable. It may take a little bit of creative shimming to get them perfect . you can't beat the price and it is a 100 % improvement over the glazed over lenses and wore out reflectors on my old original headlights. Only time will tell how good they really are.
Headlights
Dan
February 23, 2017
Wish I had done them years ago! Fantastic fit . Only problem was one turn bulb outlet , had to use the old one. No problem. Took me about two hours.
Who turned on the lights...
O
October 16, 2017
When they arrived they looked as shown online. Clear and brand new appearance. Now that they are installed they are 100 times better than the previous. My visibility at night has increased 10 fold and the car looks awesome!
easy
Chris
October 29, 2017
Arrived in perfect shape on-time. Easy to install. Thanks!
Head lamps
R
July 6, 2018
After watching a video from 1aauto on how to replace my headlamps, I purchase a pair of head lamps for my 2005 Saab 93 aero from 1aauto, shipping was free and faster than expected.
Installing was a breeeze after watching the video and not to mention the quality of the product , my car looks new again.
Thanks a lot guys.
Awesome customer service!!
Victorina
November 28, 2018
I bought a pair of headlights 4 my 2005 Saab I received the package very quickly sadly it didn't fit my car I contacted them and they refunded my money with not hesitation amazing customer service if you are in the market for auto parts this is the place for it this guy's are the best I recommend them 100%!!
Great prices, quality and on time
Michael
November 5, 2019
Ordered some after market headlamps for my Saab (hard to get OEM). They were a great value, came on time, and no problem to install. I an actually see at night now; that's a good thing. Would order from 1A Auto again.
Jorge
September 18, 2021
Theyre perfect. Excellent visibility at night. Just the way I expected.
Customer Q&A
What is the brand of these replacement headlights?March 1, 2019
John O
10
Can't remember, made in China. Works very well.
March 1, 2019
J R
10
1A Auto's house brand parts are manufactured by various aftermarket companies specifically for us and built to your vehicle's exact OEM specifications.
March 1, 2019
Jessica D
10
Saab
April 6, 2019
Felipe E
10
The brand name is Depot
January 26, 2022
Alen W
does this come with the ballast and igniter on it too ?March 30, 2024
Makayla E
10
Yes, the ballast and igniter will come as part of the assembly.
April 1, 2024
Emma F
Customer service
877-844-3393
Monday - Friday 8:00am - 9:30pm ET Saturday - Sunday 8:00am - 4:30pm ET
Enter Vehicle Year Make Model
Specify your vehicle's year, make and model to guarantee fit.
Year
Make
Model
Options
Drivetrain
This part doesn’t fit a . Select from parts that fit.