

★★★★★
May 20, 2026
Excellent product. I will buy from 1A auto again

Replaces


About TRQ:
TRQ is a trusted brand dedicated to making every repair a success story by combining premium parts with easy installation. Each TRQ part is engineered by a team of automotive experts to meet or exceed OEM standards, delivering enhanced performance and maximum longevity. With rigorous in-house testing, the brand ensures superior fit and function across every product line. TRQ also provides customers with best-in-class, step-by-step installation videos—so you can complete repairs with confidence, whether you're a first-time DIYer or an industry professional.
Product Features
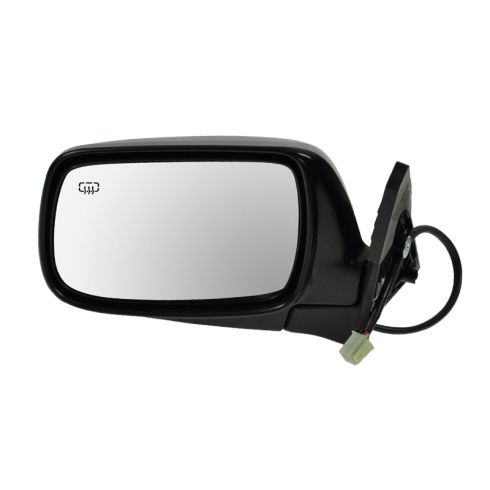
TRQ side mirrors and mirror components are designed to match the function, fixture, and performance of the original version for easy installation. TRQ mirrors are DOT certified, comply with all federal safety standards, and are independently lab tested to ensure our products comply with all government regulations. All products are fit and road-tested in our Massachusetts R&D facility to ensure we deliver on our promise of Trusted Reliable Quality.
Exact fit - To obtain proper fit and function confirm your vehicle has the exact mirror options listed.
Paint To Match Note:
"Paint-to-match finish" refers to a smooth, paintable surface. This item is not painted. Paint offers better coverage and adhesion, but it is not necessary for installation.
Attention California Customers:
 WARNING: This product can expose you to chemicals including Chromium (Hexavalent Compounds), which is known to the State of California to cause cancer, and birth defects or other reproductive harm. For more information, go to www.P65Warnings.ca.gov
This part fits 2 vehicles spanning 2000-2004.
| Year | Make | Model | Description |
|---|---|---|---|
| 2000-2001 | Subaru | Outback | Subaru Outback Driver Side Power Heated Paint to Match Mirror TRQ MRA05636 |
| 2002-2004 | Subaru | Outback | Subaru Outback Driver Side Power Heated Paint to Match Mirror with Heat TRQ MRA05636 |
| Brand Label | Part Number |
|---|---|
| Subaru | 91031AE99ANN |
| DIY Solutions | MIR00926 |
| Partslink Numbering System | SU1320105 |
| Hollander | 128-60120L |
This item may be interchangeable with parts from other brands with the above part numbers. This information is provided only for reference and does not guarantee that the item you are purchasing is identical to parts with part numbers from the brands listed above. To confirm that this item fits your vehicle, use the above "Check Vehicle Fit" option.
Lifetime Warranty
This item is backed by our limited lifetime warranty. In the event that this item should fail due to manufacturing defects during intended use, we will replace the part free of charge. This warranty covers the cost of the part only.
FREE Shipping is standard on orders shipped to the lower 48 States (Contiguous United States). Standard shipping charges apply to Hawaii and Alaska.
Shipping is not available to a P.O. Box, APO/FPO/DPO addresses, US Territories, or Canada for this item.
Expedited is available on checkout to the United States, excluding Alaska, Hawaii.
Final shipping costs are available at checkout.

Created on:
Tools used
Brought you by 1AAuto.com. Your source for quality replacement parts and best service on the internet.
Hi, I am Mike from 1A Auto. I hope this how to video helps you out. Next time you need parts for your vehicle. Think of 1AAuto.com. Thanks.
In this video we are going to show you how to replace a side rear- view mirror. On this 2003 Subaru Outback. Pretty much the same as the Outbacks from this generation. Only tools you'll need are Phillips as well a flat blade screwdriver and 8mm socket with a ratchet.
We start with a flat blade screwdriver. There is a little pin here. Reach in there carefully. Pry it out. Pull that out. Right up here this triangle it carefully pries off. Your switch plate right here. If you want to use the cloth under here to protect the vinyl, just pry it up from the bottom. Okay. And then, pull it out at the top. Pull this up and out. And there are two harnesses. One here, a little tab press it with your thumb, disconnect, and then here, there's a little tab, again press it with your thumb. Okay. The switch plate comes off.
Again with a flat blade screwdriver, there's a little plug here and now there are two Philip's screws, one here and one back in here. I will just speed it up here as I just remove those two Philip screws. Then once you have those screws out you can just reach right in here with your finger at the bottom corner, pull firmly and then quickly. Pull out on the ends here. This side, make sure it's all pulled off. Then again right here, use your flat blade screwdriver carefully pry the bezel around your door handle. That comes off.
Pull your door panel out, lift it up and then there's just one more harness right here, pull it up away from the door panel and off. And the door panel is off. There are two plugs on here, sometimes these aren't even there. They fall off during assembly. Pull those off. Get it in behind. Now in behind there is 8 mm bolts. There's also one here. Now I'm just going to fast forward as I'm using a 8 mm socket with a ratchet and extension to remove those three bolts. Once you have those bolts off, the thing is connected right here, push with your thumb, disconnect that.
Then just take and pull that right out. Your mirror, what's left of it, comes right off. The old mirror of the car, new mirror from 1A Auto, you can see it's going to go on, it's an exact match for the original. You do want to put the pad on. Pad goes on like that, take your harness, put it through the middle of the pad. Wrap the harness through the mirror and then right through there. Push the pad down on into place, the harness pulls through. As you put the mirror into place.
That bolt in place. Turn it in by hand. I'm just going to fast forward here as I start the other two bolts in. I'm just going to tighten them by hand first and then tighten them nice and snug and firm with the socket and ratchet. Put that back on and put your two plugs back on. Install the door panel, just make sure you plug in your courtesy light. Lift the door panel up. A little higher then it goes, make sure it hangs on the windowsill correctly.
Look at your door handle and make sure it's lined up correctly and then push your clips in gently first then apply a little more pressure and push them in, right around the edge of the door panel. Put this trim back on, this triangle piece back in place, reinstall your two screws. Push this one back in and it does take a little pressure, lock it in place, switch panel, this wire goes through there, make sure you fish this wire. Through the top here, plug that in there. Plug this in there. Take this and push it right down back into place, last but not least just a little plug and it goes back in place.
We hope this helps you, brought you by www.1AAuto.com, your source for quality replacement parts and the best service on the internet. Please feel free to call us toll free 888-844-3393. We are the company that's here for you on the internet and in person.
Excellent product. I will buy from 1A auto again
Delivered on time, in tact, looks great, works great. Perfect fit.
excellent product
Gr8!
Searched for some time to find a mirror assembly. Found this site and now is a go to place for all my parts. Shipped fast and shipped free of damage.
Not installed yet. Paid $60 for the heated power mirrors. Amazing price. Appear to be very high quality. Can't rate fit or performance since I haven't installed them yet. Will update this review after installation.
Everyone was super nice and helpful when I called and the Sideview mirror I needed arrived a few days later through ground shipping. The how-to video was really helpful (even though my friend - an ace mechanic!!) installed the mirror for me). Overall I can't recommend 1Aauto enough !!!
After smashing my son's driver side mirror on his 2002 Subaru Outback with a swift snowblower move, I offered to fix it. Every thing about the experience with 1A went great - online ordering was easy, the package got to me sooner than I expected, the packaging of the product was great - and 1A's online video tutorial was really good (could do with some close up shots for the detail visuals). My son and I did the install in 20 minutes and it worked perfectly. Would definitely order from 1A Auto again.
Thank you so much for the how-to video! It saved me at least $200 by convincing me (someone who has never done much more than put gas in her car) that it was easy enough for me to do it correctly. I will definitely be shopping here for future parts needed.

MRA05636
