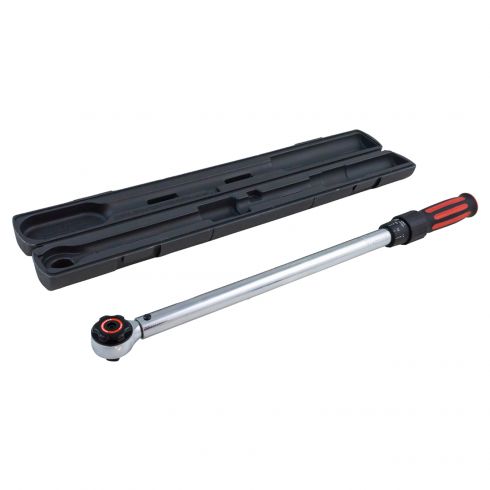
1AXAA00044-Torque Wrench Performance Tool M199

Torque Wrench

Frequently bought together
Product Reviews
Loading reviews
4.96/ 5.0
25
25 reviews
Great tool at a fair price
July 27, 2019
I highly recommend this torque wrench. It has performed flawlessly without slipping since purchase. The included case will keep the tool clean and accurate for years to come.
Works great!
November 5, 2019
I picked this torque wrench up while ordering a 6 pc ball joint kit for my 07 F150 truck. Works as advertised with simple adjustments and helped accurately torque down the new ball joints.
Must have!
December 6, 2019
I purchased this torque wrench due to some high torque values on some parts I was replacing. The wrench is easy to adjust, lock, and release. With this wrench I was able to replace several parts on my own that I would otherwise have had to have a mechanic to the job. Definitely worth it!
Torque wrench
January 26, 2020
Fast service fantastic product, now to buy the smaller torque wrench for my other projects??????
Torque Wrench
August 18, 2020
Bought this 25-250 ft lbs. torque wrench. Very impressed. Solid quality.
Steves review
August 19, 2020
Ive had nothing but great experiences with 1aauto and I plan on continuing to buy from them.
Great quality at a great price
September 6, 2020
This torque wrench is solidly built and the price is great. I chose it over others because it has the widest range of torque settings - to get this range you'd normally need to buy two different wrenches. Only downside is that it is big, measuring 24" - so it can't fit in some tight spaces.
Parts and tools
December 29, 2020
Great service.ordered toque wrench.great tool.Also ordered work light, another great tool. I use A-1 because I always get quality parts and service.
Trust
December 29, 2020
A great experience talking to Miss Jorden , while Placing order,what a great customer service.I am highly impressed.
Good
April 15, 2021
From a leverage and working room perspective, I wish it had a different gear in the head. It was tough to ratchet at times cause of tight space. But otherwise worked great
Outstanding Value
April 25, 2021
Fast shipping and torque wrench was perfect
Thank you 1aauto
May 14, 2021
Few months ago I bought motor and transmission mount set from y'all for 100 for my 05 Mazda 3. Recently got the torque wrench.. You guys saved me 600 bucks.. Torque wrench was very easy to use and cannot thank y'all enough!!
Great quality
July 9, 2021
I was a little on the fence because of the price, but this is amazing quality even if it were twice as much.
Great torque wrench
August 7, 2021
Torque wrench is well-made, accurately calibrated and brand new (unused)--unlike the two torque wrenches that I bought from Amazon a year ago.
I've bought about a dozen car parts and tools from 1A Auto this year, and so far, all were brand new and exactly as advertised.
August 8, 2021
Works great. Easy to set and lock. Like the handle. Comes in a nice case.
September 28, 2021
Works as expected and great tool
great wrench
December 13, 2021
works great, recommendations would be to make handle shorter but extendable, to great in smaller spaces. The torque wrench works great
January 30, 2022
Works great
Great tool to have
February 21, 2022
Works amazing so far
Works
September 6, 2022
Thing works great.
Good buy.
October 28, 2022
Great tool for a great price.
December 6, 2023
Shipping was fast and Wrench worked as expected! Thanks!
Torque is necessary to be accurate, safe, and not damage parts!
[{"url": "https://wac.edgecastcdn.net/001A39/prod/media/pNISJll75W64CYGsite/92fc729262950e9ad91bd66003de22ba_1707102941888_0.jpeg", "caption": "One of the projects I used my torque wrench on!"}]
February 4, 2024
This is a great Tool, I have used it quite a bit. It's been dropped on the ground many times and still works perfectly fine.
Torque Wrench
May 21, 2024
I was glad to add this torque wrench performance tool M199 because it helps with so many vehicle repairs.
As a female that's new to doing my own vehicle repairs, it's good to have a variety of tools that help me do any repair the right way.
And there are so many helpful videos on 1AAUTO.
torque wrench
October 22, 2024
performed exactly as it should.
Customer Q&A
What increments is the wrench adjustable? ft./lbs.
May 4, 2020
10
Hello,
This wrench can be read in ft/lbs and N/m. Thanks!
May 4, 2020
Adam G
What is the country of origin of this wrench?
July 28, 2020
10
Thank you for your inquiry. This torque wrench is made in Taiwan!
July 28, 2020
T I
Is that the electronic one she used with the lights and the sound when it hit the specification?
September 28, 2021
10
This listing is for a mechanical, click-type wrench.
September 28, 2021
Adam G
10
No, this is the mechanical one, with no lights but does click
September 29, 2021
Lewis M
Buenas noches ?pueden ennviar a Mxico? ?y cual seria su costo?
December 5, 2021
10
We are unbale to ship this item to Mexico.
December 6, 2021
Andra M
Does it work left and right ?
January 30, 2022
10
Yes, Adjust handle for torque settings. Has lever to adjust if you need to tighten or loosen a nut.
January 31, 2022
Victor D
Does it work left and right ?
January 30, 2022
10
Both just like a normal ratchet
January 30, 2022
Michael H
10
Rick, Im no mechanic but a home DIYer. Ive only been using my Performance Tool torque wrenches a year or two, saved me lots of money already. But one thing is, these wrenches are NOT designed for loosening nuts. Use just a breaker bar for lug nuts and other tight fasteners with your box end or similar wrenches.
January 31, 2022
Mark L
10
Rick, Im no mechanic but a home DIYer. Ive only been using my Performance Tool torque wrenches a year or two, saved me lots of money already. But one thing is, these wrenches are NOT designed for loosening nuts. Use just a breaker bar for lug nuts and other tight fasteners with your box end or similar wrenches.
February 4, 2022
Mark L
What is the length?
February 20, 2022
10
Tool is 21.5 from end of handle to top of head. Case is (lwh) 22.75x 2.75x 2.25.
February 21, 2022
James D
Hello, this torque wrench is not the same one in the video. the parts list took me to this one but the one in the video is digital and also have degrees. can you point me in the right direction to the one she used in the video. You Tube video.
(How t
January 31, 2024
10
We do not carry the one that you are looking for at this time.
January 31, 2024
Andra M
Your video required 18 pounds of torque yet recommends this tool. Will it work?
March 23, 2024
10
I was prompted to answer this since Im assuming it was the same 1/2 torque wrench I bought.. be careful what you use it on. I was remounting my strut and torquing a nut to 66 ft lbs on my strut mount last weekend. It never alerted me to reaching 66lbs and I twisted it off and now have to replace that strut mount. I dont blame the torque wrench, I wasnt using the right tool is how I see it. Being something small I should have used my 3/8 or 1/4 torque wrench. So I would just say be careful torquing something small with this, a lot of leverage with this one. Tool has worked great otherwise for tie Rod ends, axle nut, etc
March 24, 2024
Trenton H


