Replaces
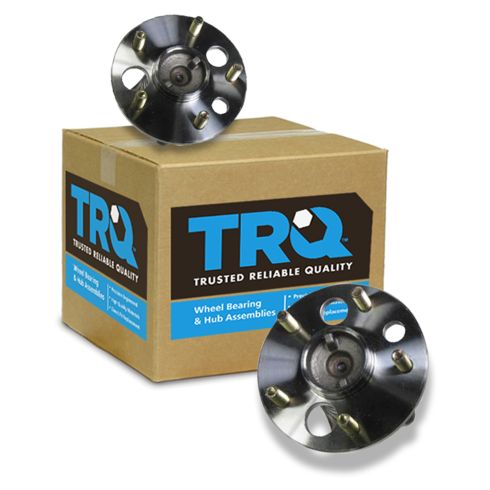
1996 Toyota Avalon Rear Driver & Passenger Side with 4 Wheel ABS Brakes 2 Piece Wheel Bearing & Hub Assembly Set TRQ BHA50040


BHA50040
This part doesn’t fit a . Select from parts that fit.
Specify your vehicle's year, make and model to guarantee fit.
This part does not fit a .
Buy in the next and
Get it by: Friday, Dec 26 with expedited shipping
Recommended for your 1996 Toyota Avalon
Frequently bought together
Specify your vehicle's year, make and model to guarantee fit.
This part does not fit a .
Part Details
- (1) Rear Passenger Side Wheel Bearing & Hub Assembly
- (1) Rear Driver Side Wheel Bearing & Hub Assembly
- Ball
- 2 Piece
Specifications
- with 4 Wheel ABS Brakes
- Driver & Passenger Side
- Rear
About TRQ:
TRQ is a trusted brand dedicated to making every repair a success story by combining premium parts with easy installation. Each TRQ part is engineered by a team of automotive experts to meet or exceed OEM standards, delivering enhanced performance and maximum longevity. With rigorous in-house testing, the brand ensures superior fit and function across every product line. TRQ also provides customers with best-in-class, step-by-step installation videos—so you can complete repairs with confidence, whether you're a first-time DIYer or an industry professional.
Attention California Customers:
![]() WARNING: This product can expose you to chemicals including Lead and Lead Compounds, which are known to the State of California to cause cancer, and birth defects or other reproductive harm. For more information, go to www.P65Warnings.ca.gov.
WARNING: This product can expose you to chemicals including Lead and Lead Compounds, which are known to the State of California to cause cancer, and birth defects or other reproductive harm. For more information, go to www.P65Warnings.ca.gov.
Lifetime Warranty
This item is backed by our limited lifetime warranty. In the event that this item should fail due to manufacturing defects during intended use, we will replace the part free of charge. This warranty covers the cost of the part only.
FREE Shipping is standard on orders shipped to the lower 48 States (Contiguous United States). Standard shipping charges apply to Hawaii and Alaska.
Shipping is not available to a P.O. Box, APO/FPO/DPO addresses, US Territories, or Canada for this item.
Expedited is available on checkout to the United States, excluding Alaska, Hawaii.
Final shipping costs are available at checkout.


Created on:
Tools used
- Loosen the 21mm lug nuts with the vehicle on the ground Raise the vehicle with a floor jack near the pinch weld Secure the vehicle on jack stands at the unibody frame rail, and place it just ahead of the lower control arm on the rear Repeat the process for the other side so the vehicle is level Remove the hub cap Remove the lug nuts Pull off the wheel
- Pull off the brake drum Remove the brake shoe springs with the vise grip pliers Hold the front retaining pin in place by hand Twist off the front retaining spring with the vise grip pliers Remove the retaining pin Repeat the process for the other shoe Hold the rear retaining pin in place by hand Twist off the rear retaining spring with the vise grip pliers Remove the rear brake shoe Pry the emergency brake cable out of the front brake shoe
- Turn the wheel hub to access the 14mm bolts with a socket and ratchet Remove the four 14mm bolts from the hub Pull off the wheel hub
- Clean the brake backing plate and the axle bore with a rag Check that the hub o-ring is in place Put the hub into place Insert the four 14mm bolts into the hub Tighten the 14mm bolts to 59 foot-pounds of torque
- Have a drain pan ready Spray the backing plate surface with brake cleaner Spray the adjustor wheel and e-brake with brake cleaner Insert the e-brake arm into the brake Press on a new horseshoe clip Clamp the horseshoe clip with pliers Tighten down the brake adjustor Place the adjustor into the spring Insert the spring and adjustor to the shoe Insert the adjustor arm into place Snap the ring onto the adjuster arm Reinstall the spring to the arm Lift the brake shoe into place Insert the e-brake spring to the brake shoe Thread the retaining pin into the brake shoe Twist on the retaining spring with vise grip pliers Put the rear brake shoe into place Thread the retaining pin into the brake shoe Twist on the retaining spring with vise grip pliers Push the brake shoes together by hand Adjust the shoes so they touch the surface of the drum Hook the springs on with the vise grip pliers Slide the brake drum on
- Slide the wheel into place Start the lug nuts by hand Tighten the lug nuts preliminarily Lower the vehicle to the ground Tighten the lug nuts to 100 foot-pounds in a crossing or star pattern Align the notch with the valve stem, and reinstall your hubcap
Brought to you by 1AAuto.com, your source for quality replacement parts and the best service on the Internet.
Hi, I'm Mike from 1A Auto. I hope this how-to video helps you out, and next time you need parts for your vehicle, think of 1AAuto.com. Thanks.
In this video, we're going to be working with our 1998 Toyota Camry. We're going to show you how to remove and reinstall the rear wheel bearing and hub assembly here for an ABS vehicle. If you like this video, please click "subscribe." We have a ton more information on this car, as well as many other makes and models. If you want this part for your vehicle, follow the link in the subscription over to 1AAuto.com. Here are the items you'll need for this repair.
Grab onto the hubcap and remove it from the wheel. We're going to use a 21mm socket and breaker bar to remove all five lug nuts. Then raise and support the vehicle, and then finish removing the lugs.
We've put our vehicle on a lift to make it easier to film for you. This job can be easily done with a jack and jack stands.
Remove the wheel and tire.
Remove the drum. You may want to wear a dust mask when working inside of your brake components, as it can become airborne while you're working. Use a pair of needle nose locking pliers to unhook the springs from the brake shoes.
Use a pair of needle-nose locking pliers to unhook the springs from the brake shoes. Using a pair of needle nose locking jaw pliers, grab onto the upper spring. Make sure that these are on there nice and tight, because these springs are under quite a bit of tension. Pull out and release the spring from its retainer. You can now use a pair of regular pliers. Support the back of the pin and the back of the plate here. Push down onto this cap and rotate it 90 degrees to remove it and the spring from this retainer pin. You can now remove this brake shoe and the pin from the backing plate.
Now we'll do the same thing to remove this spring retainer from the opposite side. Be careful when removing the shoe, because we have a lot more moving parts here you're going to have to deal with. We use those same needle nosed locking jaw pliers to grab onto the end of our emergency brake cable and work it out of the clip.
Rotate the wheel hub so you can reach through this window and access each of the four 14mm bolts on the back. We'll remove those with a socket ratchet and extension. Carefully remove the hub assembly from the vehicle.
Here we have our old rear wheel hub assembly that we removed from our vehicle, and our new part from 1AAuto.com. As you can see, these parts are exactly the same. We have the same four bolt flange on the rear here, the same ABS trigger wheel, a nice new bearing down there already packed with grease, and the hubs have the same wheel studs, the same bolt pattern. They're the same size and have the same windows in them to access the adjuster for the rear brakes, as well as to get down to these bolts to remove and reinstall the wheel hub as necessary.
A couple of things that can happen here are: that trigger wheel on the back of the hub becomes cracked, dirty, or damaged in some other way, and gets a bad ABS sensor reading. This can cause the ABS light to come on and your brakes to malfunction, or the ABS portion of your brakes to malfunction. Also, the bearing itself can go bad, which can create a whirling or grinding noise. This will change as you go side to side, depending on which side the bearing is worn out on. You may also feel a little bit of side to side, or up and down, play to the rear wheel if you were to jack the vehicle up and check it. If your old ABS wheel hub assembly is worn out, this new part from 1A Auto is going to go in, direct fit, just like your original equipment, and fix you up right.
Use a rag or a paper towel to wipe all of the old grease and dirt out of the bore. Once you've got all of that stuff out of the way, you want to check that this O-ring right here is still in place. We can then install our new hub assembly and start our four 14mm bolts. Tighten the bolts back down with a 14mm socket ratchet and extension. Torque these bolts to 59 foot-pounds.
Place a catch pan underneath your backing plate and spray the surface down with brake cleaner. We're also going to spray down our e-brake hardware and our adjuster wheel. These don't have to be perfect, but we do want to remove the majority of the build-up from them to make sure they go in easily and move smoothly.
Reinstall the e-brake actuator arm here. Put on a new horseshoe clip. Make sure you clock it so you can access the open end easily. This will rotate once you get it on, though. We're going to make sure that it's fully seated with a pair of pliers. Turn it so we can get at it. We'll clamp the ends together with our pliers until we close the gap. We'll tighten down our adjuster arm all the way. We'll send our spring back over it. Hook our spring into place at the back. This one's got kind of an odd hook on it, so it can be a little tricky to get in there.
Make sure this pin sits up. That's where we'll install our adjuster arm and the snap ring for our adjuster arm. You may also have to snap that on with a pair of pliers. Flip it over. Reinstall the small spring. Now we're ready to reinstall our shoes into the vehicle.
We'll send our retainer pin in through the back of the dust shield here with the backing plate. We'll install our shoe. Install the first retainer clip upside down, and turn it to keep it locked into place. Insert the new spring and retainer over the pin with the pair of pliers. Rotate it 90 degrees to lock it into place.
Set up our e-brake cable. You'll have to hold back the spring here. Sometimes you can push it against the clip. You may have to carefully pull it back with pliers so we can set our cable back into the retainer. Send this pin through the backing plate. Set the shoe into position. Send the pin through, and we'll put our retaining plate on upside down here. We'll set up our pliers and install our other spring plate the same way. Now we'll hook onto this spring with a pair of needle nosed locking pliers. Make sure that this slot lines up into this channel here, and we hook it into this hole at the very back of the shoe. Be careful when doing this and make sure that your pliers are locked on tight, because these springs do have a good bit of tension on them. We'll hook our lower spring in and again, and we'll grab on nice and tight. Make sure that it's behind this ear. We kind of have to pull this one and rotate it into the slot.
The brake adjuster is located here right below the wheel cylinder. We can access it through this hole in the hub. What this does is as we turn it, it spreads the shoes out. We'll install our brake drum with this hole on the drum over the opening in the hub. Line it up to the wheel. We'll run the adjuster out until the shoes just slightly drag on the inside surface of the drum.
Here, we have a little rubber plug in our brake drum to cover that adjuster wheel and keep dirt, debris, and moisture out of our brakes. We'll just push that out with the old drum with the screwdriver, and then we'll population it into our new drum. You can hear there, we have just a light bit of dragging from our shoes.
We'll reinstall our wheel and tire, test drive to make sure it's all right, and if we have to, we can simply pop this out with a screwdriver from the outside and adjust that wheel up or down as necessary.
Reinstall the wheel and tire. Get all the lug nuts down as tight as you can by hand. Lower the vehicle carefully back onto the wheel and tire. Torque the lug nuts to 76 foot-pounds in a cross pattern. Line up the notch in the hubcap over the valve stem. Tap the hubcap back into place.
Thanks for tuning in. We hope this video helped you out. Next time you need parts for your car, please visit 1AAuto.com. Also check out our other helpful how-to and diagnosis videos.
BHA50040
877-844-3393
Monday - Friday 8:00am - 9:30pm ET
Saturday - Sunday 8:00am - 4:30pm ET
Specify your vehicle's year, make and model to guarantee fit.
This part does not fit a .


