Replaces
Product Features
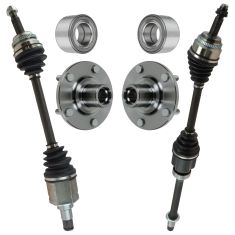
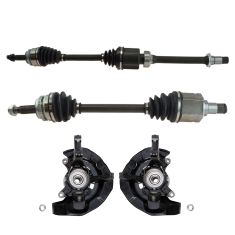
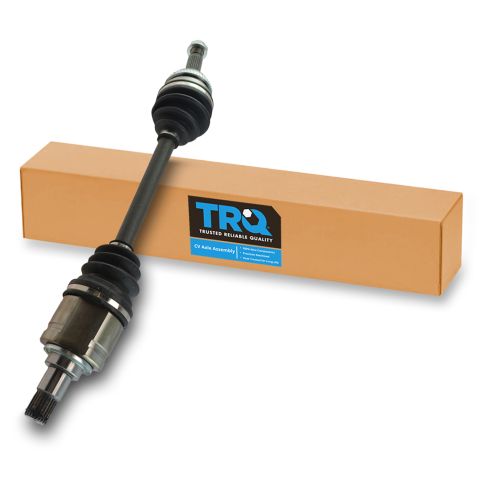
TRQ CV (constant velocity) drive axles are manufactured using premium raw materials designed to restore original performance. TRQ CV drive axles are new, so there is no core charge with your TRQ purchase. TRQ-designed drive axles utilize neoprene boots, moly grease, stainless steel clamps, and heat-treated ball tracks to ensure extended service life. Each TRQ axle is application-specific so each spline and thread will mate properly for a seamless fit. All products are fit and road-tested in our Massachusetts R&D facility to ensure we deliver on our promise of Trusted Reliable Quality.
CV axles are designed to transmit the power from your vehicle's drivetrain to the wheels while being able to flex and pivot to the demands of the steering and suspension systems. If your vehicle is making clicking noises at lower speeds or when making turns, it may be time to replace your CV axles with our 100% brand new assemblies.
Attention California Customers:
 WARNING: This product can expose you to chemicals including Lead and Lead Compounds, which are known to the State of California to cause cancer, and birth defects or other reproductive harm. For more information, go to www.P65Warnings.ca.gov.
Lifetime Warranty
This item is backed by our limited lifetime warranty. In the event that this item should fail due to manufacturing defects during intended use, we will replace the part free of charge. This warranty covers the cost of the part only.
FREE Shipping is standard on orders shipped to the lower 48 States (Contiguous United States). Standard shipping charges apply to Hawaii and Alaska.
Shipping is not available to a P.O. Box, APO/FPO/DPO addresses, US Territories, or Canada for this item.
Expedited is available on checkout to the United States, excluding Alaska, Hawaii.
Final shipping costs are available at checkout.

Created on:
Tools used
Hi, I’m Mike from 1A Auto. We’ve been selling auto parts for over 30 years!
Before I raise and support the vehicle. I'm going to remove the center cap with a flat bladed screwdriver. There's a little opening right here—just pop it right off. You don't have to take the lug nuts off on this one. I'll put that aside. I want to get to the axle nut, so I can spin it off. It's easier to spin the axle nut off with the wheel on the car and the vehicle on the ground so you're not trying to turn the wheel—otherwise you have to have someone step on the brake for you if the vehicle is up on jack stands.
This particular car has steel wheels. That center cap that pops out from the middle, or that pops out from the outside. If you had a vehicle that has alloy wheels, the center cap might be pushed into the center here. You would have to remove the wheel, pop the cap out, and then replace the wheel to get to this axle nut. This axle nut does not use a cotter pin. It's what they call staked. After it was torqued, it was then punched into this channel here and folded in. That way it can't spin off. To remove it, we're going to need to bend that out.
I'm going to clean some of this dirt and grime out of here. I'm going to switch this little punch. You really just need to get it up just enough so it will spin off the threads. Starting to go. It's not really pushed down very deep into this channel. I'm just going to try removing it with the socket. I'm going to spray some rust penetrant on here. I'm going to use a long breaker bar and a 12-point 30 millimeter socket. This is a large impact socket. It's actually an axle nut socket. Put on here. This is why you want the vehicle on the ground, the wheel, because it does take a lot of force to remove it. I'm just going to give it quite a few turns, but I'm not going to remove it all the way.
I just want to be able to spin it easier when the vehicle is up in the air. Now I need to break the lug nuts here. I'm going to use a 21 millimeter deep socket and my breaker bar. Try to loosen up these lug nuts. Now we can raise and support the vehicle, and remove the tire and wheel. I'm going to switch to just the socket and finish removing the lug nuts. The wheel is seized to the hub and rotor. This can be pretty common. I'm going to put a couple lug nuts back on, just lightly. Take our dead blow mallet, we're going to hit right on the tire. It should knock it free. Might take one hit, could take 10 hits, but just give it some good hits with a hammer and it should break free. The lug nuts hold it on there so the wheel doesn't fall off. Now you can take the wheel off and put this aside.
I want to move this axle nut out further because I want to make sure the axle is free from the hub inside, in the splines, before I start to remove other stuff. It's still wants to spin this. This is why you initially do it with the wheel on here. Kind of hold this with a pry bar. Sometimes if you put a lug nut on here, give it a little more secureness. That's good like that. Now I can spray some rust penetrant in here.
There are splines inside the hub where the axle sits, and they do look pretty rusty. I want to get some rust penetrant in there to let it soak. Take our pry bar off. I'm actually going to thread this lug nut down to keep the rotor from flopping around on me. I'm going to take our dead blow mallet. I'm going to tap the axle to try to break it free. Perfect. So, I know that when I undo the ball joint and I go to slide the axle out, it's going to come out of the hub. It's not going to fight me with this moving around because right now it's all nice and secure. It was easy to knock this axle free.
CV axles do have some in and out play on them, so that's what allowed me to do that. I'm going to remove this axle nut even more, but not completely. There we go, perfect. Don't have to go all the way, just a couple threads left. That way once I undo this it won't just like pop out, but that's nice and loose and I don't have to fight with it afterwards when everything else in the suspension is loose.
To unbolt the ball joint from the lower control arm, there's a single bolt here and two nuts here. I'm going to spray them with some rust penetrant. Start on the top with this bolt, and try to get these nuts here. These are 17 millimeter. I'm using a 17 millimeter socket extension and a long ratchet. That's not as bad. Now the bolt. I'm going to remove the bolt first, then I remove the two nuts. I'm going to use this pry bar and separate them.
I've got to pull the control arm down and get it off these studs that are on the ball joint. I'm just going to pry between the ball joint and the control arm, just pop them off, just like that. Now I'm going to undo the axle nut. I'm going to grab the hub rotor, the whole assembly. It's supported by the upper strut. At the same time I'm going to pull the axle out from the back and just kind of separate them. Just like that.
To give myself extra clearance I'm just going to turn the wheel. That's better. That prevents the whole knuckle, the weight of it, from resting on the axle. That should help me remove it. Driver's side axle goes over here and into the transmission. It is possible that when you undo this, you may lose some transmission fluid, so you should have a drain pan handy.
I'm going to use a pry bar to kind of find the edge of the axle. This little slot might work. I'm just going to pry against the transmission case. You just have to pop it out of the snap ring. There it is. I just had to bounce the pry bar a bit. Now I'm going to guide it out, don't want to damage the seal on the transmission. We have our axle assembly.
Here's the original driver's side CV axle removed from our vehicle, and our brand new one from 1AAuto.com. There's no core charge on this. It's an exact match as far as dimensions. Has the ABS tone ring. Comes with a new axle nut. Has the same style snap ring that goes into the transmission. This will fit great and work great in our vehicle. I'm going to take off the new axle nut and put that aside. We're going to guide our axle into the transmission.
Go in the same way I took the old one out. I also have to reach in here, and I want to guide it into the transmission. Be careful not to damage the seal. There are splines in the transmission so you might have to turn it a little bit. It should slide right in. Yup, there we go. Now we get it kind of started, kind of go in and then stop. It's at the snap ring. Just to help myself out here I'm going to bungee this out of the way. It's just being very annoying.
Set up and hit it home. It is seated. We did have some transmission fluid leak out, so I'm just going to wipe that out. I'm going to take the bungee cord off now. We're going to put the axle back into the hub, push it out, actually turn the axle, or twist it. Get it lined up in the opening. You might have to turn it a little bit to get the splines to line up. It should slide right on. Capture the new axle nut just a few threads so it doesn't fall off. I'm going to turn this whole assembly straight again. I need this up under here. I'm going to try to pull it down.
Now see I left the axle nut loose, so I do have play this way, I can move it around. I'm going to use a pry bar to pry down on the control arm. I'll move this around, switch hands, get the studs lined up first, push in. There we go. I'm going to get these nuts caught. Now I can use these nuts to pull the ball joint in. Now the bolt hole is closer, so I can reinstall the bolt. I'm going to torque the two nuts and the bolt to 55 foot-pounds. As soon as it clicks, it's all set. I'm going to use the axle nut socket and just thread the axle nut down. Now I did touch the surface with my greasy gloves. I don't want any of that in our brake components, so I'm just going to use some brake parts cleaner and just clean that off. Take this lug nut off.
I'll reinstall the wheel, lower the vehicle to the ground, torque the lug nuts, and then torque the axle nut. I'm going to install the lug nuts by hand. Take the socket and just snug these lug nuts up. They do have a cone seat, and they'll kind of seat themselves into the wheel and align it up. I'm going to lower the vehicle to the ground and torque the lug nuts to 76 foot-pounds in a cross pattern. I'm going to torque the axle nut to 217 foot-pounds.
Now I need to stake the axle nut so it doesn't spin loose. I'm going to use a punch and a ball peen hammer. I'm going to line it up right at the edge here on the groove. Now it's staked in place. Replace your center cap, it just clips into place. The job is complete.
Thanks for watching. Visit us at 1AAuto.com for quality auto parts, fast and free shipping, and the best customer service in the industry.