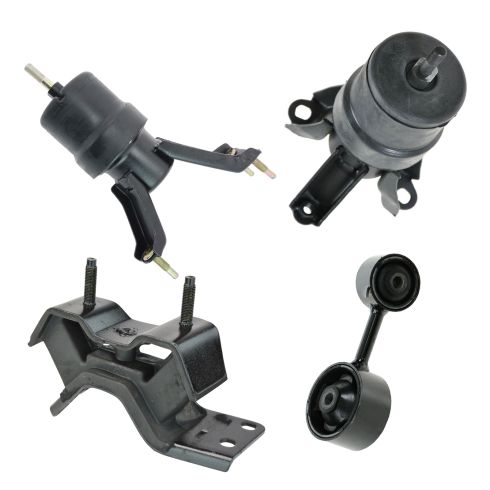
Kit Includes: (1) Transmission Mount (1) Front Lower Engine Mount (1) Engine Torque Strut Mount (1) Rear Engine Mount
Quantity: 4 Piece
Specification
Transmission Type
Automatic Transmission
Engine Displacement (Metric)
L4 2.2L
Vehicle Build Location
US Built Models
Highest Quality Materials
Made from highest quality materials that meet or exceed OEM standards
Direct Fit Replacement - Guaranteed to fit and function for your specific application Quality Tested - built to a strict level of product standards.
Item Condition:New
Attention California Customers:
WARNING: This product can expose you to chemicals including Carbon black(airborne, unbound particles of respirable size), which is known to the State of California to cause cancer. For more information, go to www.P65Warnings.ca.gov.
Lifetime Warranty
This item is backed by our limited lifetime warranty. In the event that this item should fail due to manufacturing defects during intended use, we will replace the part free of charge. This warranty covers the cost of the part only.
FREE Shipping is standard on orders shipped to the lower 48 States (Contiguous United States). Standard shipping charges apply to Hawaii and Alaska.
Shipping is not available to a P.O. Box, APO/FPO/DPO addresses, US Territories, or Canada for this item.
Expedited is available on checkout to the United States, excluding Alaska, Hawaii.
Final shipping costs are available at checkout.
How to Replace Torque Engine Mount 1997-2001 Toyota Camry
How to Diagnose a Bad Upper Motor Mount 1997-2001 Toyota Camry
How to Replace Front Engine Mount 1997-2001 Toyota Camry
Created on:
Tools used
Socket Extensions
Torque Wrench
14mm Socket
Ratchet
1. Removing the Torque Strut
Open the hood
Remove the two 14mm bolts from the torque strut
Pull out the torque strut
2. Installing the Torque Strut
Slide the torque strut into place, with the arm closer to the engine
Tap the torque strut into place
Start the shorter 14mm bolt into the body side of the torque strut
Start the longer 14mm bolt into the engine side of the torque strut
Tighten the two 14mm bolts to 47 foot-pounds of torque
Brought to you by 1AAuto.com, your source for quality replacement parts and the best service on the Internet.
Hi, I'm Mike from 1A Auto. I hope this how-to video helps you out, and next time you need parts for your vehicle, think of 1AAuto.com. Thanks.
In this video, we're going to replace the torque strut mount. Also you could say it's the upper passenger side engine mount. This is a 1998 Toyota Camry. It's the same for the ‘97 to 2001 Camry as well as the Toyota Solara with a 2.2 liter engine.
You'll need new torque engine mount from 1AAuto.com, 14 millimeter socket, ratchet and extension and a torque wrench.
Open the hood and secure the hood prop. Your upper motor mount, torque mount or most commonly the dog bone mount on your Toyota is located at the top passenger side of the engine bay. We're going to remove this and this 14 millimeter bolt, using a 14 millimeter socket and ratchet. Once the bolt's removed, simply work the mount out of it's housings.
Here we have our old dog bone mount from the vehicle and our new mount from 1AAuto.com. As you can see, these mounts are the exact same size and shape. They have the same mounting locations, both at the body side and the engine side. Your engine is constantly moving back and forth working the mount like this. That causes tearing in the motor mount, as you can see here, as well as tearing the material out of the inside here. See, we have nice, thick solid rubber in the new mount here. As that rubber wears out, breaks down and tears, this sleeve can move back and forth inside the steel of the mount as your engine rocks back and forth during acceleration and deceleration causing a delayed feel in the change of power as well as a loud clunking noise as the engine moves forward and back causing this sleeve to hit the edges of the mount.
Install your new motor mount. You'll notice that this arm is offset. You'll want the side where it's closer to the edge facing the engine, as so. Slide the motor mount into the body. You may have to tap it a little bit down into the bracket on the engine side. The shorter of the two bolts will go on the body side. The longer of the two bolts will go through the mount on the engine bracket. You may have to tap it a little to get the bolt to line up. Tighten the bolts down with a 14 millimeter socket and ratchet. Torque the bolts to 47 foot pounds.
Thanks for tuning in. We hope this video helps you out. Brought to you by www.1AAuto.com, your source for quality replacement parts and the best service on the Internet. Please feel free to call us toll-free, 888-844-3393. We're the company that's here for you on the Internet and in person.
Tools used
Assistant
1. Diagnosing the Upper Motor Mount
Open your hood
Have an assistant watch the engine
Start the car
Put your foot on the brake
Shift the car into reverse
Shift the car into driver
If your assistant sees the engine lurch when you shift, the motor mount may be worn
Shift the car into neutral
Rev the engine
If your assistant sees the engine lurch when you rev the engine, the motor mount may be worn
If you can feel the engine clunk during any of these steps, the mount may be worn
If the engine moves but the mount stays in place, that indicates that the upper motor mount is the problem
Brought to you by 1AAuto.com, your source for quality replacement parts and the best service on the Internet.
Hi, I'm Tony with 1AAuto here to talk to you today about the upper motor mount, the torque mount, or what’s most commonly referred to as the dog bone mount, on this '98 Toyota Camry behind me.
The mount is located here on the top passenger side of your engine and what it does is it prevents fore and aft movement of your engine as you let on and off the throttle. That engine wants to lurch forward and go backwards as you get on and off the gas. These mounts are very common to fail as we constantly get on and off the throttle when driving, so these really take a lot of abuse.
The easiest way to test for a bad dog bone mount is to have a friend stand with the hood open and watch the movement of the motor and the actual dog bone mount itself. We've set up a camera to show you what it looks like and what you or your friend will do from inside the vehicle while the other watches.
Put your foot on the break, shift into reverse, you'll see a large engine movement. Drive, it'll lurch the other way, and you can actually feel a little bit of a clunk inside the car as that motor is rocking back and forth.
If you're unsure, with your foot still firmly on the break, you can rev it up a few times and really see that engine move. The way you can tell it's your dog bone mount and not the fault of another mount in the motor, as you'll notice, the dog bone mount stays in place while the engine lurches back and forth.
Something that may cause you to believe that your dog bone mount has gone bad is when you accelerate and let off the throttle when driving, you'll feel the engine lurch. The most common place you'll probably notice this movement is when starting from a stop sign or a light. We've installed our new mount to give you an idea of what a normal amount of engine movement looks like. You'll notice there's no more clunking or hard lurching in the motor, while it does still rock back and forth slightly.
If your old dog bone mount has broken down, worn out, or torn and is causing clunking or excessive engine movement inside the bay, this new dog bone mount from 1AAuto is going to get rid of that noise, lock your motor down where it needs to be, and fix you up right.
Thanks for tuning in. We hope this video helps you out. Brought to you by www.1AAuto.com, your source for quality replacement parts and the best service on the Internet. Please feel free to call us toll-free, 888-844-3393. We're the company that's here for you on the Internet and in person.
Tools used
Socket Extensions
Torque Wrench
14mm Socket
17mm Socket
Jack Stands
10mm Socket
Ratchet
Floor Jack
1. Removing the Motor Mount
Remove the 10mm bolts from the engine pan
Lower the engine pan
Remove the 14mm bolt from the bottom of the motor mount
Support the oil pan with a floor jack
Remove the 17mm bolt from the top of the motor mount
Remove the two 14mm bolts from the sides of the motor mount
Raise the engine slightly with the jack
Pull the motor mount off and out
2. Installing the Motor Mount
Remove the bolt from the old mount if necessary
Lower the motor mount into place, lining up the bolt holes
Start the two 14mm bolts on the sides of the motor mount
Start the 17mm bolt into the top of the motor mount
OR Thread the 17mm nut onto the motor mount stud
Tighten the two14mm bolts to 47 foot-pounds of torque
Tighten the 17mm nut or bolt to 47 foot-pounds of torque
Lower the engine with the jack
Start the 14mm bolt into the bottom of the motor mount
Tighten the 14mm bolt to 47 foot-pounds of torque
Raise the engine pan into place
Insert the 10mm bolts into the engine pan
Brought to you by 1AAuto.com, your source for quality replacement parts and the best service on the Internet.
Hi, I'm Mike from 1A Auto. I hope this how-to video helps you out, and next time you need parts for your vehicle, think of 1AAuto.com. Thanks.
In this video, we're going to show you how to replace the front engine mount. This is a 1998 Toyota Camry. It's basically the same for yje '97-'01 Camry, with the 2.2 liter four cylinder engine, and an automatic transmission. There is a different mount for US and Japan built models, but the procedure is the same.
You'll need a new front mount from 1AAuto.com, 14-17 millimeter sockets with a ratchet and extension, torque wrench, and a jack and jack stands.
This job can be done with the vehicle on the ground. You may not even have to raise and support it, but we've put it on the lift to make it easier to film for you.
Remove the 10 millimeter bolts securing this steel pan to the bottom of the sub-frame. You have bolts hidden here, up under the splash shield in the back. All these along the front, and another one under the splash shield on this side. We'll remove the 10 millimeter bolts with a 10 millimeter socket and ratchet, and an extension if needed. Be sure to secure this pan while you remove the last bolt so it doesn't fall on you.
Remove the 14 millimeter bolt coming from the bottom of the motor mount up through the sub-frame. Use a 14 millimeter socket and ratchet. Use a floor jack under your oil pan to support the weight of the engine while we remove the mount. Remove the bolt on the top of the motor mount with a 17 millimeter socket and ratchet, and a long extension for some access. Remove the remaining two 14 millimeter bolts located on either side of the motor mount. We're going to use a 14 millimeter socket, and I like to use a couple of extensions so I can get enough clearance to swing a ratchet up over the manifold. Jack up on the motor a little. Drop the motor mount down. Remove it from the vehicle.
As you can see, the old mount and the new mount are identical. We have the same three mounting locations at the bottom and a welded nut for the bolt that comes up from the bottom of the sub-frame. They're the same height and shape. You'll notice our new part comes with a stud in it should you decide to use that. Or you can simply spin it out and re-use the top bolt that came off of your old mount.
Install your new motor mount. Line up your rear bolt holes. Start them into the frame. Start the top bolt into the motor mount. Or if you decided to use the stud, you'll thread the nut on at this point. Tighten the remaining two 14 millimeter bolts. Torque the 14 millimeter engine mount to sub-frame bolts to 47 foot-pounds. Torque the bolt from the engine mount to the rubber to 47 foot-pounds. Let the engine off the jack. Reinstall the 14 millimeter bolt on the bottom of the sub-frame up into the engine bracket. Torque the bolt to 47 foot-pounds.
Reinstall the steel pan at the bottom with your 10 millimeter bolts.
Thanks for tuning in. We hope this video helps you out. Brought to you by www.1AAuto.com, your source for quality replacement parts and the best service on the Internet. Please feel free to call us toll-free, 888-844-3393. We're the company that's here for you on the Internet and in person.
MTA32794
In Stock
Product Reviews
Loading reviews
4.00/ 5.012
12 reviews
5 Stars
4 Stars
3 Stars
2 Stars
1 Star
9
0
0
0
3
G
December 20, 2017
Part were as expected. They were the right parts !
Toyota Camry Sedan 2001 Engine & Mount Kit
L
April 8, 2018
Very good quality parts, on time delevery, I recommend the
Company for everyone, congratulations.
Very good
D
February 23, 2019
They are very Reasonable and they ship your merchandise really fast..
Camry Engine & Trans mounts
K
May 9, 2019
Repair shop advised me all mounts on my 2000 Camry needed replacement. After watching diy videos and pricing out kit from A1, ordered parts and they were shipped fast and perfect fit. Will order from A1 again for parts and videos are a simple fix.
Great Deal
A
July 19, 2019
Great deal, great product and arrived as stated. Great job 1aauto.
James
February 14, 2020
Good
Do NOT Buy
A
August 14, 2020
The four mounts do not align properly. My car shakes even worse than it did before with the 21 year old mounts.
1999 Camry LE 4-Cyl
S
August 14, 2020
Parts did not fit my car correctly. The A1 Auto mount kit made my car shake even more than it did with the Toyota factory mounts that were never changed in 21 years.
Right part, right price and right on time
jay
August 24, 2021
Right part, right price and right on time.
2002 Camry motor mount kit
Carrell
May 19, 2022
The 4-piece engine/transmission mount kit was a perfect fit. The quality of the product was superb as usual. I am pleased with all the parts I get from 1A auto.
Absolute Garbage
Jim
August 28, 2023
The dampening material on these mounts is not even close to OEM standards...I installed, re installed, and leveled these mounts several times and the vehicle continued to shudder horribly. Also, the front and rear mounts in this kit did not have moisture drainage holes (as found on the OEM mounts). After three months of trying I ultimately had to replace this kit with genuine OEM mounts...which worked perfectly. 1A Auto should remove this kit from stock and avoid its manufacturer.
Great product
jeff
August 31, 2023
Great product. Stopped the banging in the engine compartment
Customer Q&A
Can you give instructions on how to replace the rear engine and transmission mounts?February 19, 2017
Nathan N
will this fit japan built camry ? my vin # number begins with J ?December 29, 2018
Henry L
10
These mounts will fit only US built models.
December 29, 2018
Corey M
my camry is 2000 le japan built ?December 29, 2018
Henry L
10
You can tell by the 1st digit in your VIN it would start with a letter J.
December 29, 2018
Corey M
my camry is 2000 le japan built ?December 29, 2018
Henry L
10
This kit is not listed to fit your vehicle.
December 29, 2018
Peter L
What part number for 2000 camry 4cyl auto with J vin manufactured in Japan?October 31, 2020
Nick L
10
Currently, we do not carry this part for your vehicle. We're always updating our inventory so please check back soon!
November 2, 2020
Christa R
Is there a j in the 2001 camry's?June 21, 2022
John D
10
This will only be able to fit for the US built models.
June 21, 2022
Emma F
Customer service
877-844-3393
Monday - Friday 8:00am - 9:30pm ET Saturday - Sunday 8:00am - 4:30pm ET
Toyota is a registered trademark of Toyota Motor Corporation. 1A Auto is not affiliated with or sponsored by Toyota or Toyota Motor Corporation.See all trademarks.
Enter Vehicle Year Make Model
Specify your vehicle's year, make and model to guarantee fit.
Year
Make
Model
Options
Drivetrain
This part doesn’t fit a . Select from parts that fit.