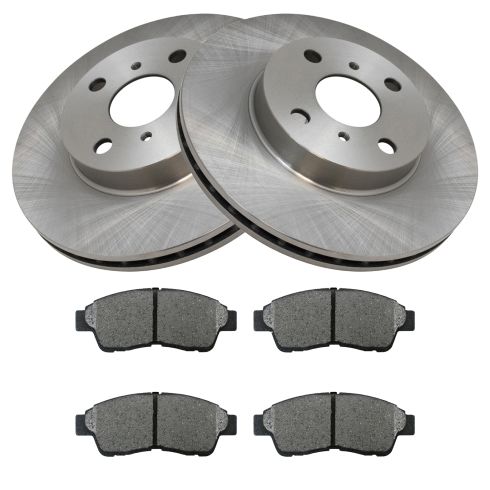
Kit Includes: (1) Front Semi-Metallic Brake Pad Set (2) Front Brake Rotors
Brake Pad Bonding Type: Premium Posi
Brake Pad Friction Material: Semi-Metallic
Complete Repair in One Purchase - Stop searching for parts individually and complete your repair with a customized kit or set from DIY Solutions.
High-Quality Parts from Trusted Brands - DIY Solutions' kits and sets are selected from the best automotive brands and include hard-to-find and even obsolete parts you may need for your vehicle.
Guaranteed Fit - DIY Solutions ensures its selected parts are quality-tested to guarantee fit and function.
Replacement Brake Kits Features & Benefits
Longer life - Positive molded to ensure even wear and enhanced performance
Less dust - Cleaner, quieter, smoother braking
Reduce vibration and noise - Balanced, finished surface
Cast from premium G3000 alloy for strength and durability
Item Condition:New
Attention California Customers:
WARNING: This product can expose you to chemicals including Lead and Lead Compounds, which are known to the State of California to cause cancer, and birth defects or other reproductive harm. For more information, go to www.P65Warnings.ca.gov.
Lifetime Warranty
This item is backed by our limited lifetime warranty. In the event that this item should fail due to manufacturing defects during intended use, we will replace the part free of charge. This warranty covers the cost of the part only.
FREE Shipping is standard on orders shipped to the lower 48 States (Contiguous United States). Standard shipping charges apply to Hawaii and Alaska.
Shipping is not available to a P.O. Box, APO/FPO/DPO addresses, US Territories, or Canada for this item.
Expedited is available on checkout to the United States, excluding Alaska, Hawaii.
Final shipping costs are available at checkout.
How to Replace Brake Kit 1992-2001 Toyota Camry
Created on:
Tools used
21mm Socket
Large C-Clamp
Flat Blade Screwdriver
14mm Socket
17mm Socket
Jack Stands
Wire Ties
Lug Wrench
Ratchet
Floor Jack
1. Removing the Wheel
Remove hub cap
While your car is still on the ground, use your 21mm socket to loosen your lug nuts
Jack up and secure your car with jack stands
Remove the lug nuts with your 21mm socket and ratchet
Remove the wheel and set aside
2. Removing the Calipers
Remove the 14mm bolts to remove the calipers
Use a wire tie to fasten the caliper out of the way
Use your screwdriver to pry out your brake pads
Use your 17mm socket and ratchet to remove your caliper brackets to access the rotors
Pull off the brake rotor
3. Installing the New Rotor and Pads
Clean new rotor with brake cleaner
Check your caliper pins to make sure they are in good working order
Put your caliper bracket back on, and tighten the 17mm bolts to 80 ft lbs
Insert your new pads into the brackets
Use your C-clamp or caliper tool to compress your caliper
Place your caliper onto the bracket
Tighten your 14mm bolts to 25 ft lbs
4. Reinstalling the Wheel
Make sure to use a star pattern when putting your wheel lugs back on
Tighten to 100 ft lbs
Replace hubcap
5. Test and Set Brakes
Before driving the car again, start it up and pump the brakes a few times to get the pistons in the brakes in place
Test the brakes in your driveway before taking the car onto the road
Set your rotors by evenly braking from 30mph to 10mph, 50mph-30mph and finally 70mph to 40mph
Obviously this is best done on a straight back road without any traffic
Brought to you by 1AAuto.com, your source for quality replacement parts and the best service on the internet.
Hi, I'm Mike Green. I'm one of the owners of 1A Auto. I want to help you save time and money repairing or maintaining your vehicle. I'm going to use my 20-plus years' experience restoring and repairing cars and trucks like this to show you the correct way to install parts from 1AAuto.com. The right parts installed correctly. That's going to save you time and money. Thank you and enjoy the video.
In this video we'll show you how to service the front disc brakes on this 1994 Camry, pretty much the same as any 1992 to 1996 Camry. The tools you'll need are a large flat-blade screwdriver, a 21 mm socket and ratchet or your lug wrench, 14 and 17 mm sockets with ratchet, a torque wrench, a large C-clamp and a jack and jack stands.
First we'll remove the hubcap. Use a large screwdriver or a pry bar. Remove the lug nuts from your wheel. I've got a 21 mm socket and I have an air wrench. You can obviously leave your car on the ground, use your lug wrench or a 21 mm socket and wrench to get them off.
As you can see I've turned the wheels, and to remove the caliper which you need to do to remove the pads you've got two 14 mm bolts, one here and then one up here. You can remove the caliper and the pads and then if you want to replace the rotor, which actually this car the rotors look really good. If you did want to replace the rotors you've got bolts that need a 17 mm bolt here and then one down lower right there.
Remove these 14 mm bolts just using a regular wrench. You can see that it's not hard to do. It's just going to take some pressure but not a ton. The other bolt is removed. Use your screwdriver and pull the caliper right off. Support it up here. Here are my pads. I'm just using my screwdriver to pry them out. You can see that they're pretty well worn, but as I said my disc is nice. What you want to do is just kind of take the back of your fingernail and run it back and forth across there. If it's nice and smooth then you're okay. If it has any deep grooves or gouges in it you'll want to replace them.
If your discs are in bad shape and you want to replace them, it is 17 mm bolts down in here. These ones are going to be quite a bit more torque to get them loose. I always like to hang up and hang down. That's usually the best way to get torque on them, or stand on the wrench. That comes off and once that bracket is off the disc for the rotor generally just comes right off. Just to show you, if you do order new discs from 1A Auto, they are going to go on there just like the originals and work for you. Like I said, these are in good shape, and I'm not a person to waste good discs. I'll put those back on.
One thing you'll want to do is take these little pins out. These look nice. They are well lubricated. They slide well. You can either take them out or just make sure that they slide back and forth with no drag. Tighten these up to the foot panels. Here are the old pads, new pads from 1A Auto. You can see they've got quite a bit more meat on them and they even have the plates and everything. They actually just kind of go down into the little. Just squeeze them together. Next, you're going to want to use a C-clamp and you're going to want to force the piston back into the caliper here. You can see the piston right in there. I'm just going to keep this C-clamp right on there and it goes back in pretty easy without a whole lot of pressure. You probably can loosen up your cap on your brake fluid reservoir and make sure it's not overfull because it will leak out if there is too much in there.
Before you install your caliper you'll want to put this little spring back in. Just kind of keeps them apart so they don't squeeze on the rotor. What we did with that C-clamp is we pushed this piston back in. Now this will go down on there very nice. Now the two 14 mm bolts. These 14 mm bolts you'll need to tighten up to about 25-foot pounds. I've got a wrench holding the stud that they're going into. Okay, and 25-foot pounds is not a lot, but it is the right amount. Let's see here. These don't really do any of the braking. The braking energy is absorbed by that big bracket. These just kind of hold that caliper in place and let it float. Now we'll do the other side and then put the wheel back on and when you put the wheel back on you want to torque the lug nuts to 100-foot pounds and then before you drive your car anywhere you want to get in, start it up and pump the brakes a few times to make sure that piston gets back out and the brakes are working. They'll take a few pumps to the brakes to make sure that everything is back where it should be. Then before you drive your care just put it in gear, make sure the brakes hold then do a stop from 5 miles an hour before you go out and test it on the road.
Here we've put the wheel on. I am just preliminarily tightening up the lug nuts with an air gun, and now I'm tightening them to 100-foot pounds using a star pattern with the torque wrench. Install the center cover; line up the indent on your valve stem there.
We hope this helps you out. Brought to you by www.1AAuto.com, your source for quality replacement parts and the best service on the internet. Please feel free to call us toll free, 888-844-3393. We're the company that's here for you on the internet and in person. Thank you.
BFS00258
In Stock
Product Reviews
Loading reviews
There are no reviews for this item.
Customer Q&A
No questions have been asked about this item.
Customer service
877-844-3393
Monday - Friday 8:00am - 9:30pm ET Saturday - Sunday 8:00am - 4:30pm ET
Enter Vehicle Year Make Model
Specify your vehicle's year, make and model to guarantee fit.
Year
Make
Model
Options
Drivetrain
This part doesn’t fit a . Select from parts that fit.