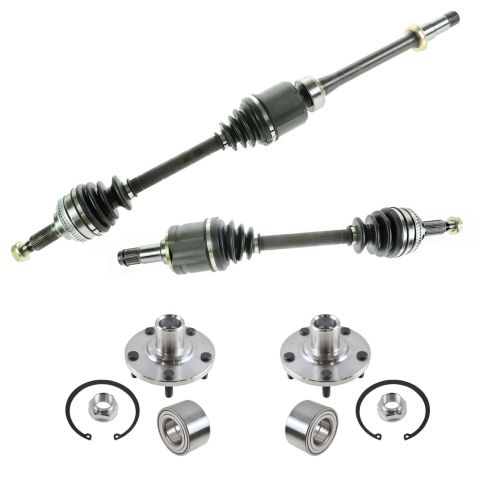
Kit Includes: (2) Front CV Axle Assemblies (2) Front Wheel Bearing & Hub Kits
Specification
Transmission Type
Automatic Transmission
Engine Displacement (Metric)
V6 3.0L
Location
Front
Product Features
100% New: Manufactured to tighter tolerances for extended service life
Upgraded Elastomer: Premium seals to extended service life
Moly Greased: Specifically-designed grease shield to reduce premature wear
Restored Performance: Refreshed steering system for improved road-feel
TRQ drivetrain kits are manufactured using premium raw materials to restore original performance. Each TRQ drivetrain component is designed to be a direct, maintenance-free replacement to the stock unit. To extend the service life of your drivetrain, TRQ recommends replacing wheel hubs, bearings, and constant velocity (CV) drive axles at the same time to ensure even wear of components and improved ride comfort. All products are fit and road-tested in our Massachusetts R&D facility to ensure we deliver on our promise of Trusted Reliable Quality.
CV axles are designed to transmit the power from your vehicle's drivetrain to the wheels while being able to flex and pivot to the demands of the steering and suspension systems. If your vehicle is making clicking noises at lower speeds or when making turns, it may be time to replace your CV axles with our 100% brand new assemblies.
Our steering and suspension components are pre-greased and sealed for long life and do not require the extra maintenance typically required by greaseable versions.
100% New Components
For quality fit, finish, and easy installation.
Heat Treated
For longer-lasting life and consistent performance under different road conditions.
Precision Machined
And made of brand new components, held to tighter tolerances for better consistency than rebuilt parts.
Item Condition:New
Attention California Customers:
WARNING: This product can expose you to chemicals including Lead and Lead Compounds, which are known to the State of California to cause cancer, and birth defects or other reproductive harm. For more information, go to www.P65Warnings.ca.gov.
Lifetime Warranty
This item is backed by our limited lifetime warranty. In the event that this item should fail due to manufacturing defects during intended use, we will replace the part free of charge. This warranty covers the cost of the part only.
FREE Shipping is standard on orders shipped to the lower 48 States (Contiguous United States). Standard shipping charges apply to Hawaii and Alaska.
Shipping is not available to a P.O. Box, APO/FPO/DPO addresses, US Territories, or Canada for this item.
Expedited is available on checkout to the United States, excluding Alaska, Hawaii.
Final shipping costs are available at checkout.
How to Replace CV Axle Passenger Side 1992-2001 Toyota Camry
CV Axle Part 1AACV00131 Review Buy Quality Auto Parts from 1A Auto
Created on:
Tools used
12mm Socket
Torque Wrench
Hammer
Pry Bar
Jack Stands
21mm Socket
32mm Socket
Center Punch
Drain Pan
Ratchet
Floor Jack
Needle nose pliers
22mm Socket
1. Removing the Wheel
Loosen the 21mm lug nuts with the vehicle on the ground
Raise the vehicle with a floor jack near the pinch weld
Secure the vehicle on jack stands at the unibody frame rail, and place it just ahead of the lower control arm on the rear
Repeat the process for the other side so the vehicle is level
Remove the hub cap
Remove the lug nuts
Pull off the wheel
2. Removing the Axle Nut
Bend the cotter pin straight out with needle nose pliers
Pull the cotter pin up and out
Remove the lock cover on the nut
Hold the hub still with a pry bar
Break the axle nut socket loose with a 30mm socket and breaker bar
Leave the nut at the end of the axle
Hammer the axle out
Remove the axle nut
3. Removing the CV Axle from the Spindle
Remove the ABS retainer from the spindle
Break the 22mm strut nuts loose and remove them
Tap the bolts out of the spindle with a punch and hammer
Pull the spindle down and out of the strut
Pull the axle out of the spindle
4. Removing the CV Axle from the Differential
Have a drain pan ready
Remove the 14mm bolt from the bearing on the end of the axle shaft
Push together to two tabs from the snap ring
Insert two pry bars to 3 and 9 o'clock on the axle, applying even pressure
Carefully work the snap ring out of its holder inside the differential
Remove the axle from the differential
5. Installing the CV Axle to the Differential
Align the axle splines with the splines in the differential
Work the axle into the differential
Insert the snap ring around the CV axle, aligning the ears up
Tighten the 14mm bearing bolt
Torque the bolt to 24 foot-pounds
6. Inserting the CV Axle to the Spindle
Line up the splines into the hub
Start the axle nut on the end of the axle
Reinstall the 22mm strut bolts to the spindle
Tighten the nuts to 156 foot-pounds
Connect the ABS retainer
7. Installing the Axle Nut
Tighten down the axle nut with a 32mm socket and ratchet
8. Reinstalling the Wheel
Slide the wheel into place
Start the lug nuts by hand
Tighten the lug nuts preliminarily
Lower the vehicle to partial weight on the ground
Tighten the lug nuts to 76 foot-pounds in a crossing or star pattern
Lower the jack
Torque the axle to 217 foot-pounds
Reinstall the lock cap and new cotter pint to the axle nut
Reinstall your hubcap
Brought to you by 1AAuto.com, your source for quality replacement parts and the best service on the Internet.
Hi, I'm Mike from 1A Auto. I hope this how-to video helps you out, and next time you need parts for your vehicle, think of 1AAuto.com. Thanks!
In this video, we're going to be working with our Toyota Camry 2.2-liter inline-4. We're going to show you how to remove and replace your old CV axle on the passenger side.
If you like this video, please click subscribe. We have a ton more information on this car, as well as many other makes and models. If you need this part for your vehicle, follow the link in the description over to 1AAuto.com.
Here are the items you'll need for this repair: 12-32mm sockets, ratchet, socket extension, torque wrench, needle nose lock pliers, flat punch, hammer, breaker bar, drain bucket, jack and jack stands.
Break all of your lug nuts loose while the vehicle is still on the ground. You're going to need a 21mm socket and a breaker bar. Install your jack under the vehicle. Line it up with the pinch weld. Jack the vehicle up high enough that you can get a stand underneath, making sure you have enough clearance to remove your tire or do whatever you have to do under the vehicle.
Stall your jack stand onto this unibody frame rail under the vehicle. With the vehicle raised and supported, remove your lug nuts the rest of the way. If you need a little more room to work, you can pull the hub cap off, remove your wheel from the hub. We've put our vehicle on a lift to make it easier to film for you, but this job can be easily done with a jack and jack stands.
Remove the cotter pin from the end of the CV axle. You have to straighten it out. Grab the end and work it out of the axle. Remove the lock cap. Insert a pry bar between the wheel studs. I'm bracing mine against the lift, but you can brace yours against the ground on the jack and jack stands when you use the 30 millimeter axle socket and a cheater pipe on a breaker bar to break the axle not loose. Once the axle nut is cracked loose, you can remove it almost fully.
We'll leave our prime bar there for when it gets a little tight on the threads to make sure that it doesn't spin. Place a punch in the center hole of the axle and tap it to release it from the splines. Remove the two strut bolts with the 22 millimeter socket. We're going to use a breaker bar to start and then switch to a ratchet and use a wrench to hold the bolts in place.
You can press in on the hub, squiggle it a little to get the bolts out, and then remove the spindle from the strut. This plastic clip will come off with it, just move that away for now. You can now remove the end of the axle from the hub. Remove this 14 millimeter bolt at the bottom of the barring at the end of your axle shaft, and you use a socket and ratchet. Using a pair of pliers, push together these two tabs on the snap ring and remove it from the bearing. Once it's off the bearing and onto the CV axle, use a pry bar on each side to make sure you put even pressure out on the axle.
You may need to use a large punch and hammer to hit the back of the CV axle until the bearing is free of the bracket. Be sure you have a drain bucket underneath the transmission for any fluid that might come out. Move the axle assembly from the vehicle.
Here we have our old CV axle that we removed from our vehicle and our new part from 1AAuto.com. As you can see, these parts are identical with the same splines and threads. We have the same joints, ABS tone ring, and the same axle shaft length. It comes with the new center bearing here, the same threads and dust boot going into the transmission itself. We also get a new nut and a new lock app for the end. Those should be replaced with any CV axle replacement.
CV axles tend to go bed from torn boots, letting all the grease out and drying up the joint inside or the joint inside going bad for another reason. It can bind or pop. You can also hear a clicking noise when you turn the wheel. These bearings also have the potential to go bad as it's another failure point on the vehicle. Due to the length of this shaft, they had to support it in the middle somewhere. If your CV axle is making noise binding or popping out, this new part from 1A Auto is going to go in direct fit just like your original equipment and fix you up right.
Reinstall the CV axle through the bearing bracket and into the transmission being careful not to score the bearings or splines off of anything on the way in. You may have to rotate it a little to line up and push it into place. Reinstall the snap ring around the CV axle. Make sure you line the ears up on the side. Set the snap ring in and compress it with your pliers. Push it back into the channel.
Reinstall the 14 millimeter bearing bolt for the socket and ratchet and torque the 24 foot-pounds. Reinstall the end of the axle into the spindle. Be sure not to pop the joint out on the inboard side while doing this. Line up the spindle into the strut and start your two 22 millimeter bolts.
Start your two 22 millimeter nuts for the strut bolts. Reinstall the plastic retainer for the ABS sensor line and tighten up the two 22 millimeter bolts for the strut with a socket ratchet and lunch. Torque to 256 foot-pounds. Within the axle nut on by hand, make sure it's fully seated. We'll reinstall our wheel and tire.
Reinstall the wheel and tire. Tighten down the nuts. Put the vehicle onto the ground so you can then torque the axle nut. Check that they're all seated. If you've removed the tire, only lower the vehicle until the wheel touches the ground. With partial weight of the vehicle on the ground, torque your lug nuts to 76 foot-pounds in a cross pattern. Then you can remove your jack the rest of the way. Torque the axle nuts to 217 foot-pounds. Install the walk cap over the axle nut and the new cotter pin. Then the cotter pin around the end of the axle. Reinstall your hub cap and you're good to go.
Thanks for tuning in. We hope this video helped you out. Next time you need parts for your car, please visit 1AAuto.com. Also check out our other helpful how-to and diagnosis videos.
Tools used
No Tools Needed
Here we have our old CV axle that we removed from our vehicle, and our new part from 1AAuto.com. As you can see, these parts are identical with the same splines and threads. We have the same joints, ABS tone ring, and the same axle shaft lengths. It comes with a new center bearing here and the same threads and dust boot going into the transmission itself. We also get a new nut and a new lock cap for the end. Those should be replaced with any CV axle replacement.
CV axles tend to go bad from torn boots letting all the grease out and drying out the joint inside, or the joint inside going bad for another reason. It can bind or pop. You can also hear a clicking noise when you turn the wheel. These bearings also have the potential to go bad, as it's another failure point on the vehicle. Due to the length of this shaft, they had to support it in the middle somewhere. If your CV axle is making noise, binding or popping out, this new part from 1A Auto is going to go in direct fit just like your original equipment and fix you up right.
CSA78351
In Stock
Product Reviews
Loading reviews
5.00/ 5.05
5 reviews
5 Stars
4 Stars
3 Stars
2 Stars
1 Star
5
0
0
0
0
Very satisfied
Raymond
July 22, 2021
Very satisfied came on time and was the right products... Thank you
Carl
October 2, 2022
New parts went right in no problem
Review
JOSEPH
July 13, 2023
Good parts
Thank you
TIM
July 21, 2024
This was perfect, thank you, A1 Auto
Andrew
November 13, 2024
Car feels more smooth
Customer Q&A
Are there any other parts needed to complete the repairs? Parts that typically get damaged during the removal process?August 23, 2019
Joe L
10
Thank you for the inquiry. If you are only replacing these items then you will have all the parts you will need minus the tools for install and the press for the bearings and hub. Without knowing what condition the other parts are in, we cannot recommend any other parts as they may not need to be replaced but as for the hubs and axles, this will be all you need.
August 24, 2019
Curtis L
Abs wheel hubs ?August 29, 2020
Kelvin W
10
Thank you for your inquiry. These parts will be the correct fit for the vehicles in the "Vehicle fit" list, please be sure to review this information to make sure they will be the correct fit. Please let us know if you have any further questions.
August 29, 2020
A C
Will this work on 2001 Lexus ES300 with ABS system ???September 20, 2020
Kelvin W
10
Thank you for your inquiry. Yes, according to the information you provided, this part will fit your vehicle. Please let us know if you have any other questions!
September 21, 2020
Christa R
Hi, what size are the wheel studs that come installed with this hardware? I bought it already and need to relace the wheel studs but i cannot find the size that came already installed.January 19, 2024
Alex G
10
I cant answer that question. Im still trying to put this together. I ran into some problems hubs and steering knuckle.
January 20, 2024
Scott G
10
Actual Measurements are not listed or available. Our parts are exact replacements for your vehicle's OEM parts. As long as your vehicle specifications match up with our listing, these parts will directly fit and function like the originals.
January 20, 2024
Meghan R
Customer service
877-844-3393
Monday - Friday 8:00am - 9:30pm ET Saturday - Sunday 8:00am - 4:30pm ET
Toyota is a registered trademark of Toyota Motor Corporation. 1A Auto is not affiliated with or sponsored by Toyota or Toyota Motor Corporation.See all trademarks.
Enter Vehicle Year Make Model
Specify your vehicle's year, make and model to guarantee fit.
Year
Make
Model
Options
Drivetrain
This part doesn’t fit a . Select from parts that fit.