About TRQ: TRQ is a trusted brand dedicated to making every repair a success story by combining premium parts with easy installation. Each TRQ part is engineered by a team of automotive experts to meet or exceed OEM standards, delivering enhanced performance and maximum longevity. With rigorous in-house testing, the brand ensures superior fit and function across every product line. TRQ also provides customers with best-in-class, step-by-step installation videos—so you can complete repairs with confidence, whether you're a first-time DIYer or an industry professional.
Product Features
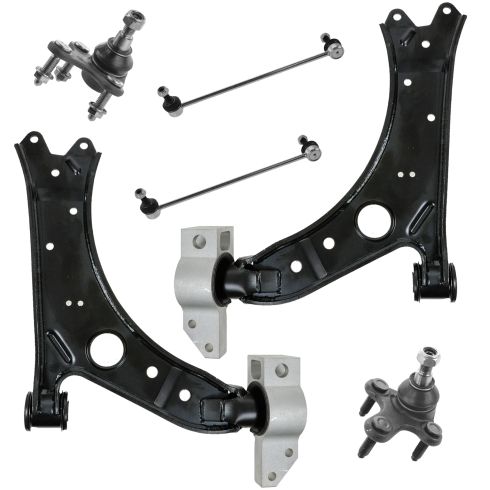
Application Specific Design: No modifications necessary
Anti-Corrosion Coated: Enhanced surface life
Pre-greased: No additional maintenance required
Kitted for Restored Performance: Improved road-feel and handling
Description
TRQ suspension kits are manufactured using premium raw materials and coatings for extended service life. Each TRQ suspension component is designed to be a direct, maintenance-free replacement to the stock unit. To extend the life of your steering and suspension components, TRQ recommends replacing components in pairs, sets, or kits. All products are fit and road-tested in our Massachusetts R&D facility to ensure we deliver on our promise of Trusted Reliable Quality.
Our steering and suspension components are pre-greased and sealed for long life and do not require the extra maintenance typically required by greaseable versions.
Attention California Customers:
WARNING: This product can expose you to chemicals including Lead and Lead Compounds, which are known to the State of California to cause cancer, and birth defects or other reproductive harm. For more information, go to www.P65Warnings.ca.gov.
This part fits
8 vehicles spanning 2006-2016.
Fits these Makes
Select vehicle
Year
Make
Model
Description
2006-2013
Audi
A3
Audi A3 without Sport Suspension Front 6 Piece Suspension Kit TRQ PSA56361
2010-2013
Audi
A3 Quattro
Audi A3 Quattro without Sport Suspension Front 6 Piece Suspension Kit TRQ PSA56361
2007-2016
Volkswagen
Eos
VW Eos Front 6 Piece Suspension Kit TRQ PSA56361
2006-2013
Volkswagen
GTI
VW GTI Front 6 Piece Suspension Kit TRQ PSA56361
2010-2014
Volkswagen
Golf
VW Golf without Automatic Leveling Headlights Front 6 Piece Suspension Kit TRQ PSA56361
2006-2010
Volkswagen
Jetta
VW Jetta without Automatic Leveling Headlights Front 6 Piece Suspension Kit TRQ PSA56361
2011-2014
Volkswagen
Jetta
VW Jetta Wagon without Automatic Leveling Headlights Front 6 Piece Suspension Kit TRQ PSA56361
2006-2009
Volkswagen
Rabbit
VW Rabbit Front 6 Piece Suspension Kit TRQ PSA56361
Part Interchange
Brand Label
Part Number
Delphi
TC1334
Volkswagen
1K0407151AA
Volkswagen
1K0407151P
ACDelco
45D10031
Volkswagen
1K0407151BC
Dorman
520-992
Delphi
TC1335
Volkswagen
1K0407152BC
Volkswagen
1K0407152AA
Audi
1K0 407 151 BC
ACDelco
45D10030
Volkswagen
1K0407152P
Dorman
520-991
Ingalls Engineering
CAK620141
MOOG Chassis Products
K620143
Mevotech
CMS101147
Beck/Arnley
102-6293
Beck/Arnley
102-6292
MAS Industries
CA43163PR
Beck/Arnley
101-5971
NAPA Premium
2606597
Beck/Arnley
1016271
SYD
1526006
Mevotech
GS20477
Beck/Arnley
1016292
Precision Driveline
5CB70021
MOOG Chassis Products
K80663
SYD
1526007
MAS Industries
CB43214PR
MOOG Chassis Products
K80478
Mevotech
MS101147
NAPA Premium
2606596
Precision Driveline
5CB70070
Dorman - OE Solutions
520-991
MAS Industries
CA43164
NAPA
2606597
MOOG Chassis Products
CK620143
MOOG Chassis Products
K620141
Mevotech
CMS101148
MOOG Chassis Products
RK620143
Precision Driveline
CB70070
Ingalls Engineering
CAK620143
Mevotech
MS101148
MOOG Chassis Products
CK620141
Dorman - OE Solutions
520-992
Precision Driveline
CB70069
Beck/Arnley
101-5972
MAS Industries
CB43213PR
MAS Industries
CA43163
MOOG Chassis Products
RK620141
MOOG Chassis Products
K80662
NAPA
2606596
Mcquay-Norris
FA3824
MAS Industries
CB43214
Beck/Arnley
1016293
Precision Driveline
5CB70069
MAS Industries
CB43213
Beck/Arnley
1016270
Mcquay-Norris
FA3825
MAS Industries
CA43164PR
DIY Solutions
SUS00344
DIY Solutions
SUS05416
DIY Solutions
SUS05417
DIY Solutions
SUS00343
DIY Solutions
SUS06905
Mevotech
MS10511
Mevotech
MS10514
Dorman
536-382
Mevotech
MK80478
RTS
93-90938-256
RTS
97-05337
RTS
93-90938-156
Mcquay-Norris
SL644
Audi
1K0411315P
Mevotech
MK80664
Beck/Arnley
101-5628
SKF
VKDS6155
Firestone
K80478
Volkswagen
1K0411315J
ACDelco
45G20554
Audi
1K0411315D
Mevotech
MS70847
Raybestos Brakes
5451394
NAPA Chassis Parts
2651603
Volkswagen
1K0411315B
Volkswagen
1K0411315R
Duralast
1880478
MAS Industries
SL43255
TRW Steering and Suspension Parts
JTSB0088
NAPA Chassis Parts
265-1763
TRW Steering and Suspension Parts
1880478
Audi
1K0411315J
Volkswagen
3QF411315
Raybestos Brakes
545-1554
MAS Industries
SL12055
Parts Master
K80478
NAPA Proformer
18444
Import Direct Chassis
LS13016
TRW Steering and Suspension Parts
JTS483
Dorman
536-317
Audi
1K0411315K
NAKATA
N97008
NAPA Chassis Parts
265-1603
Audi
1K0411315B
Volkswagen
1K0411315K
Volkswagen
1K0411315P
Audi
1K0411315R
Dorman
SL43255XL
Volkswagen
1K0411315D
Centric Parts
606.33016
Raybestos Brakes
505-1338
Raybestos Brakes
505-1337
Volkswagen
1KO407366C
Volkswagen
1KO407365B
Volkswagen
1KO407366E
AutoZone
10480663
Dorman
BJ43014XL
NAPA Chassis Parts
10480662
Carquest
410-234681
ACDelco
46D2337A
Dorman
536-383
Quinton Hazell
QSJ3295S
NAPA Chassis Parts
260-1618
Mcquay-Norris
FA2323
Volkswagen
1K0407366C
Raybestos Brakes
5051338B
Mevotech
MS70513
Mcquay-Norris
FA2302
ACDelco
45D2337
Centric Parts
610.3302
Mcquay-Norris
FA2258
AutoZone
DG5051337
AutoZone
DG5051338
Raybestos Brakes
5051337B
Quinton Hazell
QSJ3296S
NAPA Chassis Parts
10480663
Delphi
TC1317
Dorman
BJ43013XL
TRW Steering and Suspension Parts
JBJ751
Centric Parts
610.33019
Volkswagen
1KO407365E
NAPA Chassis Parts
2601617
Volkswagen
1K0407365C
Mcquay-Norris
FA2257
MAS Industries
BJ43014
Volkswagen
1KO407365C
Volkswagen
1K0407366E
MAS Industries
BJ43013
NAPA Chassis Parts
260-1617
TRW Steering and Suspension Parts
10480663
Delphi
TC1316
ACDelco
45D2338
TRW Steering and Suspension Parts
JBJ752
Volkswagen
1K0407365E
TRW Steering and Suspension Parts
10480662
Volkswagen
1KO407366B
Carquest
CA1681B
Carquest
CA1682B
Delphi
TC1315
Dorman - Premium
BJ43014XL
Dorman - Premium
CB43213PR
Dorman - Premium
BJ43013XL
Dorman - OE Solutions
536-383
Dorman - Premium
CA43164PR
Dorman - OE Solutions
536-317
Dorman - Premium
SL43255XL
Dorman - Premium
CA43163PR
Dorman - Premium
CB43214PR
Hollander
512-59015AR
Hollander
512-59016AL
Mevotech Supreme
MS10514
Mevotech Supreme
MS101148
Mevotech Supreme
GS20477
Mevotech Supreme
MS70847
Mevotech Supreme
MS101147
Mevotech Supreme
CMS101147
Mevotech Supreme
CMS101148
Mevotech Supreme
MS10511
Mevotech Supreme
MK80664
Mevotech Supreme
MS70513
Mevotech Supreme
MK80478
Audi
1K0407152AA
Audi
1K0407151AA
This item may be interchangeable with parts from other brands with the above part numbers.
This information is provided only for reference and does not guarantee that the item you are
purchasing is identical to parts with part numbers from the brands listed above.
To confirm that this item fits your vehicle, use the above "Check Vehicle Fit" option.
Lifetime Warranty
This item is backed by our limited lifetime warranty. In the event that this item should fail due to manufacturing defects during intended use, we will replace the part free of charge. This warranty covers the cost of the part only.
FREE Shipping is standard on orders shipped to the lower 48 States (Contiguous United States). Standard shipping charges apply to Hawaii and Alaska.
Shipping is not available to a P.O. Box, APO/FPO/DPO addresses, US Territories, or Canada for this item.
Expedited is available on checkout to the United States, excluding Alaska, Hawaii.
Final shipping costs are available at checkout.
How to Replace Ball Joints 2006-14 Volkswagen GTI
How to Replace Front Control Arms 2006-13 Volkswagen GTI
Created on:
Tools used
Socket Extensions
Flat Blade Screwdriver
Torque Wrench
Phillips Head Screwdriver
Pry Bar
16mm Socket
17mm Socket
18mm Socket
Ratchet
1. Removing the Wheel
Loosen the lug nut covers with the supplied lug nut tool
Loosen the 17mm lug nuts with the vehicle on the ground
Raise the vehicle with a floor jack
Secure the vehicle on jack stands
Remove the lug nuts
Pull off the wheel
2. Removing the Ball Joint
Remove the three 16mm bolts from the ball joint
Loosen the upper nut with an 18mm box wrench
If the stud keeps spinning, hold the base with locking pliers
Remove the nut
Lower the control arm and remove the ball joint
3. Installing the Ball Joint
Insert the ball joint into place
Tighten the 18mm nut by hand
Tighten the 18mm nut with a box wrench
Tighten the three 16mm bolts
Torque the 16mm nuts to 16 newton meters
4. Reattaching the Wheel
Slide the wheel into place
Start the lug nuts by hand
Tighten the lug nuts preliminarily
Lower the vehicle to the ground
Tighten the lug nuts to 120 Newton meters in a crossing or star pattern
Tighten the lug nut covers
Hi, I’m Mike from 1A Auto. We’ve been selling auto parts for over 30 years!
All right, so we're going to take the tire off. On most Volkswagens there's little caps that go over these lugs. And the caps, you're going to need the tool from the spare tire kit. You will put in and grab, it's like a hook, and you'll pull the cap out. But this vehicle does not have those on currently. So we're just going to loosen up the lugs with a 17mm socket and a breaker bar. One at a time, just a little bit.
The reason I'm jacking this vehicle, you're not going to want to use a jack or jack stands on here on the control arms or on this aluminum because you may break the aluminum. Or there. Some places you can jack up from, just over here where the pinch weld is. On this Volkswagen you can see there is specific spots where you're supposed to jack the vehicle or support the vehicle. These little arrows indicate that. And right on the pinch weld is the strongest part to be jacking and supporting. Same over here. This side. This little arrow pointing down. This one looks like it got smashed a little bit.
So we're going to take off the lugs. Volkswagen has lug bolts, not lug nuts, or lug studs. So you need to be careful when pulling off the wheel. Then you grab the wheel and set it down. Next, we're going to separate the ball joint from the control arm. We're going to use the 16mm deep socket and the extension and a ratchet. All right, we're going to loosen up the upper ball joint nut. It's an 18MM wrench. Now we're going to use a pry bar. Try to separate the ball joint from the knuckle.
If you're struggling, sometimes a fork will help get the ball joint out, especially if you're not going to reuse it, because it will probably mess up the rubber boot. So, because the ball joint, if you can see the whole stud is spinning, we're going to need to use some locking pliers at the base, to hold it. And that's loose enough. Should be able to do it with your fingers. It came out. And then pull the lower control arm, and we can pull it out.
This is our old part, this is our new part from 1Aauto.com. As you can see it comes with the nut. There is this cover that covers the boot, that's just to protect it during shipping. You want to make sure you take that off, otherwise you're going to have a very hard time getting this on. But as you can see, they look similar. They have the same studs. And there is an additional Allen. The old one has it too. If you were struggling to take the nut off like we were you can use an Allen. You will have to take the axle out to get access to this, but that would make it easier if you were in a jam like we were.
Take our ball joint and line the stud up. We're going to take our 18mm nut, get it started. Tighten it up with our 18mm wrench. If this stud ends up spinning, take notice while you're tightening it up, you can put a jack underneath the ball and push up on it, and that will put pressure on it so that it will stay locked and be easier to tighten. In this case, ours did not spin so we were good. Put the nuts on. We're going to use a torque wrench and these nuts have to be torqued.
Now we're going to install the tire. Line it up with the holes and hold it, and we'll use our 17mm socket to put our lug studs on. Or lug bolts. Whatever you want to call it. Put our center cap on. Now we're going to torque the lug studs to 120 newton meters, in a star pattern. When you do it in a star pattern it makes the wheel go flush to the brake rotor properly.
Whenever you change front end components or remove front end components and reinstall them, you always want to go to a local garage and have an alignment performed, because you are going to change the geometry of the wheel and tire going down the road, and you do not want premature wear on your tires. So you want to make sure you do that, and you'll be all set.
Thanks for watching. Visit us at 1AAuto.com for quality auto parts, fast and free shipping, and the best customer service in the industry.
Tools used
Socket Extensions
Torque Wrench
16mm Socket
17mm Socket
Jack Stands
18mm Socket
Ratchet
Floor Jack
1. Removing the Wheel
Loosen the lug nut covers with the supplied lug nut tool
Loosen the 17mm lug nuts with the vehicle on the ground
Raise the vehicle with a floor jack
Secure the vehicle on jack stands
Remove the lug nuts
Pull off the wheel
2. Removing the Control Arm
Remove the two 16mm bolts from the control arm
Remove the 18mm bolt from the control arm
Remove the three 16mm bolts from the ball joint
Place a lug nut on a ball joint stud
Remove the 18mm bolt from the control arm
Pry down the control arm from the ball joint
3. Installing the Control Arm
Insert the control arm into place
Tighten the front 18mm bolt to the control arm
Tighten the 16mm bolts to the control arm
Tighten the 18mm bolt to the control arm
Tighten the three 16mm bolts to the ball joint
Torque the front 18mm bolt to 70 Newton meters
Torque the 16mm ball joint nuts to 16 newton meters
4. Reattaching the Wheel
Slide the wheel into place
Start the lug nuts by hand
Tighten the lug nuts preliminarily
Lower the vehicle to the ground
Tighten the lug nuts to 120 Newton meters in a crossing or star pattern
Tighten the lug nut covers
Hi, I’m Mike from 1A Auto. We’ve been selling auto parts for over 30 years!
All right, we're going to take the tire off. On most Volkswagens there's little caps that go over these lugs and the caps you're going to need the tool from the spare tire kit. You'll put in and grab, it's like a hook, and you'll pull the cap off. But this vehicle does not have those on currently. We're just going to loosen up the lugs with a 17mm socket and a breaker bar. One at a time, just a little bit. Raising and jacking this vehicle.
You're not going to want to use a jack or jack stands on here, on the control arms or on this aluminum, because you may break the aluminum over there. Some places you can jack up from is over here where the pinch weld is. On this Volkswagen you can see there is specific spots where you're supposed to jack the vehicle or support the vehicle. These little arrows indicate that and right on the pinch weld is the strongest part for jacking and supporting. The same over here, this side. There's a little arrow pointing down. This one looks like it got smashed a little bit.
We're going to take off the lugs. Volkswagen has lug bolts not lug nuts or lug studs. We need to be careful in pulling off the wheel. And then you grab the wheel. It comes right down.
We're going to take off these lower control arm bolts, these two with our 16mm. We're going to use a socket, a 16mm socket and extension and a ratchet. On this bolt, I'm going to take out an 18mm and use a socket and extension and a ratchet. All right, next we're going to separate the ball joint from the control arm. We're going to use a 16mm deep socket and extension and a ratchet. Next, we're going to take this bolt out with an 18mm. I'm going to use a socket and a ratchet. I am going to put one nut here so that the control arm doesn't fall while I'm loosening this last bolt. Now I'm going to use a pry bar to go in between here to separate the control arm from the body. And I'll pull that nut back out. Pull the control arm down.
Here's your old control arm. Here's your new control arm from 1AAuto.com. As you can see, the actual design of it is very similar. There is some differences. This actually looks a little more solid than this—less likely to bend. It does comes with new nuts, as you can see. But the overall design looks very similar and it is machined the same.
Now I'm going to reinstall our control arm. I'm going to start with the front bolt. Put the nuts on. I'm going to put our other control arm bolt in. You may have to move the control arm a little bit to get the holes to line up. And I'm going to use the socket and extension, 16mm, and a ratchet. This front bolt, we're going to want to torque to 70 newton meters and it clicks. All right, we're going to use a torque wrench and these nuts are to be torqued to 16 newton meters.
Now I'm going to install the tire. Line up with the holes and hold and we'll use our 17mm socket to put our lug studs on or lug bolts, whatever you want to call it. Put our center cap on. Now we're going to torque the lug studs to 120 newton meters in a star pattern. When you do it in a star pattern, it makes the wheel go flush to the brake rotor properly.
Whenever you change front-end components or remove front-end components and reinstall, you always want to go to a local garage and have an alignment performed, because you are going to change the geometry of the wheel and tire going down the road. And you do not want premature wear on your tires, so you want to make sure you do that and you'll be all set.
Thanks for watching. Visit us at 1AAuto.com for quality auto parts, fast and free shipping, and the best customer service in the industry.
Product Reviews
5.0/ 5
★★★★★★★★★★
1 review
5★
100%
4★
0%
3★
0%
2★
0%
1★
0%
★★★★★February 16, 2024
As good as OEM
Fit like the original parts without modification. Alignment was almost unchanged (I would advise realignment after replacing such parts). I've driven almost 2000 miles since the install and I'm still very happy with these parts.
Showing 1–1 of 1 review
PSA56361
In Stock
Customer Q&A
Got a question about this part? Post it and get answers from our team.
No questions have been answered for this product yet.
Customer service
877-844-3393
Monday - Friday 8:00am - 9:30pm ET Saturday - Sunday 8:00am - 4:30pm ET
Ask a Question
Check Your Email
We sent a verification email to .
Click the Verify Email button in the email to submit your question.
This extra step helps prevent spam.
Select Your Vehicle
Specify your vehicle's year, make and model to guarantee fit.












 WARNING: This product can expose you to chemicals including Lead and Lead Compounds, which are known to the State of California to cause cancer, and birth defects or other reproductive harm. For more information, go to www.P65Warnings.ca.gov.
