Brought to you by www.1AAuto.com, your source for quality replacement parts and the best service on the Internet.
Hi, I'm Mike Green. I'm one of the owners of 1AAuto. I want to help you save time and money repairing or maintaining your vehicle. I'm going to use my 20+ years of experience restoring and repairing cars and trucks like this to show you the correct way to install parts from www.1AAuto.com. The right parts, installed correctly. That's going to save you time and money. Thank you and enjoy the video.
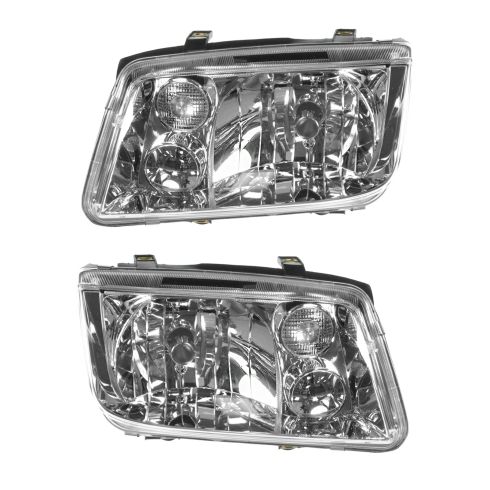
In this video, we'll be replacing the headlights on an '01 Jetta, same as any '99 to '03 Jetta. The tools needed: T20 Torx driver, a T27 Torx driver and a regular screwdriver. You do have to remove the bumper cover, but it's not that difficult, so just watch the video and you'll see. Maybe you're replacing your headlights because of some damage or because they're faded or maybe, as you can see by this before, you just want to freshen up your Jetta. Now, here's the before and then a new set of headlights and there's the after. Putting on those new headlights can take miles off the front end of your vehicle.
First, we're going to open the hood. There's a little tab. It's actually broken on this car, but you push down with your screwdriver right there and then pull this forward. You're going to want to just pull up this way and then push in here and up. Then the same thing on the other side. Out this way and up and up. Now the grill is loose, pry up on this little clip and then using your screwdriver, now your grill is off. Now that the grill is removed, you can see there are five T27 torques, bolts one, two, three, four and five. Then there are an additional two. One is here and you have to it goes right in there. It just attaches with basically a couple of tabs right here. Then up in there, the T27 bolt and then on this side, there is the last T27 bolt. In addition to those, there are four on each side, T20, bolts one, two, three and four. Remove all those. I remove all my seven T27 bolts and then the four on each side of the T20 bolts and now it might take a little bit to let go here, but you can see the bumper cover just comes right off. I pull on the parking light. It will actually pull right off. The headlights are held in by T20 screws, two on the top, which are real easy to see and then two right down here, take these out real quick. Your headlight comes out. There's a plug here. You can take your torques driver and push it into this little hole and it comes off and now your headlight is free. In 2002, Volkswagen changed to this style of light with the amber lens on the parking light. The earlier one is the clear lens on the parking light. I'm referring to basically, this small lens here; on this light it is orange. This one, it's clear. On this light, you would use an orange-color bulb. Now, you can use this later style, if you prefer it, on any '99 to '03 Jetta, same as you can use this style on any '99 to '03.
Just make sure you're using, if you switch from this style to this style, you need to switch from an amber bulb to a clear bulb and vice versa. If you switch from this style to this style, you'll need to switch from a clear bulb that will be used with this into an amber bulb on this old light, here's our new light, but on the new light, you're going to have to switch the bulbs over, but it has the same plug here for the harness. Everything is going to be the same. All the adjustors are the same. It's going to bolt in just the same, but it's going to look a whole lot better than the old one. The new light does come with the covers and everything as well. Some running lights come with these brackets in them just to keep things held together during shipping. What you want to do is just turn these bars here over, and then slide it out and slide that out like that. Got the new light? We'll plug it in first. Like I said, everything hooks up just the same as the original. Put it on. Put in our four T20 torques screws, tighten that one, come down and tighten this one and I do it in a little cross pattern. Tighten this one and tighten this one. Now we'll put our bumper cover on, reinstall the bumper cover, put it down, reconnect the parking lights here, the marker lights, and then we're going to put it up on there in the middle here, just set it in place a little bit.
Then what you want to do is you want to pull it out some and you want to get the side in, because it actually slides in and holds tight. There's actually a clip that it slides into. Now, I'm going to do the same thing on the other side, and I'm going to put my seven T27 bolts back in. I'm not going to bore you with doing every one of them, but again, there's one up here, two, three, four, five and then remember the ones up underneath. I've got my seven T27 bolts. I've got my four T20 bolts on each inner fender.
Now, I'm going to put this back in. It's a matter of obviously, you want the red arrow to be up and it goes right in. Get the grill going at this clip like this, reach in here, twist your screwdriver and wrap your finger around it. Get that on, push the clip down. Now, you want to put the bottom of your grill in first, then you want to hold these, keep them like that. Make sure your bottom is in. Now you clip the center in. Almost like you put a whole new front end on your Jetta.
This was brought to you by www.1AAuto.com, your source for quality replacement parts and the best service on the Internet. Feel free to call us toll-free, 888-844-3393. The company that is here for you, on the Internet and in person. Thank you.