Brought to you by 1AAuto.com your source for quality replacement parts and the best service on the Internet. Hi, I'm Mike Green. I'm one of the owners of 1A Auto. I want to help you save time and money repairing and maintaining your vehicle. I'm going to use my 20 plus years' experience restoring and repairing cars and trucks like this to show the correct way to install parts from 1AAuto.com. The right parts installed correctly, that's going to save you time and money. Thank you and enjoy the video.
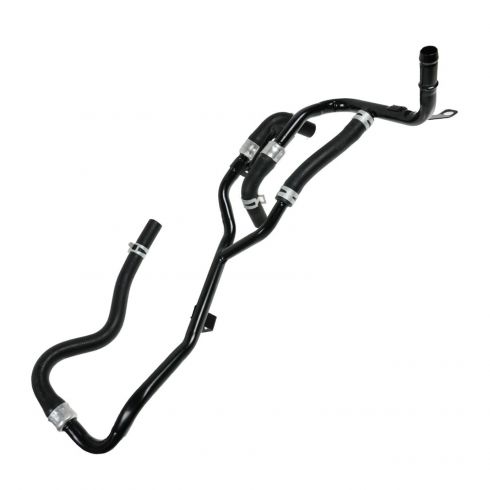
In this video we're going to replace the heater core tube assembly on this 2001 Ford Explorer, same as any 2000-2005. The procedure is probably similar for the '96-99 as well. Tools you'll need are a 10 mm socket and ratchet with a long extension, flat blade screwdriver. You'll want some large pliers and probably some regular pliers, utility knife, penetrating oil and also kind of a special tool, which is the bent nose pliers and you'll see how you use those to get a couple of the clamps off. A pretty common problem on these Taurus' this hose assembly, here's my new one roughed out. You'll know if that hose assembly if you're getting coolant leaking at the back of the engine.
Basically, if you park your car and you have a coolant puddle that kind of ends up being behind your engine you know that's it. Okay, so here you can see is my original one. It's very rusty. You can see it's kind of damp. Actually coolant is seeping out of it. These things are not that difficult, just kind of trying; because, it's behind the engine. There's two places where it mounts. One bracket here and one bracket here, okay. Okay, so there's the bolt to the firewall and then there's four hose hookups. One here which is this hookup here. Pretty easy to get to. One here, okay which is actually a hose hookup back in here that I'll show you. This hose right here, okay. There are two hose hookups here and here that are back on the firewall. I'll show you all those.
You can actually see those two right there that are going into the firewall, okay. It's four hose hookups and two bolts. It's not that difficult, just kind of hard to get to; because, of where it's located. The first bolt is back on the firewall. Right now I'm zoomed out. You'll need a long extension. Kind of feet that right into here. My head is getting in the way, okay. Okay, right behind that cap you can see a little kind of dome of rust. That is actually the bolt itself. My wrench is now on there. Okay, now here I'm just kind of fast forwarding. You can see that bolt turning, even though you can't see the socket really on there. I apologize. This is not the easiest one to shoot; because, of all the interference in the way.
Okay, so what you probably want to have hanging around in reserve is a simple magnet as I dropped the nut down here somewhere. I just knocked it down to the ground. Here is that nut. I removed the four bolts that hold the airflow sensor on here and we loosened this clamp and pulled this out of the way so now you can see the other mounting bolt which is right there, okay and maybe spray it with some penetrating oil and remove it. Okay, now that you've got those nuts off that mount the assembly you want to pull the clamps from the firewall connections and you need to do this up underneath the car. I'm up underneath near the rear of the engine and you can see the two hoses with the clamps right there.
What you want to use to do that is a pair of bent nose pliers like that. Definitely worth investing in a set; because, it's the easiest way to get in there and get to them. Okay, and I wasn't able to film it; because, of the close quarters, but you can see that I've gotten up in there and pulled those clamps back, okay. Once you've pulled the clips back the next thing you want to do is use a razor knife and slice the ends of the hose, basically just from front to back and of course I blocked it; because, it's very difficult to video all this. There after I'm done you can see there's a little slice in the hose right there. Okay, now with them sliced in a clear spot back, the next thing that's good to do and make it easy to pull those off is a nice big pair of water pump pliers like that or slip jaw pliers; however, you want to call them.
Just kind of reach down there, grab hold of the hose and just twist it back and forth to loosen it up, away from the heater core. You should hear some fluid. I've got a catch pan underneath. Here you can see the fittings for the heater core with the hoses removed. Here on the driver's side of the engine we're going to do this fitting here which is actually relatively easy. Clamps are the only thing you need to get to. Pull it right off. You may find that you want to carefully slice the hose with a razor knife. This helps to get things apart. Okay, now this hose you have to save. You don't want to cut it. What you have to do is just twist it as hard as you can to get it to break loose. Use these pliers again.
There's my first piece. You can see that it's pretty well shot there. Okay, now you need to remove the rain gutter that runs from the top of the firewall down and it's basically just a little hole that kind of presses over where the master cylinder connects to the firewall and then it pulls down and out. I'll show you what it looks like here as I pull it out. Okay, it's hard to film this. All I can show you is kind of what the rain gutter looks like. You want to pull that out. Now you can reach in behind and pull the assembly up and out. Okay, a little bit of rust and stuff. You can see kind of why this is leaking and needed to be replaced. It pretty much just fell apart as I was taking it out.
Now we're going to feed the new assembly down and in from the passenger's side. Then once we have it down in, we'll go over here on the driver's side and connect that first hose to the engine and now use our pliers to clamp onto the clamp and slide it up into place. You're all set there. Now make sure that you put that tube in back of that hose there. That's how it was routed originally and also you can see that the bracket, sorry about shaking the camera a little bit there. The bracket can go up onto that stud there. Just kind of put it in place preliminarily. Now we'll connect the upper hose and see the clips pulled back. Just push the hose on there and then I'll use my pliers. Squeeze the clamp and slide it right up onto that hose. That one's all connected.
Now no good way to film this so you've just got a good shot of my back here. I'm basically just reaching down, grabbing the hoses, the two hoses that go to the firewall, to the heater core and working them onto the fittings. Like I said, sorry there's no real good way to film this. You just kind of have to take my word for it. You can reach down in there with your hand and just like the other two hoses, work them onto the heater core. Then you'll want to go up underneath the car and work the clamps on again. I didn't film it; because, I just couldn't get a good angle on it.
Okay, then you want to make sure you put the other mounting nut back in. What I do is I take my socket and I put a little bit of glue on the nut to hold it into the socket and then just root it back there and tighten it up. Now we're going to replace the two mounting nuts. Just make sure the brackets are on the studs in the firewall. Place the nut. Put the clamp on. It's all set. The mounting nut is tight. Now we can slide our drain tube back into place. Now here we're going to re-assemble the air flow sensor and duct with the four 10 mm bolts and then also basically it's kind of the hose clamp that holds it up on top. You just want to tighten these up pretty tight. Not incredibly tight. Okay, now here obviously we are refilling the radiator overflow, the radiator bottle with new fluid. Start it, run the car a little bit. Check the level again and keep checking and making sure your temperature is good. You should be all set.
We hope this helps you out. Brought to you by www.1AAuto.com your source for quality replacement parts and the best service on the Internet. Please feel free to call us toll free 888-844-3393. We're the company that's with you on the Internet and in person.