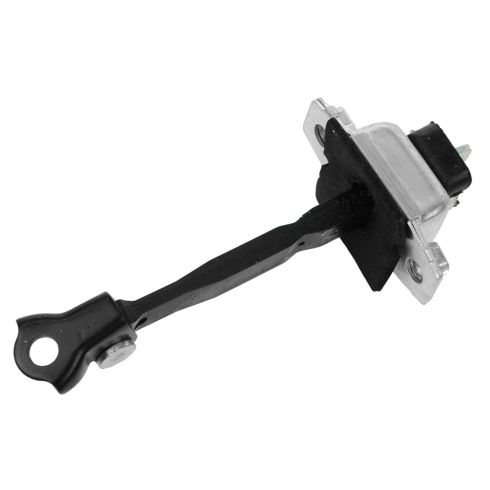
1ADMX00204-2001-07 Toyota Highlander Front Driver Side Door Check TRQ BDA41005

Replaces
2002 Toyota Highlander Front Driver Side Door Check TRQ BDA41005

Frequently bought together
Product Reviews
Loading reviews
4.00/ 5.0
13
13 reviews
A little disappointed after the time it took to install.
October 24, 2017
The first stop on the door check hardly holds on a slightly uphill driveway, the second stop is somewhat better but barely adequate. A steep driveway or brisk wind, better watch for your leg not being caught with the door shutting on it.
The indents for the stops are not deep enough to hold the door.
Thank for the opertunity to make you aware of this flaw.
Ken Seeber
Perfect fit.
December 12, 2018
Ordered a door check for my 2002 Toyota Highlander and it fit perfectly and works as expected. The how to video was extremely helpful!
Very good part
October 24, 2019
The part I ordered was of a good quality and I am very pleased with it.
I will be ordering more parts as needed. Good selection and great service! Thank you
Better than what I had
November 6, 2019
I recently acquired a new (to me) Highlander that had a really bad driver side front door check. It couldn't hold its fully open position or its partially open position on the door check so you essentially had to keep your foot on the bottom of the door to keep it from closing. It was pretty easy to remove and replace thanks to the extremely helpful videos 1A Auto puts out. While it holds the door better than the last one it still seems weaker than it should be at the fully open position compared to other cars. Not sure if that's a function of the design of the door check for that vehicle as all the other door checks seem to have a similar issue but are also not as new. I'm not yet willing to spend OEM prices for a new one to find out so this was the next best option and for what it is it's doing its job. Just don't know for how long. Maybe the door checks on that generation of Highlander are just ridiculously weak compared to any other car.
Fast shipment!
November 30, 2019
Product works great.
Worked great
July 8, 2020
The part fit perfectly. Also a great price. And the installation video was the best Ive ever seen
No Improvement
September 18, 2020
This door check created no improvement in my Toyota Highlander drivers door movement. My door still automatically close when Im even on a slight upward incline. I ordered Toyota OEM replacement door checks for my other doors on the Highlander, and they functioned perfectly.
Good product but missing nuts bolts
November 5, 2020
It didnt come with any bolts to attach but luckily I located a couple that fit fine. Otherwise the product seems very good and sturdy.
September 4, 2021
Excellent. Good video for install.
September 22, 2021
Works great and installation video was very helpful.
October 21, 2023
This item was a perfect fit for the original and installed in a snap. Unfortunately, almost all the reviews for this Toyota replacement part on the various platforms, and regardless of brand, complain that they are not nearly as effective as expected... and this one is no exception. Some reviews complain of no improvement whatsoever. Not so for this one; it is certainly better than the old one, but not nearly as positive as the door checks on a new car. Bottom line: I bought this from 1a because 1) I loved their instructional video, 2) I have purchased several items from them in the past for the same reason, and 3) their service is tops. I would purchased this item AGAIN from 1a and would purchase any additional parts for my cars from them, as well.
November 30, 2023
Product was weak. But I reported it to the company and I was sent a new one
Much better!
December 21, 2023
Works much better than the worn-out original part!
Customer Q&A
Does this same check work on different doors (Left/Right; Front/Back?)
November 15, 2023
10
No, the R and L front door checks are mirror images; i.e. reversed, and clearly not interchangeable. The rear checks also appear to be different in geometry from the front ones.
November 15, 2023
Phil L
10
This part will only fit in the front left driver side door. Currently, we do not carry the other door checks for your vehicle. We're always updating our inventory so please check back soon!
November 18, 2023
Meghan R
10
Work but of poor quality would only buy again if I cannot get anywhere else
November 30, 2023
Stephan T
Toyota is a registered trademark of Toyota Motor Corporation. 1A Auto is not affiliated with or sponsored by Toyota or Toyota Motor Corporation.
See all trademarks.


